Steampunk Ironman Helmet WIP - 5/31 update

Re: Considering a new Ironman Build - Steampunk??

I had been meaning to ask. What point of reference are you using for your design?

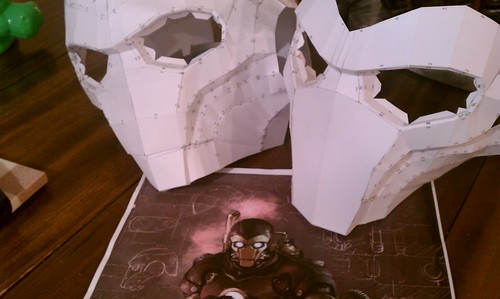
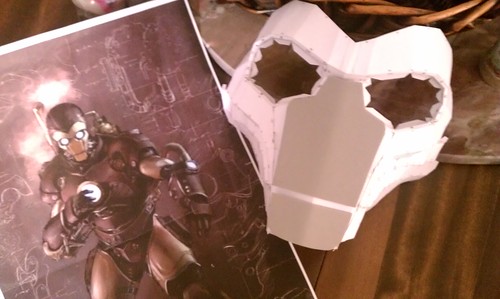
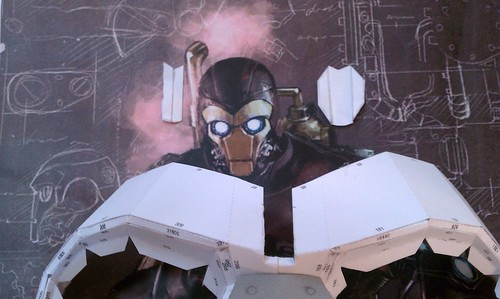
Definitely starting with the 2010 By Design cover artwork by Gerald Parel that you posted. However, since this is just a cover picture with limited sketches in the background hinting at what the back or sides of the suit looks like, there will likely be some liberties taken. The backpack is definitely one area that will be mostly made up, as it's not shown in any detail.

Also, unlike the movie suits that were physically created for actors to wear, this suit is just a drawing, so there might be things that must be altered to allow it be something wearable at Conventions.

Lastly, while I LOVE this piece of artwork, there might be one or two elements of other suits that I may try to use in combination with (or instead of) specific sections of this picture. The toe of the boot, for example, is not my favorite part of the suit. :$


55_IRON_MAN_BY_DESIGN_1.jpg
 
Re: Considering a new Ironman Build - Steampunk??

Yeah, I said I would wear it. I also want to help build it. It's been YEARS since I've built a cool costume. I think this would be loads of fun to build and to wear (because I'm just that much of an attention ho).

That means we BOTH have to go to Dragon Con, as I'm guessing there's no way to get into this thing without a lot of help.
 
Re: Considering a new Ironman Build - Steampunk??

We've both been sidetracked on other projects, but hopefully we'll get back to this one soon.

Yeah, Chris and I have both been pretty busy recently.

For my part, the plan to quickly design and prototype a new puzzle box for my own evil delight has unexpectedly developed into something that will likely result in a very cool Kickstarter project - which would be awesome! :):thumbsup

Aside from that, Allison and I are now fostering a FOURTH kid (cute little 2yr old girl). So, I'll have FOUR costumes to create this fall! :facepalm


But in regard to the Steampunk Ironman costume, it's definitely on the 'to do' list. I just want to make sure I've got the time and energy to do it RIGHT before starting working on it.

I promise this much... When we do start work on it, Chris and I will certainly be posting and sharing WAY too much info about it here on RPF. This community rocks and I can't wait to have all our friends on the forum participate in our build! :cool

Take Care!
 
Re: Steampunk Ironman Helmet WIP - finally starting it!!!

Ok, it has OFFICIALLY begun! Digitizit and I will be working on building the helmet element of this costume.

Before I get started, I need to thank Johnnymuffintop for providing a pep file for the helmet. It's low-poly and pretty basic, but it helps out a BUNCH to have that as a resource. Johnny posted the link in the first page, but I'll post it again HERE in case you still need it.

That pep looks roughly like this...
7230352218_4d3fa1cd08.jpg


And while I intend to use this as a basis for the general shape of the faceplate build, I thought a pre-padded, pre-fitted helmet would serve us well as the base for the helmet's dome.

Digitizit picked up a helmet that 'almost' fits his massive cranium (24"), and we are off to the races! :):thumbsup


****

As background, Digitizit and I both live in Knoxville, TN. We live ~10 minutes away from each other and both of us have wives, kids, jobs and at least two other side projects going at any one time. So this work, like some of my other stuff, will have to fit around our very busy schedules - that's just a disclaimer. :lol

Part of that schedule is my family's upcoming vacation to FL to visit my folks (and play in their pool). And since I can't take Digitizit's HEAD with me to Florida, I asked if we could create a model of it this weekend for me to have.

Being a clever guy, Digitizit quickly offered to (bravely) allow me to create a duct tape mold of his head.

If any of his neighbors end up asking about this first picture, please assure them that it was 'all very innocent'. :love

7230353736_9d6a4c7551.jpg


After (bravely) letting me cut him out of that with an Exacto knife, we taped it back together and prepared to cast it.
7230359250_c8c5742a13.jpg


At this point, I have to credit Digitizit for all the specific know-how. Cause rather than just 'stuffing' this (like I did for Mikey's mannequin) he offered to cast it with 10lb 2-part expanding foam.

7230355856_c8c707c372.jpg


I was VERY impressed with this stuff and am looking forward to inventing another reason to use it! If you haven't seen how this stuff works, here's a quick video of it expanding (extra commentary provided by 1yr old Digitizit-Junior)!


The result of this whole process is a rough model of Digitizit's head without any fine details, but it's perfect for what I need it for!!!

Here is the final model with the skate helmet...
7230361158_95e8c22d16.jpg


7230363138_dfdf2b8254.jpg


And here is one in the paper pep I did...

7230365174_a6f5c5d1e5.jpg


*****

Now, for reference, I took the two best images we have in the BY DESIGN artwork and put that right beside pictures of the model head with the helmet. Here's what it looks like...

SIDE VIEW
7230699308_14d3a2f447.jpg


FRONT VIEW
7230699142_85ac504892.jpg


*****

So, there's our starting point. We'll both keep this WIP thread updated as we start to build this!

:):thumbsup
 
Re: Steampunk Ironman Helmet WIP - finally starting it!!!

OMG, I look like a gimp. A cheap, low budget gimp at that. :lol

That was my first time using the foam, if you don't count the test I did the night before just to see how much time we had to work with this stuff. And yes, it gets REALLY hot. Almost too hot to hold onto.

I can't WAIT to see how this thing turns out. I thought the pep looked amazing! I managed to track down the artist and told him we were doing this, and he was thrilled. Based on Indiefilmgeek's previous work (and all the stuff I see him work on that never makes it to the RPF), I have zero doubt that this will be an amazing build once finished.
 
Re: Steampunk Ironman Helmet WIP - finally starting it!!!

Increased the total height of the paper pep by a centimeter last night. I also printed and cut out all the new pieces for that construction. I just had time to glue together some of the face-plate before I went to bed, but I think it will fit better than the first pep. :cool


The things I'm currently working through in my head are:

1. The brow ridge. The pep doesn't show the same brow ridge along the top of the faceplate as the technical sketches do. I'll probably solve this by just modifying the card stock pep to match the drawings, but I also want to keep in mind that I'll be cutting this faceplate open at some point (so I can make it open and close). I'll need to remember that fact as I fabricate those changes.

2. The chin area (behind/below the faceplace). There are obviously components along the check areas of the helmet, but since the main drawing of this is from the front and since the side views don't show the chin area, I'm considering what I can do to fabricate that area around what we have as reference. I'm actually looking forward to this section (and the eyes) quite a bit. The pep has no detail included in this section, so it's going to be a lot of scratch-building, found objects and physically testing the build to see if it works. All that sounds like a BLAST! :love:thumbsup


For now, I'm back to my day job... where I'm swamped in work as we hash out which trailers to program this weekend before MIB3 (what fun).

Have a great Monday!
 
Re: Steampunk Ironman Helmet WIP - finally starting it!!!

Tomorrow evening I'm packing the whole family up (wife and, now, four kids) and heading to my parent's house in Sarasota, FL. I'm taking the head model, helmet and as much of my supplies as I can fit into the car with me. Hopefully, after I recover from the 11 hour drive, I can spend some time dodging the sun and working on this project! :):thumbsup
 
Last edited:
Re: Steampunk Ironman Helmet WIP - finally starting it!!!

However, before we head out, I did get a little work done last night...

The skate helmet has ventilation holes on the top and back, which will need to be filled.

7252490064_f7b16efc76.jpg

This is the view from the inside.

So, I covered the holes on the smooth outside of the helmet with cardstock paper and painter's tape, then poured some fiberglass resin into the holes from the inside.

7252487732_d397e8af4c.jpg


The result of this little test was pretty positive. After taking the paper/tape off and doing just a touch of sanding, this process has filled these holes smoothly!

7252491910_df66afc3fd.jpg


...now I'll just need to do the top 6 holes (pictured above) and maybe hit each of these with some finishing putty and fine sandpaper just to make sure it's nice and smooth.
 
Last edited:
Re: Steampunk Ironman Helmet WIP - finally starting it!!!

Modifying the paper pep...

After reviewing the original drawing, I have determined that the pep isn't as accurate on the faceplate as I'd like. The basic issue is that the main flat faceplate area (over the nose) looks like it's a flat piece with two plates on TOP of that plate which have a gap between them (which produces the look of the mouth). The pep doesn't have a layered plate look and the 'mouth' is produced by a groove into the 'nose' plate itself.

So, I decided to cut the assembled 'nose' pieces out of the pep I have and replace it with a smooth single piece that will then add the two top plates to.

Here is the original piece as I began to cut out the nose piece...
7265475530_8b6fed11c6.jpg


Here is the replacement next to the original pep piece...
7265478506_d798953069.jpg


Here is the replacement piece now attached to the final pep build (the original scaling pep is beside it so you can tell the difference...
7265481482_967bfa0f89.jpg


And here is a very bad picture of the two plates that will be added on top of the new 'nose' plate...
7265483694_c7efc72574.jpg


I've also filled the rest of the 'holes' in the skate helmet. I have bondo with me, but I completely forgot my set of sanding sponges (subconsciously trying to avoid sanding, maybe?!) :facepalm

So, I'll be running out to the store in a bit to get that project started! I just wish it wasn't 98 degrees in Florida this week... the garage work is going to suck. :cry
 
Re: Steampunk Ironman Helmet WIP - finally starting it!!!

I like the changes! Yeah, I agree, this is more accurate to the way the drawing looks. Great eye!

It's hot here too, so don't feel too bad.
 
Re: Steampunk Ironman Helmet WIP - finally starting it!!!

Some more work done...

1. Mounted Digitizit's head (rock is just holding things in place while the liquid nail cures).
7269637176_b4f8b0fa07.jpg


2. Sanded the resin hole-filler in the helmet and hit it with a round of finishing putty.
7269606552_1ea78bc031.jpg


7269610514_88372cb65b.jpg


3. I also took on the brow ridge. Again, the pep is a great start but on the artwork you can see that there is a groove between the brows. So, I created a new piece for that section.
7269614932_94b97e3485.jpg


7269617628_747355f39b.jpg


And here is what the faceplate looks like with the new 'note' plate attached and brow ridge. The rivets are just penciled onto the foam plate as a test to see what they will look like. I haven't measured or perfectly placed them, but from the artwork this is where they appear to be. I think they'll look pretty cool when done.)
7269620442_56115cfbfa.jpg


4. Finally, I attached the pep dome to the faceplate in preparation of my work to determine where/how the pep will connect with the skate helmet. I've got it taped together here for reference in these pics. Here's where we are...

FRONT:
7269626662_60bdb178aa.jpg


SIDE:
7269634040_90d15c135d.jpg

**Mikey was in the background when I took this one, and waved 'HI' to everyone on RPF!
 
Re: Steampunk Ironman Helmet WIP - finally starting it!!!

I'm sad that you don't live in my garage. Amazing work on the head! You should go on vacation more often. I'm REALLY looking forward to the painting stage!!
 
Re: Steampunk Ironman Helmet WIP - finally starting it!!!

Started to work on connecting the paper pep to the helmet in preparation for hardening it all with fiberglass.

Here is what I have so far...

FRONT:
7276241902_67507b4d98.jpg


1/2 FRONT:
7276239866_5f76d0993c.jpg


SIDE:
7276240760_605d151b98.jpg


BACK:
7276239160_b5e8f3d69e.jpg


HIGH ANGLE:
7276238258_4cfa57d3ce.jpg


I still have some work to do on the 'jaw' area - which will need to be connected to the back of the helmet so it remains in place when the faceplate is up or down.

...but that's work for tomorrow! :):thumbsup
 
This thread is more than 9 years old.

Your message may be considered spam for the following reasons:

  1. This thread hasn't been active in some time. A new post in this thread might not contribute constructively to this discussion after so long.
If you wish to reply despite these issues, check the box below before replying.
Be aware that malicious compliance may result in more severe penalties.
Back
Top