Show your custom Lightsabers!

Hey Everyone!
Here's my first saber build I did for myself to carry around at Star Wars Weekend at Disney World.
I only had about a week to make it but I was pretty happy with the outcome.
I based it off of Luke's ROTJ model and made it with around $20 of whatever I could find at my local surplus store.
The base is just a bit of PVC piping. I felt it needed a little something so I wired up a single green led at the end to a watch battery for some lightage.
My Luke ROTJ Saber.JPG
 

Attachments

  • My Luke ROTJ Saber.JPG
    My Luke ROTJ Saber.JPG
    1.1 MB · Views: 161
This my first custom based on a King Sol. I'm not a big fan of aluminum camera flashes. I don't like the lighter weight, I don't like the flat/dull finish and this might sound weird, but I don't even like the "feel" of aluminum.

DSC03498_zpsuwbsak75.jpg


The tube had a lot of minor scratches and the clamp would not budge, even with the two set screws removed. After giving it some thought, I ended up dunking it in near-scalding hot water for a minute or so. The clamp loosened up and slid right off. It was tight tolerences that changed/expanded after a little heat, or it was a combination of sweat & niccotine that had seeped down betweeen the tube and clamp. It looked a little yellow under the clamp.

The first step after disassembly was to get rid of the flat finish and remove the scratches, so the bare tube was wet-sanded with 220 grit wet sandpaper, followed by 320 grit wet sandpaper. This was done with a small plastic tub filled with hot/soapy water, turning it in my hands like it was in a lathe. This process wasn't fun because my right forearm/elbow has a touch of the tennis elbow. It ended up looking great, though.

The grips are some of my stainless steel grip material. I made 8 grips, which meant 16 drilled and tapped 6/32" holes.

The replica Kobold d-ring and textured tape are Yodashouse/Blast-Tech leftovers from 10+ years ago. It looks like I'll be making orders from Roy very soon. My old stash of spare parts is starting to dwindle.

The circuit board is from a late 1970's Magnavox Odyssey2 video game cartridge. Fellow RPF member Dr Talyn was the first to do this on his current Zeiss Ikon custom saber project. I loved the look of it and after carefully cutting it down and sanding the edges, it pressed right into the King Sol clamp. No glue needed.

DSC03523_zpsko7gfzmh.jpg

DSC03525_zpsfogbspwz.jpg

DSC03529_zps4zsdwts7.jpg

DSC03532_zpsvjwtnynv.jpg


All in all, this was another fun project completed and I discovered that an aluminum camera flash can be converted into a nice custom. The clamp is brass and that gives it some decent weight, along with the steel grips. The overall look of it fits in with the current "Silver Saber" building phase that I'm apparently going though, as well.

I didn't realize it until final assembly, but I had accidently built a "tribute" to the first custom saber that I had ever built. I bought the Peak 3 cell flash pictured below 15 years ago from Jim Fowler. The original end cap was missing so he included a King Sol end cap that I was able to retrofit with a couple of drilled holes and 1/8" pop rivets. With the King Sol end cap and the short grips, the "look" is very similar to the finished project above.

I sold this one many years ago because it didn't "match" all of my other converted Peak camera flashes. Yes, I regret it now, but I did sell it to a fellow RPF member. At least it's still in good hands.

my1stcustomsaber_zpsur99lj0y.jpg


DSC03498_zpsuwbsak75.jpg


DSC03523_zpsko7gfzmh.jpg


DSC03525_zpsfogbspwz.jpg


DSC03529_zps4zsdwts7.jpg


DSC03532_zpsvjwtnynv.jpg


my1stcustomsaber_zpsur99lj0y.jpg
 
Last edited by a moderator:
Those pictures aren't working for me ... please check what's going on with your links to photobucket?

- Nevermind ... it's fine now :)

Perhaps a new developed MPP style shroud by Roy would look so good on top, yes?

Chaim
 
Here's another one I made a few years back. I call this one "Nemesis". It sports a US 2.1 soundboard and an older Luxeon Rebel blue LED. I made it for my cousin Jonathon. His requirements at the time was no visible switches or other greeblies that might make wielding it uncomfortable so I took this as an opportunity to get creative and designed and machined a pommel with the switch hidden inside. To turn the saber on or off, you push in on the pommel spike. The pommel spike is connected to a mechanism that utilizes a spring so that the pommel returns and stays in it's normal position when released. I also used three brass rods mounted in the pommel spike that slide into holes in the main pommel piece so that the spike cannot rotate circumferentially.

He also wanted it to withstand extreme heavy dueling so the claws are 3/8" thick and I used six screws to hold the blade holder/emitter to the hilt body as opposed to the 3 or 4 that I normally would have used. The main body is powder coated satin black.

The sound vents from six slots near the bottom of the handle. They vent out sideways from the hilt body which surprisingly works very well for venting sound.

Nemesis_02.jpg~original

Nemesis_01.jpg~original

Nemesis_03.jpg

Nemesis_Pommel_01.jpg

Nemesis_Pommel_02.jpg

Nemesis_Pommel_03.jpg
 
Last edited:
Perhaps a new developed MPP style shroud by Roy would look so good on top, yes?

Chaim

No, there would be a huge gap between the push button and the slot in the MPP shroud where the bulb release would be.

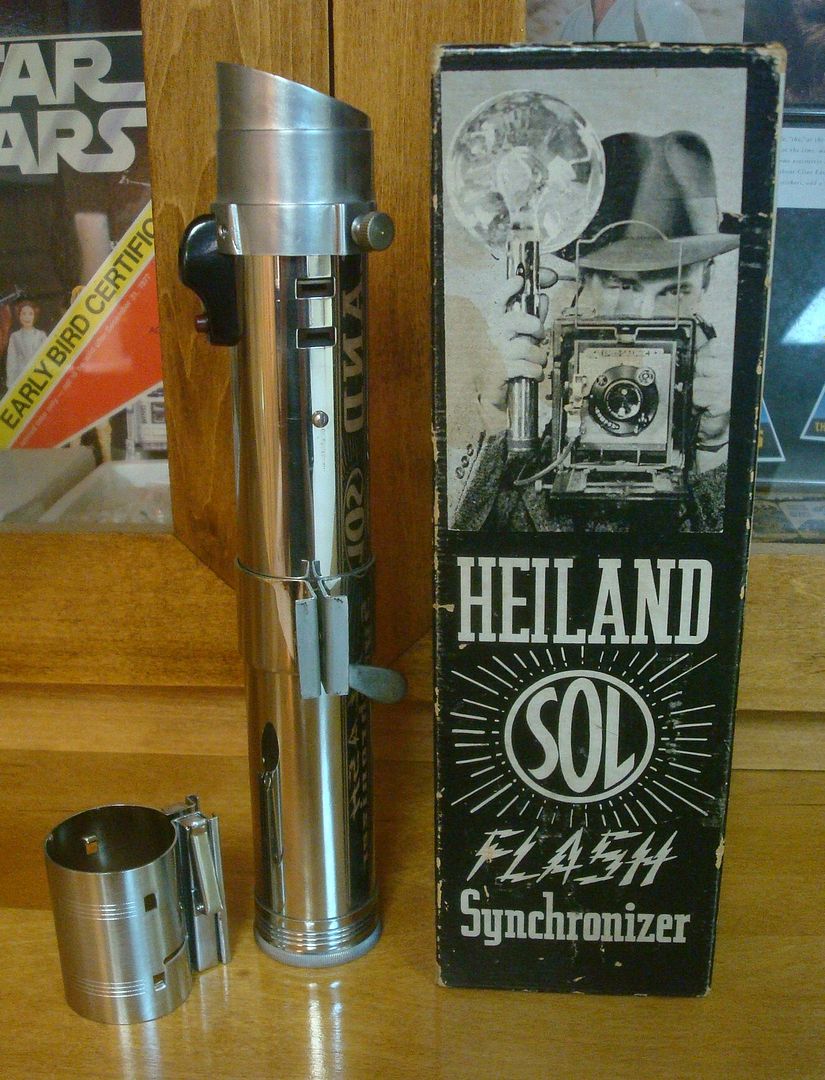
I am working on another custom with a shroud, though I'm sure the Heiland hunters saw this one on Ebay recently. I bought it just to get the box. The flash looked scratched up pretty bad in the seller's pictures, but it polished up pretty good. That was a bonus.


The Parks Graflex clamp will end up on this one and the Heiland Sol clamp will probably end up on my other project. (another "Brute" style custom saber like the one I put together a few pages back)

Love it, glad the circuit board fit well :)

Thanks. :cool I have a couple more of them on the way from Ebay. Something cool/different and low-cost, too. :thumbsup
 
This my first custom based on a King Sol. I'm not a big fan of aluminum camera flashes. I don't like the lighter weight, I don't like the flat/dull finish and this might sound weird, but I don't even like the "feel" of aluminum.

http://i1200.photobucket.com/albums...eplica Progress Pics/DSC03498_zpsuwbsak75.jpg

The tube had a lot of minor scratches and the clamp would not budge, even with the two set screws removed. After giving it some thought, I ended up dunking it in near-scalding hot water for a minute or so. The clamp loosened up and slid right off. It was tight tolerences that changed/expanded after a little heat, or it was a combination of sweat & niccotine that had seeped down betweeen the tube and clamp. It looked a little yellow under the clamp.

The first step after disassembly was to get rid of the flat finish and remove the scratches, so the bare tube was wet-sanded with 220 grit wet sandpaper, followed by 320 grit wet sandpaper. This was done with a small plastic tub filled with hot/soapy water, turning it in my hands like it was in a lathe. This process wasn't fun because my right forearm/elbow has a touch of the tennis elbow. It ended up looking great, though.

The grips are some of my stainless steel grip material. I made 8 grips, which meant 16 drilled and tapped 6/32" holes.

The replica Kobold d-ring and textured tape are Yodashouse/Blast-Tech leftovers from 10+ years ago. It looks like I'll be making orders from Roy very soon. My old stash of spare parts is starting to dwindle.

The circuit board is from a late 1970's Magnavox Odyssey2 video game cartridge. Fellow RPF member Dr Talyn was the first to do this on his current Zeiss Ikon custom saber project. I loved the look of it and after carefully cutting it down and sanding the edges, it pressed right into the King Sol clamp. No glue needed.

http://i1200.photobucket.com/albums/bb333/Scott_D_1969_007/Prop Collection/DSC03523_zpsko7gfzmh.jpg
http://i1200.photobucket.com/albums/bb333/Scott_D_1969_007/Prop Collection/DSC03525_zpsfogbspwz.jpg
http://i1200.photobucket.com/albums/bb333/Scott_D_1969_007/Prop Collection/DSC03529_zps4zsdwts7.jpg
http://i1200.photobucket.com/albums/bb333/Scott_D_1969_007/Prop Collection/DSC03532_zpsvjwtnynv.jpg

All in all, this was another fun project completed and I discovered that an aluminum camera flash can be converted into a nice custom. The clamp is brass and that gives it some decent weight, along with the steel grips. The overall look of it fits in with the current "Silver Saber" building phase that I'm apparently going though, as well.

I didn't realize it until final assembly, but I had accidently built a "tribute" to the first custom saber that I had ever built. I bought the Peak 3 cell flash pictured below 15 years ago from Jim Fowler. The original end cap was missing so he included a King Sol end cap that I was able to retrofit with a couple of drilled holes and 1/8" pop rivets. With the King Sol end cap and the short grips, the "look" is very similar to the finished project above.

I sold this one many years ago because it didn't "match" all of my other converted Peak camera flashes. Yes, I regret it now, but I did sell it to a fellow RPF member. At least it's still in good hands.

http://i1200.photobucket.com/albums...p Collection/my1stcustomsaber_zpsur99lj0y.jpg


peak is a good brand it seems, looking at that button. Jim is a fanatic of oddball flashes, he actually bought my Mystery Saber. Glad it went to good hands. Your custom jobs are impeccable, they really look like space hardware. I noticed a gap between Heiland shrouds and the King Sol test button plate, but it's starting to grow on me. Once I get some T track I'll post MY version of this. Thank you for the sanding tips, you have quite the eye for this!
 
Last edited by a moderator:
peak is a good brand it seems, looking at that button. Jim is a fanatic of oddball flashes, he actually bought my Mystery Saber. Glad it went to good hands. Your custom jobs are impeccable, they really look like space hardware. I noticed a gap between Heiland shrouds and the King Sol test button plate, but it's starting to grow on me. Once I get some T track I'll post MY version of this. Thank you for the sanding tips, you have quite the eye for this!

No problem, more than happy to help a fellow RPFmember/Saber builder out. Thanks for the kind compliments, too. :cool

There's something rewarding about taking an old antique camera part, cleaning it up, drilling lots of holes in it and trying to make it look like it fits in somewhere in the Star Wars universe.

Speaking of Peak flashes, I finished up my chrome-plated Peaksaber™ earlier today. I'll get some pics up before the weekend is over.
 
Last edited by a moderator:
Went to visit the folks tonight and found this thing. Have no clue what it is or what it went to, but it sure looks promising to me. My dad let me keep it, so now I have another project to throw on the pile.


image hosting sites

Now here's where I need your guys expertise, should this black piece be the emitter or the bottom pommel?


photo share
 
Neat piece! I would vote pommel too - going the way of "weapon" from Star Wars, the emitters have all been either thin or flanged pieces, and the thicker/heavier end of the saber is at the back, like a power cell.

That being said, this thread is all about fostering creativity, so I say you show US what part that really is ;)
 
Thanks! Glad you like it. Im really not even sure what it was or what it belonged to, neither did my dad which is why he let me take it lol. Haha, well, after painting the black piece silver it'd make a pretty good pommel. We shall see.
 
Looks like a segment of telescoping leg, as from a camera tripod or something similar.

Whatever it is, though, good luck with your build!
 
Thanks, guys! I'm playing around with a few ideas as to what I'm going to do with this. I'm not starting on it just yet, as I want to finish my droid first.
 

Your message may be considered spam for the following reasons:

If you wish to reply despite these issues, check the box below before replying.
Be aware that malicious compliance may result in more severe penalties.
Back
Top