So, i wanted to post an FYI thread. This is what you get when you order an EF project from Saberz
Saberz did a wonderful job. It was supposed to replicate that stunt saber featured in the Behind the Scenes featurette that Ewan seems to favorite. I ordered one with a blade. I was excited because I couldn’t afford the other projects and this was much more affordable.


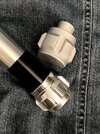
Here are the parts. (The blades also come with anodized threaded cylinders which are adapters for other sabers, and the hilt comes with an Allen socket screw to hold the hilt together sans blade)

I actually swapped out the M5 set screws for ones a little longer. The tang (which I think is anodized aluminum?) has a reduced section that snugly press fits into the blade. With glue it won’t go anywhere. The set screws are kind of like pins that double check it won’t slide out. The holes in the tang go all the way through. The screws I swapped out extend from the outside of the carbon fiber to the other inside wall. The ones it came with only went through the tang diameter instead of pressing against anything. I don’t think that’s an issue, again they machined the tang to press fit inside the carbon fiber blades.

Which are heat shrunk. I thought the original blades were painted with a key-in color and heat shrink wrapped, but this colored carbon fiber is just plain cool: if it is accurate, WOW, if not, I quite like it anyway

The hilt comes in the machined pieces you would expect. They slide together perfectly, and everything is anodized or polished. The originals were either shiny aluminum or chromed plastic so the polishing is for replication and being someone who only can buff something to 1200 sandpaper and doesn’t know how to polish, im impressed haha


The lip of the blade material is one half of your sandwich. The other half? A machined aluminum pommel that includes the threaded insert as part of the lathed piece. Very structurally sound.
The tang isn’t steel so I would never think of a duel.
My customization plans:
1) Maybe fabricating my own steel replacement tang? I have never tapped holes in steel, only Al and Brass.. and I would be buying an M10 thing, i can’t imagine die cutting steel by hand
2) I’m used to the hefty 1980 and 1983 saber hilts. The thin walled aluminum body worries me a little, I drop things and worry about it denting. I want to buy some custom aluminum and slide it into the body, just for support. This is not necessary for display or a takeaway from the replica, the props in my house are handled a lot and I over-engineer coatings and attachments just to be safe. I’ve had a few kids damage props by accident, so I’m traumatized!

Other than maybe glueing the blade in place, there’s nothing I want to customize or alter which is new for me! Im a builder….
The center of balance is right on the emitter. With a little extra weight, it would bring it back to the choke. I’ve never held a real one, anyone know what it’s like?

Also, I’ve always hated the choke on the anakin…. But flipping the saber with the choke feels PERFECT! I can’t describe it… other than, whatever you wish a saber tube was like when flipping it… this is what your hand wants it to be.
Saberz did a wonderful job. It was supposed to replicate that stunt saber featured in the Behind the Scenes featurette that Ewan seems to favorite. I ordered one with a blade. I was excited because I couldn’t afford the other projects and this was much more affordable.
Here are the parts. (The blades also come with anodized threaded cylinders which are adapters for other sabers, and the hilt comes with an Allen socket screw to hold the hilt together sans blade)
I actually swapped out the M5 set screws for ones a little longer. The tang (which I think is anodized aluminum?) has a reduced section that snugly press fits into the blade. With glue it won’t go anywhere. The set screws are kind of like pins that double check it won’t slide out. The holes in the tang go all the way through. The screws I swapped out extend from the outside of the carbon fiber to the other inside wall. The ones it came with only went through the tang diameter instead of pressing against anything. I don’t think that’s an issue, again they machined the tang to press fit inside the carbon fiber blades.
Which are heat shrunk. I thought the original blades were painted with a key-in color and heat shrink wrapped, but this colored carbon fiber is just plain cool: if it is accurate, WOW, if not, I quite like it anyway
The hilt comes in the machined pieces you would expect. They slide together perfectly, and everything is anodized or polished. The originals were either shiny aluminum or chromed plastic so the polishing is for replication and being someone who only can buff something to 1200 sandpaper and doesn’t know how to polish, im impressed haha
The lip of the blade material is one half of your sandwich. The other half? A machined aluminum pommel that includes the threaded insert as part of the lathed piece. Very structurally sound.
The tang isn’t steel so I would never think of a duel.
My customization plans:
1) Maybe fabricating my own steel replacement tang? I have never tapped holes in steel, only Al and Brass.. and I would be buying an M10 thing, i can’t imagine die cutting steel by hand
2) I’m used to the hefty 1980 and 1983 saber hilts. The thin walled aluminum body worries me a little, I drop things and worry about it denting. I want to buy some custom aluminum and slide it into the body, just for support. This is not necessary for display or a takeaway from the replica, the props in my house are handled a lot and I over-engineer coatings and attachments just to be safe. I’ve had a few kids damage props by accident, so I’m traumatized!
Other than maybe glueing the blade in place, there’s nothing I want to customize or alter which is new for me! Im a builder….
The center of balance is right on the emitter. With a little extra weight, it would bring it back to the choke. I’ve never held a real one, anyone know what it’s like?
Also, I’ve always hated the choke on the anakin…. But flipping the saber with the choke feels PERFECT! I can’t describe it… other than, whatever you wish a saber tube was like when flipping it… this is what your hand wants it to be.