Superpants
New Member
I recently built a full, practical light suit for a party- This is an introduction to how I put it together. I have put a comprehensive write up on my own site, with a few more photos:
http://www.superpants.net/troncostume.html
I'll break this down into a few posts.
I started my costume build by deciding that as others may be interested, I wanted to be able to create more than one costume. I therefore decided to put effort into creating drawings, patterns and moulds to be able to produce multiples of parts. I also wanted to experiment with some techniques and materials not familiar to me, and this gave me a good opportunity.
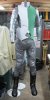
My vision for the costume is not to produce something fully screen accurate to the film, but neither to create something simple but Tron like. Rather I would make something that to a general observer looks like the film versions, but is of a far better quality than cheap Halloween costumes, is durable, and most importantly has real functioning lighting.
It has always been my desire to make the costume fully lit, not relying on retro-reflective tapes as others have done. I therefore considered a wide range of options for lighting, but settled for the more expensive, but lower work option of using a kit of pre-cut electroluminescent shapes (from EL wire craft). This ties in with an easier ability to make multiple costumes.
Identity Disk
The film is reported to have a number of variants of disk (a), but for ease of handling I chose to go with the more common 10" disk. Many earlier costumes have used the Disney deluxe toy disk, and modified it; however these are now becoming uncommon and expensive, so I took the decision to make my own mouldings.
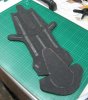
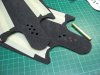
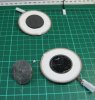
The master disk was made from MDF- the base shape was finished in a couple of evenings' work (6-8 hours), but I then had to spend a much longer time (probably about 16-20 hours) on finishing the disk to a level at which it would be able to make a good mould. This included many layers of primer and paint, spot putty and a lot of careful sanding. I have since learnt of the trick of using superglue to seal MDF that may have saved quite a lot of time.
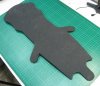
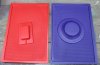
The mould was made using Mold Max 20 silicone from Smooth on, and backed with plaster. Initially I cast the disks in polyurethane, but ended up choosing to change to GRP due to a number of challenges. The first polyurethane I picked (smooth-on task 15), ended up being too flexible to make a good joint between the two halves, and as I was brushing up and it was low viscosity, it ended up pooled in the bottom of the mould cutting down my internal space. The second version used Sika Bi-Resin, and worked much better, but still left me with a poor inner space to fit the inverter so after discussion with a professional body caster at the Brighton Mini Maker Faire, I chose to change to Polyester based GRP.
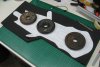
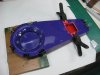
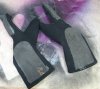
The illumination is by EL wire sunk into the C ring and glued in place. The inverter is inside the disk. This is a standard inverter with the case removed and the battery holder replaced with an AAA unit to make it fit. The on off button pokes through the disk and is un-obtrusive. To diffuse the light on the disk, I used clear silicone sealant mixed with a small amount of talc to make it more translucent than transparent. This hasn't proven very durable, so in future I would likely use polyurethane resin instead.
The disk is held together with 4 small screws. I haven't made a lit outer ring yet, but may do so in the future when time permits.


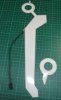
The main build stages of the Disk
http://www.superpants.net/troncostume.html
I'll break this down into a few posts.
I started my costume build by deciding that as others may be interested, I wanted to be able to create more than one costume. I therefore decided to put effort into creating drawings, patterns and moulds to be able to produce multiples of parts. I also wanted to experiment with some techniques and materials not familiar to me, and this gave me a good opportunity.
My vision for the costume is not to produce something fully screen accurate to the film, but neither to create something simple but Tron like. Rather I would make something that to a general observer looks like the film versions, but is of a far better quality than cheap Halloween costumes, is durable, and most importantly has real functioning lighting.
It has always been my desire to make the costume fully lit, not relying on retro-reflective tapes as others have done. I therefore considered a wide range of options for lighting, but settled for the more expensive, but lower work option of using a kit of pre-cut electroluminescent shapes (from EL wire craft). This ties in with an easier ability to make multiple costumes.
Identity Disk
The film is reported to have a number of variants of disk (a), but for ease of handling I chose to go with the more common 10" disk. Many earlier costumes have used the Disney deluxe toy disk, and modified it; however these are now becoming uncommon and expensive, so I took the decision to make my own mouldings.
The master disk was made from MDF- the base shape was finished in a couple of evenings' work (6-8 hours), but I then had to spend a much longer time (probably about 16-20 hours) on finishing the disk to a level at which it would be able to make a good mould. This included many layers of primer and paint, spot putty and a lot of careful sanding. I have since learnt of the trick of using superglue to seal MDF that may have saved quite a lot of time.
The mould was made using Mold Max 20 silicone from Smooth on, and backed with plaster. Initially I cast the disks in polyurethane, but ended up choosing to change to GRP due to a number of challenges. The first polyurethane I picked (smooth-on task 15), ended up being too flexible to make a good joint between the two halves, and as I was brushing up and it was low viscosity, it ended up pooled in the bottom of the mould cutting down my internal space. The second version used Sika Bi-Resin, and worked much better, but still left me with a poor inner space to fit the inverter so after discussion with a professional body caster at the Brighton Mini Maker Faire, I chose to change to Polyester based GRP.
The illumination is by EL wire sunk into the C ring and glued in place. The inverter is inside the disk. This is a standard inverter with the case removed and the battery holder replaced with an AAA unit to make it fit. The on off button pokes through the disk and is un-obtrusive. To diffuse the light on the disk, I used clear silicone sealant mixed with a small amount of talc to make it more translucent than transparent. This hasn't proven very durable, so in future I would likely use polyurethane resin instead.
The disk is held together with 4 small screws. I haven't made a lit outer ring yet, but may do so in the future when time permits.
The main build stages of the Disk


")