Proton Pack Pattern Plans

i believe it isnt a project until i bleed on it.

I literally said this to my roommate last night ! So true !

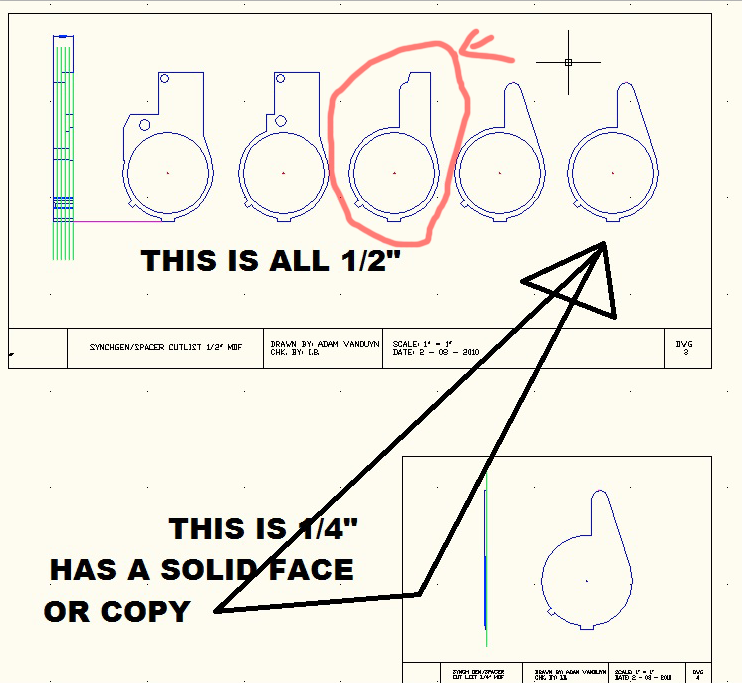
And as far as that diagram you posted goes - whats up with the 3rd drawing - why does it seem to have an extra bit on the right ? shouldn't there be 2 of the #2 cut outs ?

packc.jpg
 
the green highlighted stuff? its to illustrate a side view of all the cut pieces where they're placed. ive been making my own proton pack plans in autocad 1:1 scale off an on whenever im frustrated with my rocketeer project.

the top one is 5 layers of 1/2" mdf, and the bottom one on the bottom right is the last 1/4" to make the spacer a complete 2 3/4" height. you can make it solid, or the same pattern where the arrow points to. i would leave it solid until you have your cyclotron finished and mounted.
 
Sorry for the confusing response - I meant what is the deal with the red circled one below. I understand the cutaway diagram and everything I'm just wondering why this one in the plans is shaped oddly:

Picture2-5.png
 
ah crap. you just helped me notice something i messed up. im remaking stefans plans because they dont make any sense, as they are in decimal measurements, some measurements dont exist or are hard to find, hidden lines dont match up to what they illustrate. that's an example of when i should have looked to norm's plans.

hang tight, i'll revise that part of the drawing and post it for you
 
fixna.jpg


still use that pattern on the bottom right of the first drawing i posted.

an explaination of the first three, is the second two together are supposed to be 1 1/2" tall. the first pattern shows where the cosmetic plating starts on stefan's plans. and when you put the second two patterns together on top of the first, it'll give you that pattern you had questions about in the red circle.

im sorry about that. its still a work in progress.
 
No problem !

I'm just glad I caught it, knew something was a miss.

I got the MDF and I drew out the patterns in the format we've discussed - I need to get a better hand saw once I get some $$ and I think with A LOT of hard work I can just core out the middle by using a blade and literally scooping the inside out like I've done with the inside of my Jack Sparrow Compasses.

In the mean time, got any recommendations for the ribbing that doesn't require me cutting a billion plywood strips ?

And as I always say - the help is appreciated !

Moony
 
if you want to go the budget route, go the ORIGINAL budget route and follow Norm Gagnon's plans
+1:thumbsup The are really easy to follow and looks good.
I built my pack from his plans around 10 years ago (2000-2001)
That was one of the first props that i made, and i have learned ALOT since then..
protonpack05iq1.jpg
protonpack09lo3.jpg
protonpack11oz1.jpg
protonpack12jn7.jpg
 
That was one of the first props that i made, and i have learned ALOT since then..

this is one very big reason why i cant impress upon enough people to use norm's plans for their first prop/proton pack. he makes it so simple, so available, so sturdy and you learn alot from that build that you can later apply to other props you build. i echo your statement in my own personal experience, i cant thank norm enough for his plans.

i still remember in 9th grade printing out his first set of black and white plans.


as for the ribbing, honestly i didnt put them in my last pack because i didnt think they were necessary. i will be doing them on my next pack, and use 1/8" balsa strips. you can get at a hobby store, or micheals. that wont suck as hard for cutting strip after strip, you could probably get atleast 5 strips for out of one stick. they make them 1/2" too. the only thing i would see would be a possible problem would be the nubby ends on the face of the boxes. you can get away with making them a few hairs taller than the longer strip, and then sand smooth. balsa is so easy to work with its not even funny.
 
Me 2 !

I'm starting to prime and sand and get it all together. Having some difficulty deciding on what to do for the gorram cyclotron as I don't know if I wanna do a cake pan.

I'm also unsure of wether I can rig up lights or not before halloween.

And any of you guys know where I can locally get my hands on some of those oddly colored tubes for the pack ?

Cheers!

Moony
 
you can layer it like you did the spacer/synch gen. i havent gotten around to that to make a pattern yet though :/ second best thing to use is whatever you can find at the dollar store in the tupperware dept. if its tall, you can cut it down.

the lights, if you're good with cannibalising stuff, a quick trip to the dollar store will get you a laser sword with lights and a speaker. they dont blink, but they turn on and off.

as for the odd colored tubes, are they the red, yellow and blue hoses through out the pack? for the hoses, i used electrical wire for my last pack. it doubled as my wiring for my pack too. i finagled some of the brass elbows out of electrical connectors.
 
got myself a blue "big mouth bucket" from home depot for a little over a $1 and it's EXACTLY what I was looking for I highly recommend it to anyone building a cyclotron !

Pics soon - once she's all painted !
 
you know it just occured to be about those hoses, you can get some 1/8" tubing in the plumbing dept at home depot for under 10 bucks, and dollar red, yellow adn blue spray paint at walmart. some people spray the inside of the clear tubing for their hoses.

even if you have medical tubing laying around that would work as well, im not sure how the barbs on the inside would work though.

im going to do it that way next time, i dont know why i didnt think of that until now.
 
Mooniteman said:
Me 2 !

I'm starting to prime and sand and get it all together. Having some difficulty deciding on what to do for the gorram cyclotron as I don't know if I wanna do a cake pan.

I'm also unsure of wether I can rig up lights or not before halloween.

And any of you guys know where I can locally get my hands on some of those oddly colored tubes for the pack ?

Cheers!

Moony

check out homedepot or menards if you have one in your area.
 
The pictures are garbage, but this is essentially it - heavy as **** !

Really special thanks themanwoaname - you've been a real HUGE help to me ! And an ispiration to make it ALL from scratch!

Cheers!


76456_540101266002_43101129_31706507_3072820_n.jpg


76456_540101266002_43101129_31706507_3072820_n.jpg


76434_540101246042_43101129_31706506_3705699_n.jpg


And for fun:

75596_540070063532_43101129_31705286_3052908_n.jpg

Moony
 
This thread is more than 13 years old.

Your message may be considered spam for the following reasons:

  1. This thread hasn't been active in some time. A new post in this thread might not contribute constructively to this discussion after so long.
If you wish to reply despite these issues, check the box below before replying.
Be aware that malicious compliance may result in more severe penalties.
Back
Top