Our Four-Year Interstellar TARS Build

Rebelscum

Sr Member
tars-log-01.jpg


Good things take time. Given that, this better be awesome. On seeing the film, I really liked the robots, which were clearly different than all the robots that have come before. My friend Devin, who was running Blue Realm Studios at the time, was also taken in by them. Always on the lookout for a good project, we set out to see if we could make replicas. Just like any good prop chase, we started first by finding everything written about them, and grabbed every photo we could find.

We didn't just want good replicas, we wanted them to be built just like the props in every way possible. Early on we decided they would never puppet as they do in the film, but they would be poseable.

tars-log-02.jpg


Once we had the fundamental dimensions sorted out, Devin started in on a drawing using SolidWorks. We poured over the reference, what seemed like endlessly, until we had satisfied ourselves we had as good a replica as we could find. No detail was too small. We made some basic rules. The outside had to match the prop in every way possible. The functional build had to be the same, but we weren't going to put a screw in every location on the back side that we could see they had. IE, I'm not a fan of replicating a paint run on a prop, unless you see it in the film.

tars-log-03.jpg


tars-log-04.jpg


tars-log-05.JPG


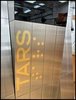
The next step was to test making the name plate TARS with the braille dots. Unfortunately, we couldn't find reference photos showing how the letters were done. It looked to us like the letters might have been glued in, but we wanted them to be made with no gap at the joint. This ended up being quite difficult to achieve. Working with my sheet metal fabricator, we went through countless tests until we did get it done. We are quite happy with the result.

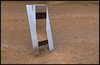
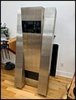
We made three of them. Though I'm planning to show how we built them, here is the end result:

tars-log-59.jpg


tars-log-61.jpg


tars-log-60.jpg


tars-log-63.jpg


tars-log-62.jpg
 

Attachments

  • tars-log-01-tn.jpg
    tars-log-01-tn.jpg
    3.9 KB · Views: 223
  • tars-log-59-tn.jpg
    tars-log-59-tn.jpg
    5.5 KB · Views: 172
  • tars-log-60-tn.jpg
    tars-log-60-tn.jpg
    5.6 KB · Views: 148
  • tars-log-62.jpg
    tars-log-62.jpg
    52.7 KB · Views: 150
Seeing this thread again I see there were some posts I missed.

Thanks for the kind comments from all.

I also realize I never went back and added build photos.

After Devin and I poured over every reference for TARS we could find, including from some pretty deep dives, we planned the build and dimensions. Devin made a detailed Solidworks model, and I set off to machine the frame out of 3/4" sq aluminum tubing, and placed the detailed PO for the aluminum inside sub-skin stainless steel cosmetic pieces.

The frame was complex to machine not only because the pieces were longer than the longest mill bed I have, but the frame was a zero sum game and almost every piece was different. Logistically, it was difficult to keep everything straight, making sure the drilled and tapped holes in the tubing were on the right sides of each piece, with a very tight tolerance that had to match the laser cut aluminum sub-skins.

tars-log-06.jpg


tars-log-07.jpg


tars-log-08.jpg


I finished up the frame machining about the same time the skins were finished, and the assembly began. I had ordered 2,000 stainless flat head screws, and just hoped the skins would line up with the frame. I was concerned because even a few thousandths off would mess up the alignment. Fortunately, everything was perfect and all that was left was figuring out which piece went where. Other than a few wrong piece errors, it was just work to get the frames assembled, and standing up in the order needed to make three of them.

tars-log-10.jpg


tars-log-09.jpg


tars-log-16.jpg


We had decided to use iPad Minis for the displays because they fit a natural spot in the frames. We'd drive them with Raspberry Pis using software Devin would write.

The solution for mounting them ended up being a 3d printed, adjustable mount that would bolt to the sub-skin and clip onto the iPad. We ran into a slight problem when we didn't have room for the iPad cable to run, but it turns out you can buy a 180 degree lightning cable, which solved our problem. We also needed to have removable acrylic covers over the iPads, and that solution ended up being precisely mounted steel plates that attached to flush mounted magnets in the tubing frame.

tars-log-17.jpg


tars-log-18.jpg


tars-log-20.jpg


Skinning TARS was left to Devin. Like the prop, we used VHB tape to attach the stainless, which was an exercise in patience. Anybody that's used much VHB knows just how little fun it is to remove the plastic layer on the pieces. It gets old real fast.

tars-log-21.jpg


tars-log-22.jpg


It was about this time we realized the builds really needed a functioning Humor Light, as in the film. This turned out to be quite an exercise to get it to look correct. Unfortunately part of TARS had to be disassembled for this.

tars-log-44.jpg


While these builds don't puppet, they were built to pivot either in the middle or the top, which required an axle and mounting that would enable that, as well as we learned the feet needed to be bendy to pose well. Devin printed feet from Ninjaflex to meet this need. The wires between the sections of TARS ran inside the axles as well.

tars-log-13.jpg


tars-log-55.jpg


tars-log-54.jpg


We also wanted the same handles on the prop, so these were fabricated and bolted on.

tars-log-57.jpg


The final step was to install the electronics. We used a Raspberry Pi to control everything and connect to the iPads. The Pi runs as a webserver and the iPads use a browser to hit the server, and display the content. Bluetooth speakers are in the base of the legs. The interface is an app on our phones, and it can stream text like in the film, play video, such as behind the scenes from the Bluray, play music, or snippets of TARS dialog from the film.

tars-log-53.jpg


tars-log-46.jpg


tars-log-47.jpg


tars-log-30.jpg
 
:eek:o_O That type of build is way above my pay grade/skills/machines/materials. Kudos for you guys to have tackled that prop; Pro-Job all the way and more(y)(y)(y)(y):notworthy::notworthy::notworthy::notworthy:
 
This thread is more than 3 years old.

Your message may be considered spam for the following reasons:

  1. This thread hasn't been active in some time. A new post in this thread might not contribute constructively to this discussion after so long.
If you wish to reply despite these issues, check the box below before replying.
Be aware that malicious compliance may result in more severe penalties.
Back
Top