Iron Man Mk II (wearable) Arc Reactor and Faceplate

Good luck on finishing on time, I too decided to go as iron man this halloween, growing out the beard and everything, man, i itch and look homeless. I got the arc reactor side of it done, and was plaining on doing a full helmet, starting from paper, but it is alot of work, like you are deff finding, and I haven't even finished the paper part of it lol, well good luck again, i feel your pain.
 
It's coming along nice man keep it up. You can always pickup a tube of spot putty to help fill the small divots between bondo coats.

You've got me wanting to make my own face plate.
 
Man the things I've learned in the past two weeks, but mostly what an a-hole I was on day 1...

Day 15 : T-minus 8 days

I'm still sour about declaring how much free time I was going to have. Can you tell?

I poured another arc ring and made it slightly less blue (which I wish I could say was intentional but it will give me some options). I tried a vacuum thing, but only for about 10 minutes. I needed to make this one so I can use one to mold if I need and not use this ridiculous duncan hines container anymore (which as the only one that turned out I'm not bashing).

I went and got a bunch of supplies yesterday. for faceplate: bondo spot putty ($6.42), primer sealer ($5.79), 400 grit sandpaper* ($4.49). for arc reactor: 18-gauge copper wire to wire the leds ($4.98), screen patches or the little mesh interior circle (3x for $2.36), 60/40 .6mm flux solder ($6.50), flush snips ($9.70), tweezerman ingrown hair tweezers ($11.99) -- it was decided that I shouldn't be using my girlfriend's good tweezers for electric soldering. Also picked up a set of test leads ($5.98), and a pair of anti-fog safety glasses ($8.44) so I don't have to use my sunglasses at night or have my other's getting super foggy (it's been weirdly foggy where I live in la the last couple nights). My led's are supposed to arrive tomorrow, so hopefully I'll do a basic light ring tomorrow if they arrive on time.

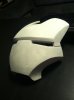
I sprayed the bad boy and it looked pretty good. Obviously there are some scratches and pin holes, and there are the two or three sections I need to finish sculpting with bondo.

I think this (e)rondo coat was the biggest misstep I've made. I'm going to cast (eventually but probably not this one) it anyway and put padding on the inside so I'm not sure why I did it. It smells to high heaven, and makes the fiberglass matt inaccessible so last minute shaping with the hair dryer is all but impossible. Alas.

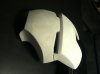
I was giving it a once over and working on the eye parts, building up the frame. I am going to have to do a lot of sanding work here.

2013-10-24 12.20.36.jpg

The outer edges are a lot thinner than I have them, as is the layer before the build up inside the eye socket (here I actually just got that from sanding the right shape for the bottom lines). But it still wasn't looking right to me. Then I looked at a bunch of reference pictures and notices that the bottom (uni) brown line is nearly flush with the top edge of the nose and not angled indented like I have it. I then realized I was super exhausted, came back inside, had a very minor melt down, decided I would write this post today, and went to sleep dreaming of sanding bondo (I kid you not).

Now I feel refreshed, had a nice coffee, and I'm back to the grind.

Quick update, the smell of chemical peanut butter is just not at a tolerable level where I think I can work on it inside while my girlfriend is working.

Thanks for reading,
Cory

* I've corrected it, but in the past I referred to using 120 grit sandpaper. It was 150, 220, and now 400.

One last thing, on a whim I tried out my new dremel to see how it worked and clean up some things (eye line geometry). Was only going to test it out so I didn't but on my ventilator or eyes protection and then I got carried away. I think i breathed in some bondo dust and got a couple flecks in my eye. It was not bad. I just took a shower, but it was unpleasant for a few hours. Don't be an idiot like me. Wear a dust mask (at the very least) when sanding and eye protection.
 
Last edited:
Good luck on finishing on time, I too decided to go as iron man this halloween, growing out the beard and everything, man, i itch and look homeless. I got the arc reactor side of it done, and was plaining on doing a full helmet, starting from paper, but it is alot of work, like you are deff finding, and I haven't even finished the paper part of it lol, well good luck again, i feel your pain.

Thanks! I'm definitely going to be finished on time. No idea what it'll look like, but like I said, I'll just glue the soldered led to my chest, thrown on a t-shirt and buy a child's iron man mask if it comes to it!

In all seriousness, I hope that I'll be ok, and may have to be satisfied with touching it up after halloween.

Just make sure the paper is exactly how you want it. As a first time builder, I was satisfied with my faceplate just coming together. If i knew what I know now, I would have redone the whole thing, which would have been a ludicrous suggestion to me then.

You're arc reactor looks awesome. cnc milling is a whole another beast that I have no idea bout, so I' really enjoyed your thread thus far.

- - - Updated - - -

It's coming along nice man keep it up. You can always pickup a tube of spot putty to help fill the small divots between bondo coats.

You've got me wanting to make my own face plate.

Do it! your magneto helmet looks awesome, and I think I saw you mention you have a kid, so you can do awesome marvel battles at home when they get a little older!
 
The name of the task is Bondo. Shaping bondo.

Day 16 : T-minus 7 days

So I thought I was done, but I'm shaping bondo again.

Here's the in progress of the new eye line geometry.

2013-10-24 15.31.42.jpg

I'm glad that I did it though, because I was able to fix a couple of other things. I sanded the corners of the forehead and cheeks. Since then, I've sanded and and spot puttied, and I'm going to primer/seal afterward I finish this post.

I've done a lot of work in the eye socket stuff but it's still got a while to go. I can't get the lines just right, and I need to iild up the inner detail a little.

Ok, time to sand and primer. Tomorrow, I hunt for something in my house that is the same diameter of the arc ring but open so I can wrap the copper around it so I can more easily assemble the transformers (sigh) and probably more bondo work, and then take a shot at transformers, and soldering the led ring.

Big day. Wish me luck.

Ok thanks for reading,
Cory
 
Hey man you might want to consider 60-80 grit sand paper after initial bondo then working to 120 etc that might save you some precious sanding time.
 
Hey man you might want to consider 60-80 grit sand paper after initial bondo then working to 120 etc that might save you some precious sanding time.

Ha it's funny you mention that. I realize I never said it, but I have been sanding with the 60 to start off with to take out the burrs and things like that (actually most of the pictures are from post-60 sandings). Then I go with the 150/220 to smooth. The 400 I bought yesterday is crazy. Superfine.

Anyway it's weird you wrote this, because I just got back from the store because I ran out of 60 last night!
 
Solder, oh sod it.

Day 17 : T-minus 6 days

A little clean up on the faceplate. Here it is after a bit.

2013-10-26 00.01.33.jpg

It's definitely finally getting there. Need a little shaping and some sanding. Will work on it as I can.

Today my solder and tweezers etc came. Then the time came. And I tried to solder, and it would not melt properly. After scouring the internet, the one I borrowed from my friend was so old and unchromed or whatever the real word is and it wouldn't melt properly. I couldn't get the tip off (tried CRL) so I ended up getting a cheap 40w weller soldering iron for 20 bucks. Man did I not want to. And it's not great so I'm probably going to return it.

2013-10-25 18.47.17.jpg

After the first ring got messed up, I just practiced soldering the pieces of copper wire together.

So here was my pattern for the outer (positive) ring (the negative side of the LED's has a T-line on the back that would point towards the negative end).

2013-10-25 18.47.30.jpg

I hot glued just the outside of the ring to keep it to the paper. It was a lot more difficult. Some times the solder joints would happen like magic, and be perfect. Other times, it would be a cold joint and wouldn't stick. Other times, the solder would bead on the tip and go upwards and away from where I wanted it to stick. I tried heating the copper wire and pressing the solder to the lead (it wouldn't melt). Sometimes I tried to tin the copper wire and then press the LED there with tweezers and then melt the solder, but I couldn't get it on the right side. It would always bead and go to the other side of the LED. Finally I just started to make a small line and place it on top of the lead of the LED and the wire and just press it on and pull it away. That turned out pretty well, but I still never got it down perfectly. Anyway here it is:

2013-10-25 23.55.04.jpg2013-10-25 23.55.14.jpg

I somehow burned one out but for my first time I'm pretty happy with it (I put it in the helping hands pretty much to test and take the picture). Some of the soldering is terrible and I hope it doesn't crack as I assemble the arc reactor.

Here's the thing with the epoxy ring I scuffed up:

2013-10-25 23.56.00.jpg

Oh yeah. Now we're cooking. Two cr2032 batteries seemed to be the right brightness I liked (the pic is with the aperture for the brightness of the LEDs). Just have to figure out how to get them arranged, so I can change them out when I need.

OK, tired. Bed now.

Thanks for reading,
Cory
 
Day 18 : T-minus 5 days

Not much today. Just got some paint, super glue, and cleaned up the arc reactor ring with my dremel.

I also dropped my phone in the sink while I was doing some dishes, and I'm trying to dry it out so I'll have to post some pictures later.

Ok, thanks for reading,
Cory
 
RICE RICE RICE. Hope it's not messed up! Oh ya and great work on the reactor and bondo'ing!!!

Ha yeah. I got it in the rice right away after drying it. Everything seemed to be broken then came back in bit but the power button. Have a new one coming from ebay on wednesday. Hopefully it's just a corroded connection b/c of a bad connector. we'll see!
 
Day 19 : T-minus 4 days

Big day today. Cut out the foam pieces for the transformers and heated up one of my small files to press in the center. Then I primed them and spray painted with my chrome silver spray paint. They looked metallic but a little too much so I ended up just dusting it with sanded bondo "dust." took the shine off and made it look pretty good. I also used the mold putty ($19.99) to make a cast of the straight foam piece to cast later...I guess. I also ended up wasting it by making a crap mold of the arc ring (didn't press it close enough so it ended up having a bunch of lines in it (which admittedly can be sanded). Then I made another one and when I pulled the ring out it tore through because it was too thin (but very smooth inside). I then decided that I would make another one. Then immediately realized that I was not a crazy person and that I would not make another one.

I tried wrapping the copper around a makeshift (read failed foam transformer). It looked good but it was really intensive, and since I am planning on making the wrapped arc ring separate from the LED ring (I want it bellow the transformers to make the light look more diffuse), I need to have the bottom open. I tried cutting them (after glueing them but they ended up splitting, so I'm having a small terrifying fear that I'm not sure how to keep them on there and the transformers open at the bottom. I bought some new glue.

I also epoxied another cutout of the shield ring (I'm going to double up). I'm going to sculpt it later but for the costume I'm going to have to go with this one. I also cut out the eyes from the back making them open, and did some cleaning of the the eyes and scratches with some spot filler. oh-I-did-another-bondo-build-coat-even-though-I-said-I-would-never-do-another.

Ok, thanks for reading,
Cory
 
Hard decisions

Day 20 : T-minus 3 days

It's come to the point where I've had to make some hard decisions. While the mask is not entirely where I want, the overall shape is good. The edges are not as crisp because in the time crunch I put myself into, I did not bondo the mask edges like I wanted to, or the eyes edges or inner detail build up. THe overall shape is there and it is about 80% of the way there I'd say. I also primed it up because I read on FSURobbie's thread (http://www.therpf.com/f9/iron-man-faceplate-interior-wip-vashdstampedes-kit-pic-heavy-165206/) that some of the chrome paint takes a few days to dry. I've primed it and here's where I'm at.

2013-10-28 20.49.17.JPG2013-10-28 20.48.17.JPG2013-10-28 20.47.17.JPG

I'm going to give it one or more hours of sanding, and then I'll hit it with the primer one last time before I spray.

I've also done a lot of work on the the arc ring. I glued the foam "transformers" on the ring. Hot glue ended up being a bit to thick so I went with gorilla glue. I wrapped the copper wire for the transformers around a spare piece of the cast resin ring (remember the one that wouldn't come out of the mold?-- i hit it with a hammer to break it so I'd have something of about the same size). I cut two sections out of it to form a "U" like this video Iron Man Arc Reactor, DIY Wearable, Detailed Tutorial - YouTube. I taped one wrapped edge with 1" paper tape to keep together when cut. Unfortunately the sides were too short (something I knew but didn't admit to myself until I'd glued down two transformers). I change it to just making one cut and then bending the bottom side edge to make it "straight." It was certainly a learning curve to putting them on so it looked neat enough (about 3/4 transformers). I then used the gorilla glue to glue down the outer and inner edge. Not sure if the cyanoacrylate messed with the paint or if it was just not dry but it make it run, and went from looking nice and metallic looking to foam covered in gunky grey paint. ugh. I will have to touch up the paint with a q-tip later. Other than the transformers looking a bit crappy (which I think I can salvage), it looks ok. It's more Mk I arc reactor than Mk II (so maybe it will be better for the proof tony stark has a heart case, not super great for a Mk II point in the movie I'm trying to costume (read hard decision). The glue got sort of crusted and white (i applied it a little too heavily). I need to get use some nail polish remover to wipe up the over crusted areas on the ring and copper. I'll have to post a picture tomorrow since my power button hasn't gotten here yet, and my girlfriend's phone is upstairs and if I go up there I will get in bed and pass out (it's ridiculous how much stuff I've been able to use from my girlfriend ha).

In the future I'll probably take some of my aluminium tape and spray paint it copper, and place it in the center of the transformers, so if there is any gaps in the copper it won't show up grey.

Ok it's time for bed.

Thanks for reading,
Cory

Edit: here's a picture of the arc ring with the copper wrapped transformers.

2013-10-30 01.45.55.jpg
 

Attachments

  • 2013-10-28 20.48.17.JPG
    2013-10-28 20.48.17.JPG
    654.2 KB · Views: 97
  • 2013-10-28 20.49.17.JPG
    2013-10-28 20.49.17.JPG
    895.8 KB · Views: 91
  • 2013-10-28 20.48.17.JPG
    2013-10-28 20.48.17.JPG
    1.2 MB · Views: 106
Last edited:
Looking good man... should be fine for you to use for Halloween then continue working on after.

Yea you will need at least a coat of two of the chrome paint and will want that to set for about 2 days.

After you can sand it back down and continue on.
Looking good though
 
Hey just a friendly caution, those leds look like surface mount leds, if they are, they require additional cooling if they are just hovering with nothing t0 help suck the heat out they might get really hot and burn out quickly. Not sure how hard you are running them but a piece of aluminum on the back side of the wouldn't hurt as long as you can isolate the pos and neg.

Solder, oh sod it.

Day 17 : T-minus 6 days

A little clean up on the faceplate. Here it is after a bit.

View attachment 246801

It's definitely finally getting there. Need a little shaping and some sanding. Will work on it as I can.

Today my solder and tweezers etc came. Then the time came. And I tried to solder, and it would not melt properly. After scouring the internet, the one I borrowed from my friend was so old and unchromed or whatever the real word is and it wouldn't melt properly. I couldn't get the tip off (tried CRL) so I ended up getting a cheap 40w weller soldering iron for 20 bucks. Man did I not want to. And it's not great so I'm probably going to return it.

View attachment 246802

After the first ring got messed up, I just practiced soldering the pieces of copper wire together.

So here was my pattern for the outer (positive) ring (the negative side of the LED's has a T-line on the back that would point towards the negative end).

View attachment 246803

I hot glued just the outside of the ring to keep it to the paper. It was a lot more difficult. Some times the solder joints would happen like magic, and be perfect. Other times, it would be a cold joint and wouldn't stick. Other times, the solder would bead on the tip and go upwards and away from where I wanted it to stick. I tried heating the copper wire and pressing the solder to the lead (it wouldn't melt). Sometimes I tried to tin the copper wire and then press the LED there with tweezers and then melt the solder, but I couldn't get it on the right side. It would always bead and go to the other side of the LED. Finally I just started to make a small line and place it on top of the lead of the LED and the wire and just press it on and pull it away. That turned out pretty well, but I still never got it down perfectly. Anyway here it is:

View attachment 246804View attachment 246805

I somehow burned one out but for my first time I'm pretty happy with it (I put it in the helping hands pretty much to test and take the picture). Some of the soldering is terrible and I hope it doesn't crack as I assemble the arc reactor.

Here's the thing with the epoxy ring I scuffed up:

View attachment 246806

Oh yeah. Now we're cooking. Two cr2032 batteries seemed to be the right brightness I liked (the pic is with the aperture for the brightness of the LEDs). Just have to figure out how to get them arranged, so I can change them out when I need.

OK, tired. Bed now.

Thanks for reading,
Cory
 
Hey just a friendly caution, those leds look like surface mount leds, if they are, they require additional cooling if they are just hovering with nothing t0 help suck the heat out they might get really hot and burn out quickly. Not sure how hard you are running them but a piece of aluminum on the back side of the wouldn't hurt as long as you can isolate the pos and neg.

Oh man I totally didn't even think about a heat sink. Thanks. Although, maybe if they burned out I'd be forced to redo my terrible soldering...hmmm no I don't have time.

Seriously though thanks. I'll try to work one in.
 
It's back...back in black...

Day 21 : T-minus 2 days

Yep, as the countdown continues, the song is back. ha. it comes and goes.

Yesterday I crisped up some edges. and overall sanded for a little. Then I primed. I was going to paint but the primer dried with raised bumps--in a hurry from too far away--so I had to sand them down.

Then I worked on cleaning up the arc ring. Acetone didn't quite work as well as I wanted and I'm still a little scared to trim up the bottom of the "transformers" for fear that everything will fall apart.

2013-10-30 14.07.51.jpg

I also cut out the holes of the "shield ring" or maybe "vent" ring. I drilled three holes with the dremel and then "cleaned up with my needle files. It cleaned the holes up but left a lot of fibers since the resin didn't sink all the way through. I then used a conical engraving bit to clean up the ridges that popped up for filing.

2013-10-30 02.44.52.jpg

Then, I spend an infuriating hour looking up some sort of cone to wrap the copper wire (large) around for the inner rings.

Tomorrow, I'm going to epoxy the vent ring to clean up some of the paper fibers, and I'll try to use the molding putty to make a mold of it (I'll cast another one later...maybe).

Ok time for bed.

Thanks for reading,
Cory
 
Last edited:
On man...one more day!

Day 22 : T-minus 1 day

Feeling a bit crazy about it almost being done, but ok at the same time.

I epoxied the vent ring (shield ring isn't the right term I think). and made a mold that I think will be pretty useful in the future.

I also painted the faceplate with the silver paint, but of course it's a little too silver. Should have gone with chrome or something else instead. I'm thinking about now using a black paint in between, then another coat of silver/chrome. I saw a stan winston preview video (Metallic Paint - PREVIEW - Special Effects Character Creation Video Tutorial with Rob Ramsdell - YouTube) that made me think multiple coats of different layers might help give it some dimensionality. Ugh I'm going to return the silver. This is now the costume paint job and not for prop. Ha. lots of things being let slide for the next few days.

I also fabricated the copper rings with the "lens":

2013-10-31 01.22.03-2.jpg

I used an aerator repair kit from a hardware store that won't be named...

2013-10-30 21.27.17.jpg

I also attached the soldered wire between the transformers, and then "soldered" with epoxy resin I mixed with the silver spray paint. Some of them came out great, but others, the epoxy was a bit to runny and spread and looked bizarre. I might clean them off tomorrow and reapaint:

2013-10-31 01.19.54.jpg

I also fabricated the connectors from the vent ring to the silver central ring thing from the top to the tin can that the cast arc ring wouldn't come out:

2013-10-30 23.51.28.jpg

I used the ribbon cable from a broken scanner. to be the connector but when painted they sort of lost their texture.

Tomorrow all I have to do is get the screws for the vent ring, and assemble the whole thing. Then I have to connect the center led to my two batteries.

Right now though I'm exhausted.

Thanks for reading,
Cory
 
Halloween!

Day 23 - T(he) Day!

Everything is a disaster. Broken. Destroyed. Ruined. I had to go with my backup:

2013-10-31 23.42.45.jpg

My girlfriend's iphone under my shirt

Just kidding. I am Iron Man:

2013-10-31 21.20.37.jpg.

I'll write more about finishing tomorrow but for tonight here's my Mk II Faceplace:

2013-10-31 21.24.08.jpg

And here's my Mk II Arc Reactor, which admittedly looks like I made it from a box of scraps (I couldn't resist):

2013-10-31 20.00.07.jpg

Happy Halloween! Hope that all your costumes and props look great tonight!

Thanks for reading,
Cory
 
Looks good. Curious how you attached your arc reactor to your chest?

Had a lot of trouble with mine last night. I attached it directly to my shirt and had to constantly adjust to fight it from sagging.

Was going to attach it to a belt run under my shirt with a hole cut of the arc reactor but didn't feel it as working for me.
 
This thread is more than 10 years old.

Your message may be considered spam for the following reasons:

  1. This thread hasn't been active in some time. A new post in this thread might not contribute constructively to this discussion after so long.
If you wish to reply despite these issues, check the box below before replying.
Be aware that malicious compliance may result in more severe penalties.
Back
Top