SD Studios
Well-Known Member
As some of you know, I worked on the Falcon project at MR. I was leaving at that point, so I wasn’t there for the entire operation, but I helped as much as I could. Because of the complexity of the model, MR asked Frank, Moe and Jason to help out with reference and development. Bryan Ono and Larry coordinated the product development. Without all of these guys, this project could NOT have been completed. There are 1100 parts on each production model, and trying to catalog all of the original kits was an insane amount of work.
The original model was white-light scanned. There are 2.1 million data points in the file. Jason and I supervised that operation and then took hundreds of photographs, check-measurements, and notes.
MR then used the scan data to CNC a master pattern. The factory also used the kit parts supplied by Frank/Moe and their guide document to locate about half of the surface details (this saves having to recreate each part from the scan from scratch). The parts that could not be located, were machined/built from the scans and photos. Because we did this in 2004/2005, the model was in its current condition. So, the MR model is NOT accurate to the filming model if you want to get super-hardcore. Fortunately, ILM gave us a disk of super-high rez images of the ANH and ESB Falcons, so I could see how they looked AS-FILMED. I used these images, the Chronicles book, the pics we took at the archive, and the Sculpting a Galaxy (SAG) book to re-do my model and locate the missing parts. All of these pics in the books were taken back when the filming model was still completely intact.
SO, if you REALLY want to accurize your Falcon, there are a number of steps you need to do. I will list everything I can think of. This process (including reference) took me almost 60 hours. So, if you are really serious, here we go:
-Gotta repaint. Yup. Sorry. The factory paintjob is great for what it is, but if you are going to be COMPLETELY accurate, it has to be repainted. The big polka dot airbrush marks don’t exist on the original model…they gotta go. Base color: we Pantoned the model and matched it as best we could. The color on the MR model is a TINGE too light. But really close. The formula I used to make one paint bottle full is: 3 parts flat white, 1 part desert sand, 4 drops of insignia yellow and 3 or 5 drops of black to taste.
It is very difficult to color match an ILM model, as you are looking at 3 or 4 layers of color, blending together to create what your eye now sees. (side note: The Falcon, as well as ILM X-Wings are NOT white. They are a very light gray with that color then sanded down to expose white and darker gray underneath along panel edges…and then oversprayed with a slightly darker gray. The gray color almost always “blows out” in flash photography and really looks white…but it is NOT WHITE. When you see them right in front of your face, you can see this. Sorry. That has been bugging me). The Falcon is light gray with a cool-yellow cast. The X-wings and Y-wings were a warmer gray. That is how I painted both of mine.
-The hull is COVERED in teeny dots. Gazillions of them. The first thing we noticed when we set up the lights was…WOW, the model is completely COVERED in spatter paint! The really odd thing is that they rarely show up in even close-up pics. If you want to see what I am talking about…look at the SAG book on page 14. THAT is what the ESB model looks like up-close, in-person under good lighting. (In the book, it is mislabeled as the ANH model but it is DEFINITELY the EBS model.) There are three shades of “spatter”. Light gray, darker gray and rusty yellow. Thin the colors a LOT and use the trusty toothbrush-spatter method. This worked perfectly for me. It looks weird, but is absolutely correct. The MR model has this a bit, but it is actually ten times heavier than the factory did it. (and more colors).
-Make notes all over the reference images. I drew arrows to spots I knew I would forget about. Look at what other people are doing. I missed a few spots that I later saw on the RPF forum and others. They were RIGHT THERE in the pics, but I didn’t even notice them, until someone else said something (or I saw it painted it on their model) That is an invaluable resource. Use it!
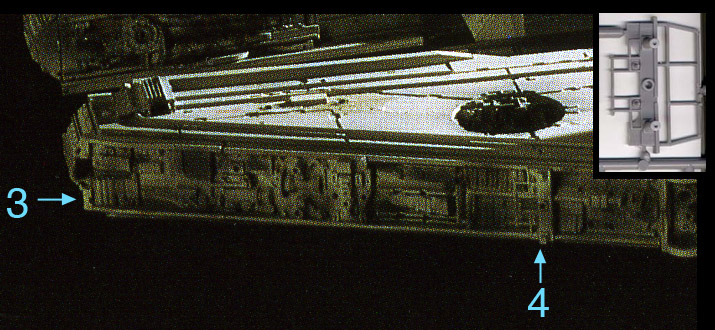
-Refer to the missing parts thread. Very good job guys! There are 7 parts missing in total. They found all but one…the teensy detail on the center ridge about 1 ½ inches in front of the top guns. The detail is
there already, but there is supposed to be another one next to it.
-Drill out all of the cast-in-place set screws and replace them with real screws. Yah, you heard me. They are black on the bottom, center disk and silver on the mandibles. Lightly paint the mandible screws with body color, but let some of the silver show. That is how it was on the filming model. No idea what they are there for. Also, replace the two resin Allen-head screws on the top/front of the mandibles with real ones. This is a subtle item, but is definitely noticeable. Still with me? Did you think this was going to be easy??? HUH???
-Many of the perimeter edge panels were smacked down/cracked on the archive model. We corrected this in the files. We DID have to thicken them up so that the resin wouldn’t be too fragile. SO, technically, you have to go around ALL of the panel edges and thin them with a Dremel down to .080. (They varied with location, but close-enough.) I started doing this on my model, but got really tired of it, so I stopped.
-Some of the chip details are located wrong. I only found three; there could be more. eg; top of the right docking port. The missing detail in this location conflicts with the chip. Remove/relocate the chip-detail and add the missing detail part.
-Bottom center disk, behind gun window port: There is one panel with some odd surface “damage”. That was done after filming and the digital scan picked it right up. NOT on the model as-filmed. Has to go. I filled this in with epoxy, leveled out the surface and painted the panel gray. It is body color on the MR model…that is wrong.
-There are numerous ILM staff names written all over the model. They are kind-of-sloppily done with a black rapidograph pen. I asked Lucasfilm if we could replicate those, but they said no. So, I added all of them on MY model. About 9 or 10, IIRC. Eg; “Michel Fulmer” appears twice on the cockpit. Once on top in a box and once, much larger on the bottom. And someone wrote: “WHO?” in pencil next to his name on the bottom, so that is what I did too. “Lorne Peterson” appears twice. And Ease Oweung appears twice, once in English on the rear engine panel, and once in Korean (I think) on the side mandible. The names are pretty large…SO large, I am surprised how well you can see them once you know they are there. Yup, gotta add those.
-Double hashes and dots. I located EVERY one of these. There are almost 60 locations missing on the MR model and many are in the wrong location. (not bad, but slightly off). On the filming model, they were done with a drafting pen, as the ends of the lines are rounded. SOME were done with Letraset and have squared ends, so you have to look to see the difference. There are many different sizes. I used both methods. Some are closed on one end to form a rectangular U-shape. So you have to watch out.
-ILM ALWAYS sands their models down after painting. ALWAYS. We saw it on every model we referenced…Speeders, Y-Wings, X-Wings, ATATs, etc. So, you should go over the model LIGHTLY and sand the gray and red panels. In super-close-up, high-rez shots, you can clearly see the scratch marks in the panels. Don’t go nuts, just a TOUCH. It makes a very nice subtle wearing effect that you can’t get with an airbrush…and the cameras would NEVER pick up in a million years. Crazy ILM modelers!
-You will need to use pastel chalks as well. It is evident all over the filming model. Much more subtle than airbrushing a “splotch” or streak. Dark gray, yellow and black were used on my model.
To be continued...
The original model was white-light scanned. There are 2.1 million data points in the file. Jason and I supervised that operation and then took hundreds of photographs, check-measurements, and notes.
MR then used the scan data to CNC a master pattern. The factory also used the kit parts supplied by Frank/Moe and their guide document to locate about half of the surface details (this saves having to recreate each part from the scan from scratch). The parts that could not be located, were machined/built from the scans and photos. Because we did this in 2004/2005, the model was in its current condition. So, the MR model is NOT accurate to the filming model if you want to get super-hardcore. Fortunately, ILM gave us a disk of super-high rez images of the ANH and ESB Falcons, so I could see how they looked AS-FILMED. I used these images, the Chronicles book, the pics we took at the archive, and the Sculpting a Galaxy (SAG) book to re-do my model and locate the missing parts. All of these pics in the books were taken back when the filming model was still completely intact.
SO, if you REALLY want to accurize your Falcon, there are a number of steps you need to do. I will list everything I can think of. This process (including reference) took me almost 60 hours. So, if you are really serious, here we go:
-Gotta repaint. Yup. Sorry. The factory paintjob is great for what it is, but if you are going to be COMPLETELY accurate, it has to be repainted. The big polka dot airbrush marks don’t exist on the original model…they gotta go. Base color: we Pantoned the model and matched it as best we could. The color on the MR model is a TINGE too light. But really close. The formula I used to make one paint bottle full is: 3 parts flat white, 1 part desert sand, 4 drops of insignia yellow and 3 or 5 drops of black to taste.
It is very difficult to color match an ILM model, as you are looking at 3 or 4 layers of color, blending together to create what your eye now sees. (side note: The Falcon, as well as ILM X-Wings are NOT white. They are a very light gray with that color then sanded down to expose white and darker gray underneath along panel edges…and then oversprayed with a slightly darker gray. The gray color almost always “blows out” in flash photography and really looks white…but it is NOT WHITE. When you see them right in front of your face, you can see this. Sorry. That has been bugging me). The Falcon is light gray with a cool-yellow cast. The X-wings and Y-wings were a warmer gray. That is how I painted both of mine.
-The hull is COVERED in teeny dots. Gazillions of them. The first thing we noticed when we set up the lights was…WOW, the model is completely COVERED in spatter paint! The really odd thing is that they rarely show up in even close-up pics. If you want to see what I am talking about…look at the SAG book on page 14. THAT is what the ESB model looks like up-close, in-person under good lighting. (In the book, it is mislabeled as the ANH model but it is DEFINITELY the EBS model.) There are three shades of “spatter”. Light gray, darker gray and rusty yellow. Thin the colors a LOT and use the trusty toothbrush-spatter method. This worked perfectly for me. It looks weird, but is absolutely correct. The MR model has this a bit, but it is actually ten times heavier than the factory did it. (and more colors).
-Make notes all over the reference images. I drew arrows to spots I knew I would forget about. Look at what other people are doing. I missed a few spots that I later saw on the RPF forum and others. They were RIGHT THERE in the pics, but I didn’t even notice them, until someone else said something (or I saw it painted it on their model) That is an invaluable resource. Use it!
-Refer to the missing parts thread. Very good job guys! There are 7 parts missing in total. They found all but one…the teensy detail on the center ridge about 1 ½ inches in front of the top guns. The detail is
there already, but there is supposed to be another one next to it.
-Drill out all of the cast-in-place set screws and replace them with real screws. Yah, you heard me. They are black on the bottom, center disk and silver on the mandibles. Lightly paint the mandible screws with body color, but let some of the silver show. That is how it was on the filming model. No idea what they are there for. Also, replace the two resin Allen-head screws on the top/front of the mandibles with real ones. This is a subtle item, but is definitely noticeable. Still with me? Did you think this was going to be easy??? HUH???
-Many of the perimeter edge panels were smacked down/cracked on the archive model. We corrected this in the files. We DID have to thicken them up so that the resin wouldn’t be too fragile. SO, technically, you have to go around ALL of the panel edges and thin them with a Dremel down to .080. (They varied with location, but close-enough.) I started doing this on my model, but got really tired of it, so I stopped.
-Some of the chip details are located wrong. I only found three; there could be more. eg; top of the right docking port. The missing detail in this location conflicts with the chip. Remove/relocate the chip-detail and add the missing detail part.
-Bottom center disk, behind gun window port: There is one panel with some odd surface “damage”. That was done after filming and the digital scan picked it right up. NOT on the model as-filmed. Has to go. I filled this in with epoxy, leveled out the surface and painted the panel gray. It is body color on the MR model…that is wrong.
-There are numerous ILM staff names written all over the model. They are kind-of-sloppily done with a black rapidograph pen. I asked Lucasfilm if we could replicate those, but they said no. So, I added all of them on MY model. About 9 or 10, IIRC. Eg; “Michel Fulmer” appears twice on the cockpit. Once on top in a box and once, much larger on the bottom. And someone wrote: “WHO?” in pencil next to his name on the bottom, so that is what I did too. “Lorne Peterson” appears twice. And Ease Oweung appears twice, once in English on the rear engine panel, and once in Korean (I think) on the side mandible. The names are pretty large…SO large, I am surprised how well you can see them once you know they are there. Yup, gotta add those.
-Double hashes and dots. I located EVERY one of these. There are almost 60 locations missing on the MR model and many are in the wrong location. (not bad, but slightly off). On the filming model, they were done with a drafting pen, as the ends of the lines are rounded. SOME were done with Letraset and have squared ends, so you have to look to see the difference. There are many different sizes. I used both methods. Some are closed on one end to form a rectangular U-shape. So you have to watch out.
-ILM ALWAYS sands their models down after painting. ALWAYS. We saw it on every model we referenced…Speeders, Y-Wings, X-Wings, ATATs, etc. So, you should go over the model LIGHTLY and sand the gray and red panels. In super-close-up, high-rez shots, you can clearly see the scratch marks in the panels. Don’t go nuts, just a TOUCH. It makes a very nice subtle wearing effect that you can’t get with an airbrush…and the cameras would NEVER pick up in a million years. Crazy ILM modelers!
-You will need to use pastel chalks as well. It is evident all over the filming model. Much more subtle than airbrushing a “splotch” or streak. Dark gray, yellow and black were used on my model.
To be continued...
Last edited by a moderator:


")