Help with a V2 kit

bozhanpetrov

New Member
Hello there !
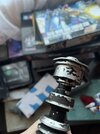
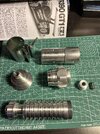
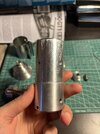
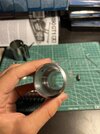
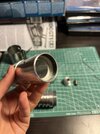
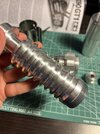
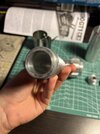
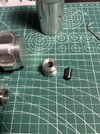
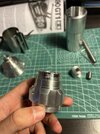
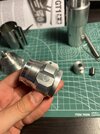
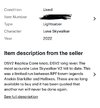
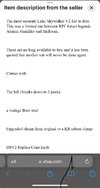
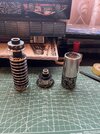
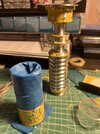
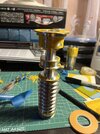
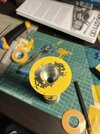
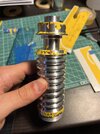
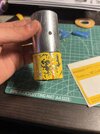
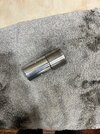
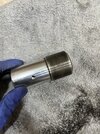
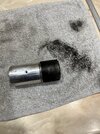
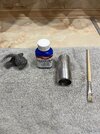
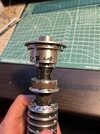
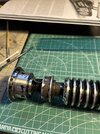
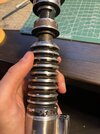
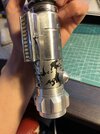
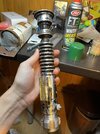
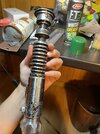
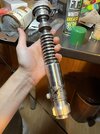
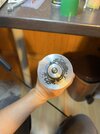
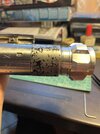
My name is Bozhan Petrov and I’ve become member last mont and this is my first topic. After couple of days or reading RPF topics I said “ Thats it Im getting into this prop making stuff”. Since then i’ve read almost everything Graflex, DL-44, MPP, MK1 ans V2 related. One day when looking for some graflex hilts in ebay out of nowhere in poped out a listing whith the following topic “ Star Wars DSV2 Luke Skywalker V2 Lightsaber Replica Return Of The Jedi.As reading this I literally jumped out of my chair. Red the description and while doing I was already calling my best friend ( I did that because he lives in London and the guy selling it was in UK ). The idea was to send it to my friend and he will bring it to me the following week, because I’m from Bulgaria and everything cost pretty penny for delivery and custom taxes. Here comes my mistake in the picture clearly is showed than at the end of the grenade section there is a thread not a L shaped locking mechanism as the real DSV2. I was to busy thinking where exactly to put it in my room. Today I’ve got this in hand alongside all materials for painting, sanding, weathering and so on. As disassembling it i’ve noticed something not right and the my lid up and realise that this has nothing in common with the Starkiller and Halliwax desig. With bit of heart fallen to my stomach searched which kit is this and i couldn’t find anything similar. Can you help found if this has anything to do with DSV2 or i‘ve got scamme. Im posting some pics that i find disturbing and deviating from the DSV2. Thank You in advance and sorry for bringing this topic in this way and I don’t want to offend anybody with this post.
 

Attachments

  • 6A26AB98-92AF-46E9-876C-D9BE1AFCB0C4.jpeg
    6A26AB98-92AF-46E9-876C-D9BE1AFCB0C4.jpeg
    1.1 MB · Views: 136
  • DD63560F-0EFC-4264-B25C-E31EC6D79B3F.jpeg
    DD63560F-0EFC-4264-B25C-E31EC6D79B3F.jpeg
    629 KB · Views: 121
  • A32EA8E0-AE7C-4719-87BE-B666EA23EB5A.jpeg
    A32EA8E0-AE7C-4719-87BE-B666EA23EB5A.jpeg
    606.4 KB · Views: 112
  • 4E4C292F-198B-4300-A4C2-D244A7ED7F47.jpeg
    4E4C292F-198B-4300-A4C2-D244A7ED7F47.jpeg
    568.2 KB · Views: 113
  • 4E97A25D-9B5F-4E28-9B05-38459B981C2D.jpeg
    4E97A25D-9B5F-4E28-9B05-38459B981C2D.jpeg
    661.4 KB · Views: 116
  • 5A85C699-8D4F-4B57-93C2-C9607A627C3F.jpeg
    5A85C699-8D4F-4B57-93C2-C9607A627C3F.jpeg
    550.1 KB · Views: 123
  • 4C4B434A-0D06-41A1-AC7A-16BE3AECC61F.jpeg
    4C4B434A-0D06-41A1-AC7A-16BE3AECC61F.jpeg
    1,006.1 KB · Views: 115
  • EF2309B3-DF9B-4E9E-9376-D8A74A982CD3.jpeg
    EF2309B3-DF9B-4E9E-9376-D8A74A982CD3.jpeg
    632.3 KB · Views: 121
  • F0FD71BC-B93C-4E8C-8B25-E38590A87B74.jpeg
    F0FD71BC-B93C-4E8C-8B25-E38590A87B74.jpeg
    652.7 KB · Views: 125
  • C3644972-AA2D-4F8C-9B3A-F00A440E2511.jpeg
    C3644972-AA2D-4F8C-9B3A-F00A440E2511.jpeg
    184.8 KB · Views: 114
  • C951918F-BC71-4B2B-8436-7652E4AB9047.jpeg
    C951918F-BC71-4B2B-8436-7652E4AB9047.jpeg
    550 KB · Views: 132
  • 52CCD89D-48FE-48E9-A681-F78DE1D56ED1.jpeg
    52CCD89D-48FE-48E9-A681-F78DE1D56ED1.jpeg
    488.3 KB · Views: 109
  • 6BE13EB3-D4CF-46DC-B27D-B877CF62B7D1.jpeg
    6BE13EB3-D4CF-46DC-B27D-B877CF62B7D1.jpeg
    475.8 KB · Views: 133
Last edited:
8 hours of work done. Quick disclaimer this will not be NOT the final version. I’ve just wanted to try out paint process, stancil fitment and overall rough view on if put effort to it, what will be the final result. I’ve done nothing to the pommel at all, not bended the emitter and didn’t modify it to spin. My future plan is to strip down the paint because it came out sooo much thicker that i wanted ( i did two coats of primer, two paint and one clear coat). I put primer because here we dont have rustoleum and used what I had in hand. From all the improvisation i like most the booster weathering ( i did with birchwood casey aluminum black ). Three runs with it and polished with 0000 steel wool. The stencils was fun, they were Solos Hold version and they fit only 4 out of 11 steps. They came with the kit and had to try, but I don’t recommend to do it. I’will just order the correct one and do more precise paint applicatio. The gaffer tape is found item in my garage, no idea the brand but i think look alike the real thing, but use Trooper Trent in future. So for v2 of my v2 I’will put some attention to details, weather the pommel and the clamp, install the boot stud and do the emitter as well. Not the greatest outcome but feel happy that it took some form and looks like a lightsaber. I want to thank Halliwax for all of his tutorials on the forum and You Tube, without it this wouldn’t be a weekend build for sure.
 

Attachments

  • F66DC0EB-8979-4A67-B700-854B30B36F4A.jpeg
    F66DC0EB-8979-4A67-B700-854B30B36F4A.jpeg
    2.1 MB · Views: 151
  • 7DFD20C9-FE69-4BA4-9FB8-D5C20B9247A8.jpeg
    7DFD20C9-FE69-4BA4-9FB8-D5C20B9247A8.jpeg
    1.4 MB · Views: 136
  • C28AA151-0D3F-4F56-9622-53C288DA3EED.jpeg
    C28AA151-0D3F-4F56-9622-53C288DA3EED.jpeg
    1.4 MB · Views: 124
  • 58494B5D-AC55-4C49-A490-0F8EB150DDAC.jpeg
    58494B5D-AC55-4C49-A490-0F8EB150DDAC.jpeg
    1.3 MB · Views: 129
  • 38DED84B-C8BB-416C-8CF6-3D0D8B553D2F.jpeg
    38DED84B-C8BB-416C-8CF6-3D0D8B553D2F.jpeg
    1.5 MB · Views: 111
  • 67004A6C-6A91-40A3-8682-0DE4698FB682.jpeg
    67004A6C-6A91-40A3-8682-0DE4698FB682.jpeg
    1.5 MB · Views: 121
  • A45783F4-CBB6-4B90-92E3-137207F8F8EB.jpeg
    A45783F4-CBB6-4B90-92E3-137207F8F8EB.jpeg
    3.1 MB · Views: 110
  • 6762EE2A-B1CE-4703-BC9E-32A47B0664C2.jpeg
    6762EE2A-B1CE-4703-BC9E-32A47B0664C2.jpeg
    2.3 MB · Views: 115
  • E4510DD9-8823-4534-B3F2-59D8A89B0F28.jpeg
    E4510DD9-8823-4534-B3F2-59D8A89B0F28.jpeg
    2.5 MB · Views: 124
  • F6E7A685-F544-4F96-A31D-0602AB0C101D.jpeg
    F6E7A685-F544-4F96-A31D-0602AB0C101D.jpeg
    2.8 MB · Views: 132
  • BE132FFA-FEB3-4454-A1F6-7BFCCD838919.jpeg
    BE132FFA-FEB3-4454-A1F6-7BFCCD838919.jpeg
    715.5 KB · Views: 142
  • 93A96EF0-FCB3-435A-81D3-A32E592849A3.jpeg
    93A96EF0-FCB3-435A-81D3-A32E592849A3.jpeg
    799.7 KB · Views: 142
  • FFEA257B-4770-4D51-800C-C10FC80DA67F.jpeg
    FFEA257B-4770-4D51-800C-C10FC80DA67F.jpeg
    686.4 KB · Views: 141
  • 64FC903B-2D28-44C5-8E04-6526927D2BDE.jpeg
    64FC903B-2D28-44C5-8E04-6526927D2BDE.jpeg
    692.8 KB · Views: 138
  • 71F52F67-F039-4064-903A-6AD4D5A98012.jpeg
    71F52F67-F039-4064-903A-6AD4D5A98012.jpeg
    770.7 KB · Views: 137
  • 48D3085B-5CEB-473B-ABAB-3C7BDFD39B0B.jpeg
    48D3085B-5CEB-473B-ABAB-3C7BDFD39B0B.jpeg
    770.5 KB · Views: 139
  • 7D404791-4E47-486F-B347-2D0A35805014.jpeg
    7D404791-4E47-486F-B347-2D0A35805014.jpeg
    794.6 KB · Views: 138
  • 29D92936-78DD-403F-856A-297C382E60C9.jpeg
    29D92936-78DD-403F-856A-297C382E60C9.jpeg
    581.3 KB · Views: 138
  • D49C4C2B-8E86-48F8-A106-9487AB091390.jpeg
    D49C4C2B-8E86-48F8-A106-9487AB091390.jpeg
    647.4 KB · Views: 157
With some time put to it, and more reference chipping on the grande, this was at random. Definitely sharing whit you guys is motivational. Thanks for the support.
 
8 hours of work done. Quick disclaimer this will not be NOT the final version. I’ve just wanted to try out paint process, stancil fitment and overall rough view on if put effort to it, what will be the final result. I’ve done nothing to the pommel at all, not bended the emitter and didn’t modify it to spin. My future plan is to strip down the paint because it came out sooo much thicker that i wanted ( i did two coats of primer, two paint and one clear coat). I put primer because here we dont have rustoleum and used what I had in hand. From all the improvisation i like most the booster weathering ( i did with birchwood casey aluminum black ). Three runs with it and polished with 0000 steel wool. The stencils was fun, they were Solos Hold version and they fit only 4 out of 11 steps. They came with the kit and had to try, but I don’t recommend to do it. I’will just order the correct one and do more precise paint applicatio. The gaffer tape is found item in my garage, no idea the brand but i think look alike the real thing, but use Trooper Trent in future. So for v2 of my v2 I’will put some attention to details, weather the pommel and the clamp, install the boot stud and do the emitter as well. Not the greatest outcome but feel happy that it took some form and looks like a lightsaber. I want to thank Halliwax for all of his tutorials on the forum and You Tube, without it this wouldn’t be a weekend build for sure.
I think it turned out great! Don’t be so hard on yourself
 
Question to the more experienced builders. Is it worth it to buy a mini milling machine (150$) for stripping the paint by sanding or to use chemical paint stripper ? I will use the machine only for sanding and drilling if buy it.
 
Ok so this will be the way. But for the sanding (polishing) part, what you’ll recommend. for example, I painted over the grips and sanded them down with sanding paper around my hand. Thank you in advance.
 
Damaged my emitter….. After new year i would go ask a guy with milling machine if he can do something. If someone has extra DS2 emitter lying around for sell I’m up. So so angry of myself. I feel like I’ve ruined a masterpiece.
 

Attachments

  • 91A1816D-0EE9-446C-A8FD-A77722A80239.jpeg
    91A1816D-0EE9-446C-A8FD-A77722A80239.jpeg
    675.5 KB · Views: 79
Nice work!!!

Yeah, I agree with the others - the props themselves are uglier in person than we realize, it's the magic of film. It's like a 3D picture, once you see it you can't UN-see it. Like the messy brown neck on the V2 or the thick, battered paint.

I think you've nailed it
 
I'm pretty much debated whether to bend my emitter as well. Having it straight is not bad too. What method is the best method to bend the emitter? I dont want to risk damaging mine.

A little bit off track, I've got myself korbanth steel V2, i have always love the crystal chamber they have. So, anyone would suggest chemical weathering for steel? Got myself trooper trent stencil and I can do airbrushing, but i'm wondering how well would brichwood blue steel works? I've used birchwood aluminium before, but never birchwood blue.
 
Just as a public service announcement, Don't use bluing fluid with the stencils!

If you want to blue the base hilt and buff it back down to darken it a bit before applying the stencils and painting the chips, great, but don't use bluing fluid to make the chipping effect itself.
It's way too thin, will eat the adhesive on the vinyl, causing it to leak through and will only look like a blotchy mess. Ask me how I know. ;)

The real one was chipped black spray paint, so why not go authentic (and easier). :)

I never thought that the bluing would dissolve the adhesive on the vinyl. That's a good heads up. I almost ended up up knowing like how you would. My blue chemical is already on the mail. Haha.

Apart from that, as far as I know, the thin neck section is not black, its somewhat dark brownish. What is a good blend for that?
 

Your message may be considered spam for the following reasons:

If you wish to reply despite these issues, check the box below before replying.
Be aware that malicious compliance may result in more severe penalties.
Back
Top