Ghostbusters 1:1 Ecto Containment Unit Build

Seems like this is gonna be a ittle heavy to transport and hang on a wall. Have you given any though to molding and making the shell in fiberglass?

It's actually not that heavy at all. My proton pack weighs a lot more. Transporting it wont be too bad. It's just going to be a little bulky. We did have a thought about doing molds in the beginning but neither of us have ever done any casting before so we decided not to. We will be releasing our measurements and a full parts list once the build is completed. Anyone will be able to make one quite easily.
 
If it were me I'd feel better knowing I could pop a new one out of a mold, if the master ever got damaged. Still, looks great though, hopefully it holds up to the wear and tear of con-life.
 

Thank you for sharing those pictures. It's close but doesn't look to be a perfect match. The real part on the ecu certainly looks like a camera bellow but i'm not totally convinced especially made from leather/nylon. I found a few close results for rubber camera bellows months back when I began the search. Leather or nylon seems to be the common and more preferred material for photography bellows whereas rubber seemed to be a rare specialty. I could never find a perfect match as the ribs were either too big or not enough of them. Right now i'd say my guess would be that it's some sort of cylindrical rubber bellow (not particularly for photography) cut in half, then flattened and fitted for the trap housing frame. Either that or just strips of rubber folded over itself and then glued or stapled down. If you look toward the bottom of the rubber and the frame you can see a lighter substance that looks like glue. That very well might be the method we'll end up doing.
 
Last edited:
I don't have anything useful to add, but I had to post what an awesome project this is. It will look so cool on any wall!! I've always wanted to build one, but all my room is eaten up with Doctor Who and Batman stuff. This is most excellent!!

"Generally you don't see that kind of behavior in an appliance..."
 
We've discovered a lot of things about the containment unit since my last update here. This has all really happened in the last couple of days. A lot of mysteries on parts have been solved.

First, this was brought to my attention by gbfans user ectotwinkie.

xMr2oun.jpg

This is an image taken from a 'making of' featurette on the Ghostbusters blu-ray. It's the bellow portion of the containment unit being fabricated. The mystery of the bellow has been solved. It's production made and nothing but some type of foam or rubber material that's been hot glued to wood. Woo-hoo! I'd like to know what type of material that is. Anyone have an idea? It looks to have some ridges in it and it might also be used on the sides of the unit as well.

Next, the same user and I made a discovery on the labels. They are reused on other Ghostbusters props! I made this diagram to show what other props these appear on. Now if we can only get access to hi-res images of these labels,

5YkxDTI.jpg

Ectotwinkie has been extremely helpful to our project so I decided to share all of my parts research with him because he also wants to build one. Then he shared this discovery he made with me.

10238_9842856654.jpg

This is the actual part that holds the trap housing door open. You can see it in action if you watch the scene real closely. We were amazed with his discovery and it led to something even greater!

Now, this next find was sheer dumb luck on my behalf. I've been chasing down this next part every day for over the last year. Ectotwinkie pointed me to a site where I could purchase the spring mechanism. This site also sold handles so I went browsing. I found a handle that look similar in features to the one used on the containment unit. So, I found the manufacturer and went searching. I found an almost dead ringer for the handle, but it wasn't 100% accurate. A buddy in our cosplay group offered to help search for it. He dug up a catalog where the handle was in except it was missing the jack dish. I then shared this info with ectotwinkie and he dug up the handle with the jack dish!

UhIWLbF.jpg

There it is in all its glory! We have now officially found every part to the containment unit except one...

Whatever this thing is:

4ECroCh.jpg

Anyone on here have any clues on what this part might be?

Anyways, besides the research on the parts, we've been doing a little bit on the actual build here and there. Right now we've constructed a mock prototype for the door hinge. It's going to be fabricated out of aluminum so the mock up is really just an easier way of gathering the measurements we need.

3oamTfn.jpg

We are going to start the inner workings of the door today. First it donuts and coffee... Until next update.
 
The bellows look like plain ol' round insulation foam. The ridges tend to just be discoloration from the extruder feeding a little wonky. The middle two don't have the "ridges" so it is most likely all smooth. Nice finds on all the pieces!
 
I thought to myself this morning that's it's been a long time since I gave an update to our project here on the RPF. What I didn't realize is that it's been over a year since the last?! Time does fly but luckily I am back with an update.

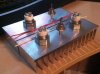
First, I want to get this out of the way since it was primarily the main focus around the time of the last update. Luckily we found several of the 3/4" red control knobs that we were desperately in search of. Also, here's a pretty shot of it with the other knobs.

GezssI2.jpgg7kF9yx.jpg

Along with finding the knobs, we also found most of the other parts that we were missing. In the last update, we stated that we correctly identified the handle for the unit. Some time went by and we were able to source one for our project. It's our belief that the handle by itself came coated with plastisol and the same version with the jack dish did not. We had no luck in sourcing the version with the jack dish so we had to go with what we could find. The plastisol was fairly easy to remove. With a heat gun, an exacto blade, some patience and some light sanding, we got the handle to look the way it should.

ei5UlcE.jpg7GgcuJQ.jpg

We are still in search of the jack dish that goes along with the handle. It is proving very difficult to locate one with the precise measurements that we need. We have a backup dish with dimensions that are close but it's a little too small for the handle. Luckily we are working with some talented people who are working on a custom one for us.

Mrr4KZ6.jpg

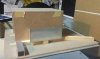
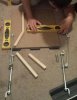
Most of the outside of the unit is completed so we've been busy focusing on the door and its inner workings. First, we constructed a mock up of the door with mdf so we could plot out and play with some measurements. Our plan is to have the door constructed out of aluminum so that the prop holds up with repeated use. During this time we only had the heat sinks and the knowledge that the square aluminum that holds the ball latch bearings was 1" to base scale on. We also built a quick mock up hero trap to use alongside with a Matty trap to aid us in determining the size. We think we did a pretty bang up job.

f742kMU.jpgBX1Ky6x.jpg
hY8qsMp.jpg

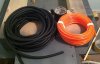
Next, we found out what the metal rods are called that hold open the door. Once we had them in hand we had to figure out where they needed to be positioned so that the door would sit as well as close properly.

lE97hQk.jpg

Now that we had things figured out, it was time to have the door constructed out of aluminum. Once it arrived it was time to work out the measurements of the trap housing all over again. Before having the door fabricated, we had to take into consideration that there is a spring loaded ball latch which keeps the door closed. We had to make sure we had the dimensions right. We were all very nervous we would receive a door where nothing would fit.

pjDolAx.jpgpHZyE0x.jpg

Here is a closer look at the inside of the frame where the ball latch meets the door frame. The latch is mounted on the inside of the square aluminum and the spring loaded ball protrudes slightly outward. You can see how close we were able to get it to the frame where it will latch into place to keep the door closed.

hTYjP1E.jpg

Here is a quick video demonstration of the door opening.


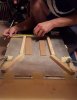
We haven't got to the part yet where we assemble the housing just yet. We have to figure out all of the greeblies that get mounted on the outside of the trap housing before we can do that. Starting with the easy stuff first, we bought ourselves some insulation foam and made a mock up to see if we could fit all of the rows in the space we allowed ourselves. Success!

moinaDc.jpg

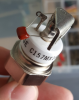
Next, we slipped up and made a huge boo-boo by misidentifying a greeblie early on. What we thought we needed were vacuum relays but ended up being a similar but different part all together. I feel completely awful about it too because they aren't cheap and some others over on gbfans bought them for their builds. Some time machine owners will know what these ones are. Also, we weren't that far off when comparing them to the relays.

The relay is on the left and the correct part is on the right:
gPZ6fLG.png

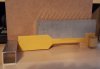
The last of the greeblies is a piece in which we have to clue as to what it is. Whenever that happens in propmaking you improvise and make your best guess as to how big and what material to go with. My own personal hunch is that I think this piece is some sort of mounting bracket for some type of electrical equipment. It also appears that the original may have been made out of brass. Well, we messed around with some measurements and made a paper mock-up to see if it would fit. Then we shot these over to a friend that is helping us and he came up with an aluminum buck. From there it was cast so that resin copies could be made. They turned out great!

W8AOPuE.jpgKQp5ULA.jpg


That just about gets the rpf caught up on our progress. We are still doing regular updates on our build thread over on gbfans.com. All the latest gets posted there first. Plus if you decide to visit, you can read about other discoveries, blunders, headaches, achievements, etc. that I didn't mention here. You can also see how we plan on presenting the unit when we take it places.

http://www.gbfans.com/forum/viewtopic.php?f=7&t=36847
 

Attachments

  • mUilaty.jpg
    mUilaty.jpg
    85.2 KB · Views: 144
  • TrnRkKQ.jpg
    TrnRkKQ.jpg
    71.6 KB · Views: 148
  • uwTkfzz.jpg
    uwTkfzz.jpg
    136.4 KB · Views: 139
  • vNEEfOJ.jpg
    vNEEfOJ.jpg
    203.6 KB · Views: 141
  • lKRbkeU.jpg
    lKRbkeU.jpg
    87.4 KB · Views: 153
  • riqbs7b.jpg
    riqbs7b.jpg
    78.5 KB · Views: 154
  • rni0BVm.png
    rni0BVm.png
    449.6 KB · Views: 174
  • eF5fjlp.jpg
    eF5fjlp.jpg
    130.5 KB · Views: 150
Last edited by a moderator:
We've discovered a lot of things about the containment unit since my last update here. This has all really happened in the last couple of days. A lot of mysteries on parts have been solved.

First, this was brought to my attention by gbfans user ectotwinkie.

View attachment 439690

This is an image taken from a 'making of' featurette on the Ghostbusters blu-ray. It's the bellow portion of the containment unit being fabricated. The mystery of the bellow has been solved. It's production made and nothing but some type of foam or rubber material that's been hot glued to wood. Woo-hoo! I'd like to know what type of material that is. Anyone have an idea? It looks to have some ridges in it and it might also be used on the sides of the unit as well.

Don't know why you other people can't see it but the bellow is clearly a cut electrical cable with two wires inside. , You can see the two wires in your picture.
That explains why you can see text on the bellow in another shot.
Maybe this picture gonna clear it up for you :
2con_soow.jpg
 
This thread is more than 8 years old.

Your message may be considered spam for the following reasons:

  1. This thread hasn't been active in some time. A new post in this thread might not contribute constructively to this discussion after so long.
If you wish to reply despite these issues, check the box below before replying.
Be aware that malicious compliance may result in more severe penalties.
Back
Top