Gombabomb
Active Member
Very excited to finally get this project to a point that is worth sharing... just took pictures today of the pile of prototypes, fails, and good prints that have been accumulating and taking up all the space on my bench.
Was given a 3D printer to test out last spring after moving as an opportunity to learn something new and improve my skills/toolset and help to me pay my rent and survive (like ya' do). Didn't know a thing about 3D modeling and had to get familiar with that before getting up to steam and printing anything worthwhile... but the first thing I ambitiously tried to model was the Mini Nuke from Fallout, one of my favorite series and one of those items that you see in game and instantly want to have on your shelf. There were plenty of places you could snag a free papercraft version, but they were just unfolded game models of the same resolution/polycount. While still cool, I though it would be more awesome to have one that looked "real".


Seemed simple enough, but proved too complex to continue with early on with such little experience and getting to know the program so it got put on hold until I had enough "aha" moments (and people saying "shut up and take my money") to try again. Went through many iterations and size/proportion tweaks before it looked anywhere near right...

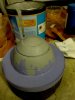
On the left is an unsanded PLA print and a sanded primed one of the nukes (this was probably the 3rd "version" since starting and the second version to make it as far as printing). It was modeled in tinkercad from scratch using a couple of screenshots and done entirely by eye. Unfortunately that was more or less the smoothest tinkercad's non-scripted round shapes could manage... The one on right is after many hours with a heavy wood-rasp and back and forth sessions of high build filler-primer and sanding to eliminate the vertices and get a smooth surface (all of this was done sitting outside in the snow because I didn't want auto-body filler dust in my house and had no where else to work). This version was split into 3 parts: the body, the stabilizing ring, and the fins (x-shaped and slides in through bottom). Learned after the first print that had the body and fins together that it was hell to sand it with the fins sticking out without breaking them...because I broke them. Modeled the screws onto it (see on black one) which ended up completely sanded off... tried to fix by drilling holes to put real screws in but made them too big and was too frustrated to patch them, plus not entirely happy with overall shape and accuracy in places after finding better references... ended up tossing them both in the "i don't even" pile since other things had come up at the time.
After a few months and much more experience with tinkercad, decided to do another scratch redesign that was closer to the in game model but done in a way that would print easier and be less difficult to smooth and finally paint. Ended up redesigning two more times from scratch because I learned so much each time.

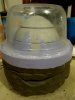
This was the next attempt, which looked moderately okay on screen but really off once printed. Also forgot to rescale it before printing so it was really small. Tried to make a more streamlined shape instead of an oval but it looked completely wrong. Only improvements were "countersunk" holes for inserting real screws, and making the turbine in the end. Because of the rounded nose and the complexities of the bottom it ended up being split into top and bottom (holding it together here).
Back to the drawing board!

As I made each version I would copy and paste it into a lineup to compare to the previous ones and work from there...
Leftmost is the early model that was printed, next to it is the newest one, and 3rd is the wonky one from above. Putting the one I'm working on in between to others helps me see where it needs to change. Thing on the right was a conglomerate of crap that I would copy-pasta parts onto to test.


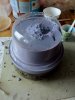
Fixing the nose here. Showing turbine "fan" in bottom.

Thing about tinkercad is I don't know how to use scripts so everything is assembled from modified primitives and negative shapes. And when combining and ungrouping multiple shapes it turns into something like this until poor tinkercad can process the horrifying number of shapes I burdened it with. :facepalm

Final version assembled, and all of the parts laid out. Time to get printing!
Was having endless technical trouble with the printer especially with the spool jamming and printing air halfway into builds... resolved by switching to higher quality filament. Now I could trust the printer to run unsupervised unlike before which is a major plus since all of the parts for this build totaled close to 12 hours (had to abort and reprint a couple parts here and there because settings were not right).

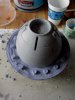
So then operator error was the only major issue. Last part printed was the nose which I started before going to bed.. pried it off the plate in the morning and put the thing together and noticed something was not entirely right here...

Forgot I had scaled up the other parts slightly to make the dimensions nice even numbers. 3 Hours later the resized part was done.


Here's the final version with a pile of prototypes and my horrible little workspace.
The stabilizing ring looks a little off proportion-wise in the photos because of the camera's barrel distortion... The first one is the best representation of the size. It ended up being a fraction over 7" high and 4" diameter (designed metric and had to scale to something nice and even in inches because reasons). The rocket in the background of the leftmost photo was a simpler print that I decided to test out the mini nuke's intended paints on as practice. Now to glue the two halves together and start sanding!


Here's a lineup of the 3 versions for comparison (because one ain't enough and two is too low). And then the VERY first one I printed and "finished" compared to the final. Yes the paint is inexcusably bad and the wrong colors, trust me I'm better now haha. There's also a naval mine and a huge rocket from Loadout that you can kinda see in the works here too... Sea mine is a commission with a tight due date but the mini nuke will resume once that's shipped out.
More updates as they come. Lemmie know what you think! The first completely finished one already has a buyer but I plan on molding and slush casting the main body of it and printing the fins/ring/turbine for each new one to make it easier on me rather than smoothing all of the parts by hand for each one. This is my first detailed build log here and hope i'm doing it right... tried to be brief but failed miserably. With the next updates will try to let the pictures do the talking instead of building a wall of text. ha ha. : )
- Dreggs
Was given a 3D printer to test out last spring after moving as an opportunity to learn something new and improve my skills/toolset and help to me pay my rent and survive (like ya' do). Didn't know a thing about 3D modeling and had to get familiar with that before getting up to steam and printing anything worthwhile... but the first thing I ambitiously tried to model was the Mini Nuke from Fallout, one of my favorite series and one of those items that you see in game and instantly want to have on your shelf. There were plenty of places you could snag a free papercraft version, but they were just unfolded game models of the same resolution/polycount. While still cool, I though it would be more awesome to have one that looked "real".
Seemed simple enough, but proved too complex to continue with early on with such little experience and getting to know the program so it got put on hold until I had enough "aha" moments (and people saying "shut up and take my money") to try again. Went through many iterations and size/proportion tweaks before it looked anywhere near right...
On the left is an unsanded PLA print and a sanded primed one of the nukes (this was probably the 3rd "version" since starting and the second version to make it as far as printing). It was modeled in tinkercad from scratch using a couple of screenshots and done entirely by eye. Unfortunately that was more or less the smoothest tinkercad's non-scripted round shapes could manage... The one on right is after many hours with a heavy wood-rasp and back and forth sessions of high build filler-primer and sanding to eliminate the vertices and get a smooth surface (all of this was done sitting outside in the snow because I didn't want auto-body filler dust in my house and had no where else to work). This version was split into 3 parts: the body, the stabilizing ring, and the fins (x-shaped and slides in through bottom). Learned after the first print that had the body and fins together that it was hell to sand it with the fins sticking out without breaking them...because I broke them. Modeled the screws onto it (see on black one) which ended up completely sanded off... tried to fix by drilling holes to put real screws in but made them too big and was too frustrated to patch them, plus not entirely happy with overall shape and accuracy in places after finding better references... ended up tossing them both in the "i don't even" pile since other things had come up at the time.
After a few months and much more experience with tinkercad, decided to do another scratch redesign that was closer to the in game model but done in a way that would print easier and be less difficult to smooth and finally paint. Ended up redesigning two more times from scratch because I learned so much each time.
This was the next attempt, which looked moderately okay on screen but really off once printed. Also forgot to rescale it before printing so it was really small. Tried to make a more streamlined shape instead of an oval but it looked completely wrong. Only improvements were "countersunk" holes for inserting real screws, and making the turbine in the end. Because of the rounded nose and the complexities of the bottom it ended up being split into top and bottom (holding it together here).
Back to the drawing board!
As I made each version I would copy and paste it into a lineup to compare to the previous ones and work from there...
Leftmost is the early model that was printed, next to it is the newest one, and 3rd is the wonky one from above. Putting the one I'm working on in between to others helps me see where it needs to change. Thing on the right was a conglomerate of crap that I would copy-pasta parts onto to test.
Fixing the nose here. Showing turbine "fan" in bottom.
Thing about tinkercad is I don't know how to use scripts so everything is assembled from modified primitives and negative shapes. And when combining and ungrouping multiple shapes it turns into something like this until poor tinkercad can process the horrifying number of shapes I burdened it with. :facepalm
Final version assembled, and all of the parts laid out. Time to get printing!
Was having endless technical trouble with the printer especially with the spool jamming and printing air halfway into builds... resolved by switching to higher quality filament. Now I could trust the printer to run unsupervised unlike before which is a major plus since all of the parts for this build totaled close to 12 hours (had to abort and reprint a couple parts here and there because settings were not right).
So then operator error was the only major issue. Last part printed was the nose which I started before going to bed.. pried it off the plate in the morning and put the thing together and noticed something was not entirely right here...
Forgot I had scaled up the other parts slightly to make the dimensions nice even numbers. 3 Hours later the resized part was done.
Here's the final version with a pile of prototypes and my horrible little workspace.
The stabilizing ring looks a little off proportion-wise in the photos because of the camera's barrel distortion... The first one is the best representation of the size. It ended up being a fraction over 7" high and 4" diameter (designed metric and had to scale to something nice and even in inches because reasons). The rocket in the background of the leftmost photo was a simpler print that I decided to test out the mini nuke's intended paints on as practice. Now to glue the two halves together and start sanding!
Here's a lineup of the 3 versions for comparison (because one ain't enough and two is too low). And then the VERY first one I printed and "finished" compared to the final. Yes the paint is inexcusably bad and the wrong colors, trust me I'm better now haha. There's also a naval mine and a huge rocket from Loadout that you can kinda see in the works here too... Sea mine is a commission with a tight due date but the mini nuke will resume once that's shipped out.
More updates as they come. Lemmie know what you think! The first completely finished one already has a buyer but I plan on molding and slush casting the main body of it and printing the fins/ring/turbine for each new one to make it easier on me rather than smoothing all of the parts by hand for each one. This is my first detailed build log here and hope i'm doing it right... tried to be brief but failed miserably. With the next updates will try to let the pictures do the talking instead of building a wall of text. ha ha. : )
- Dreggs


 opcorn