Athanasios
Active Member
UPDATE!
I've started working on a new version, better, more accurate, and more detailed! You can find it here.
Okay, back to the old build.
================================================================
Hello all.
So this is my first new thread.
 Never done this before, and I hope I'm not breaking any rules. Let me know if there's something I need to know/do so I don't make any serious mistakes!
 Anyway, I decided a few months ago (before the summer, actually), that I wanted to make a costume based off of Ezio's Brotherhood suit (the Ebony version), because I've always liked the Assassin's Creed series, and especially that suit. So I started making it, basing it mostly on the NECA figure I had. It hadn't even occurred to me to look at the verious hyper-realistic renders of Ezio (albeit in the white "classic" suit), until much, much, later, to my regret.
Anyway, I started making it, and in my excitement and intense focus on what I was doing I completely forgot to take MANY in progress pics along the way, so there are actually many steps missing, unfortunately. Anyway, I'll try my best to fill in what I've not shown, explaining to you guys what I've done.
As always, I'm open to suggestions, and I would love some advice on how to improve, what I could do better, tips, etc. This is, after all, my first costume (the first one I've made entirely by myself, that is).
Here's a pic of the finished costume, by the way
The rest of the pictures are on the second page.
Ooookay, so here we go.
I'm going to post a lot of pictures, and I'm probably going to extend this thread quite a bit. It will also take me a while to write up, since we're talking over 200 hours of work here so far.
Anyway, I started with the basic robes. I searched online for a doublet pattern, and after measuring myself to ensure a perfect fit, I went ahead and make the doubled out of some very nice fabric I had picked up from Jo-Ann's when I was in the States. I can't remember what it's called at the moment, but it's kind of thick, and has about 30% stretch.
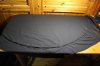
Here are some pics of the finished doublet (as I said, I completely forgot to take progress pics):
(I think you can click on each picture to enlarge it, if you want a closer look - but I'm keeping everything at max 600 pixel width, because I don't want to fry all my broadband
)


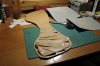
After finishing the doublet, I decided the best and most straightforward idea would be to simply attach the robe tails directly to the doublet, making it one piece. No one can see what's going on under that ridiculously oversized belt buckle and sash, so I decided I would just sew them on underneath the doublet. I prepared the pieces, using patterns I drew up myself (as you can see they are more curved than Ezio's original suit - I preferred this look.) I also didn't add the red trim because I felt there was too much red. Also, for the front panels, I kept to the color scheme of Ezio's white suit (going from largest panel to smallest - white, red, white) versus his ebony version (again, largest to smallest - black, red, red). I simply replaced the white with black, so had a color scheme going black, red, black, as in the pictures below.


(The first two pictures are the back panels, the third picture shows the front panels, and the color scheme I was talking about.)
Okay, so first I sewed the back panels on. It was actually quite difficult getting them lined up nicely - and in the end, I was sewing through more than 8 layers of this already thick fabric. It was quite a stretch for my poor sewing machine


It was looking pretty good, I though, so I decided to go ahead and sew on the front panels as well.
Man.
If I thought that the back ones were difficult, the front ones were even worse! At least with the back I could just lay the doublet out flat and fit them underneath. But suddenly since the front is open, I had to try and get them lined up straight each one on its own. Long story short, it took a while, but I got it done. I sewed them all in place.
I think this is a good time to mention that each panel is double-layered. I cut a double-piece and folded it over on itself, tucked in the edges, and sewed a double seam (with a single needle, so essentially I had to go over it all twice) all around. The double layer (and now quadruple at the edges) helped add to the weight of the panels and kept them hanging nicely. I also Ironed them before I sewed them on, which really helped them fall nicely. I definitely recommend ironing anything that has to fall straight - it really helps do a great job. I'ts been over 5 months now since I've ironed them, and even though it's been essentially hanging for all this time, I have still worn it, folded it, rolled around in it, etc. and they are still keeping their great shape. So, definitely recommend ironing.
Anyway, I sewed them on to the front, and was also pretty pleased with the overall result so far.


No, I don't think Ezio ever wore slippers. But then he never made his clothes either, so get off my case!
So the main robes were almost done. Time to make the hood.
So the hood has been a large source of controversy, because its shape is so unique and it seems very few people actually get it right. Usually, it ends up looking like a giant ring around the person's head, completely mis-shapen and just not looking very nice. Which is completely understandable. The hood is INCREDIBLY difficult, and not only that; but it's also not intended for fabric. Looking closely at the promo art, you can see that his "clothes" are actually made of leather. Soft, thin, leather. Maybe gazelle or something, I don't know. But leather is much heavier than fabric, and falls differently. Who knows, there is even a chance that it falls better with less effort.
In any case, I decided that I cared more about how not bubbly my hood was than how accurately it was attached to the robes, so I opted for a very slim shape, and decided to sew it INSIDE the collar, as opposed to OUTSIDE the collar. This allowed me to bypass the hood problem entirely, although I inevitably sacrificed the classic "A" shape. Nevertheless, I also don't (like, ever) have to worry about it falling off, because it fits very snugly.
I found a picture of a pattern online, (I forget who's it was), and based on the picture I drew up my own similar pattern, which I edited until I got the shape I wanted. I ended up making three hoods.
I first made a mock-up of the hood using some cheap fabric I had to finalize the overall shape and get it looking the way I wanted.
Then I made an entirely black version.
Finally I made a version with red lining, but that (at least in the beginning) could be flipped inside out to create a red hood with black lining.


I'm missing a picture of the finished third hood... eh, it doesn't matter, you'll see it in the final costume anyway
Anyway so without the hood, after a solid (I think it was 2 weeks) of work, here's what we have (minus the hood... for some reason).

Because I was originally intending on making a costume BASED on Ezio, rather than OF Ezio himself, I simply bought a pirate-type shirt (the kind with poofy sleeves) and was going to use that as an undershirt. It was looking pretty good, so why not?)
Having brought the suit to a satisfactory level (for the time being, I thought), I felt it was time I moved on to the leather armor.
I had decided from the very beginning that I wanted my suit to be as "real" as possible.
This meant no fake leather, no thin, cheap fabrics, and new plastic/clay/whatever parts. Even if you can achieve a very real looking effect with those materials, and I've seen some pretty awesome costumes utilizing those techniques, I decided against it.
However, I said, leather is expensive. So let's "cheat" anyway, and by some thin leather, from which we'll cut double-layer pieces lined with stiff paper to add thickness and strength.
So I did that. I went and bought some cheap, thin leather, and started working on it.


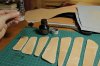
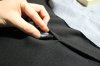
So what I did was I found an online pattern of Ezio's vambrace (from AC:II), and used that as a template. I decided brown would be the inner layer, and black the outer layer. So I cut 8 pieces of leather, 2 for each layer.
The idea was that the larger pieces would be folded over the paper and smaller leather pieces and then sewn around the edges to create the final layer.
I don't seem to have any pictures of the paper, unfortunately... although I though I had them somewhere. Anyway, the sewing machine couldn't puncture leather; I needed a special 500 euro (and more) machine to do this job, and since I had a VERY limited budget, no WAY could I afford a machine like that... not even a used one. Hell, I couldn't even afford a machine that was broken.
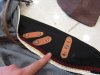
So I took it to the leather guys down town who were able to sew it for me, and who gave me some great tips on working with leather. Really helpful, nice people. They actually allowed me to hang out in their shop and work. (Little did I know just how much time I would end up spending there later on....)
Anyway, so I got the vambraces finished, and yeah I was pretty proud of myself. First leather project? Lookin, good, right?
(Looks like I've reached my cap for picture posting... the rest will be continued on another post.)
Last edited by a moderator:


.jpg")
.jpg")


.JPG")
.JPG")
.JPG")


