Okay, I haven't actually completed a model in something like 20 years now. I'm still buying kits, tools, paint, scratch building supplies, and all that sort of thing, I just haven't done more than get a start on a model since time unremembered.
But it is time for me to start back up, and I'm starting with a Kenner Collector's Fleet Rebel Blockade Runner.
I know. It isn't a model, it is a toy. Please don't report me and have me banned, okay?")
The plan is to do some minor modifications and a repaint and use it in X-Wing Miniatures games. Here's a couple of "before" pictures:


Those of you who have seen the X-Wing Miniatures game minis know that they are pretty high quality for mass-produced pre-paints, so you'll probably understand why I cannot bear to have my RBR equipped with the soft-edged, cartoonish looking guns and sensors that Kenner Shipyards installed. I also wanted to get rid of the dark gray buttons that control the installed electronics:

So I started by flipping it over, taking off the battery cover, taking out all of the screws I could find, and trying to open it up. Unfortunately, it seems that the engine assembly is glued together or something, because it won't come apart. I was able to pry open the front enough to take out the screws holding the guns in, as well as the screws holding the board the buttons are installed on, but I couldn't get to the screws holding the sensor dishes in place. My plan was to cut them off, so I wedged an X-Acto #26 blade between the fuselage and the dish, and started trying to cut. That provided enough leverage that the screw inside loosened up, and I was able to just unscrew the dish. That worked for both top and bottom, so now the details I plan to replace have been removed:

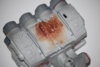
Meanwhile, I was running a test on stripping the paint. I took the battery compartment door off, sprayed it with some oven cleaner, and let it sit for about 25 minutes. The result was a difficult to remove brown coating. I scrubbed at it with a plastic pot scrubber for about 10 minutes and managed to remove some of it, but just enough to make it look like I had done a light drybrush with gray paint:

(It is more brown and less red in real life, otherwise I'd claim I had discovered a new surface rust technique... Also, obviously the battery cover has been re-installed on the body for this photo.)
If anybody has any suggestions for what might work to remove the existing paint, I'd like to hear them. If not, I might just end up painting over the existing paint. That's not my first choice, but the ship IS destined for a gaming table, not a display case, so if the paint is a bit thick I think I can live with it.
But it is time for me to start back up, and I'm starting with a Kenner Collector's Fleet Rebel Blockade Runner.
I know. It isn't a model, it is a toy. Please don't report me and have me banned, okay?
The plan is to do some minor modifications and a repaint and use it in X-Wing Miniatures games. Here's a couple of "before" pictures:
Those of you who have seen the X-Wing Miniatures game minis know that they are pretty high quality for mass-produced pre-paints, so you'll probably understand why I cannot bear to have my RBR equipped with the soft-edged, cartoonish looking guns and sensors that Kenner Shipyards installed. I also wanted to get rid of the dark gray buttons that control the installed electronics:
So I started by flipping it over, taking off the battery cover, taking out all of the screws I could find, and trying to open it up. Unfortunately, it seems that the engine assembly is glued together or something, because it won't come apart. I was able to pry open the front enough to take out the screws holding the guns in, as well as the screws holding the board the buttons are installed on, but I couldn't get to the screws holding the sensor dishes in place. My plan was to cut them off, so I wedged an X-Acto #26 blade between the fuselage and the dish, and started trying to cut. That provided enough leverage that the screw inside loosened up, and I was able to just unscrew the dish. That worked for both top and bottom, so now the details I plan to replace have been removed:
Meanwhile, I was running a test on stripping the paint. I took the battery compartment door off, sprayed it with some oven cleaner, and let it sit for about 25 minutes. The result was a difficult to remove brown coating. I scrubbed at it with a plastic pot scrubber for about 10 minutes and managed to remove some of it, but just enough to make it look like I had done a light drybrush with gray paint:
(It is more brown and less red in real life, otherwise I'd claim I had discovered a new surface rust technique... Also, obviously the battery cover has been re-installed on the body for this photo.)
If anybody has any suggestions for what might work to remove the existing paint, I'd like to hear them. If not, I might just end up painting over the existing paint. That's not my first choice, but the ship IS destined for a gaming table, not a display case, so if the paint is a bit thick I think I can live with it.
Attachments
Last edited: