Hello all,
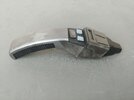
First crack at a replica prop and I've gone with a ST:VOY Type 2 phaser. I've called it done at this point, it passes the 6ft test but definitely a first model with alot of learning points.
I've started by resin 3d printing all the parts (model isn't mine, came from Thingiverse) . And here is my first learning point. While I've been 3d printing for some time, I'm very new to resin printing, so I'm still learning how to optimise the settings to get the best outcome. With this I made 2 errors, first I made the supports too thick, and I removed them the wrong way - this left bumps and pitting all over parts of the model.
.jpg")
I've the attacked it with sandpaper and modelling putty to try and solve some of the bumps and pitting. Definitely had some success, but not nearly as much as I wanted. I suspect I'm not using the modelling putty correctly (thinning it too much or something similar) because despite multiple coats, I wasn't able to fill some of the holes.

In the interests of time (and life getting in the way) I pushed forward. I gave everything a airbrushed black primer coat before airbrushing the individual colours on as required before finally gluing it together.
Second major lesson here - the Vallejo black primer doesn't bond perfectly with the resin 3d print and can be removed with masking tape.

It got a couple of coats, with sanding inbetween before I glued everything together.
Also use the right glue, don't just use modelling cement because that's the only thing you've got lying round and realise too late that it will eat away at the paint.....

Given the failures I had and the end result, I decided not to go ahead (at least at the moment) with weathering it, instead focusing my time on other things.
Overall I'm happy with it, it is a nice thing to have on my desk at work as a conversation piece and I suspect I'm the only one who is going to look as critically at it as I am doing.
Was definitely a fun first hit out and learning experience though!
First crack at a replica prop and I've gone with a ST:VOY Type 2 phaser. I've called it done at this point, it passes the 6ft test but definitely a first model with alot of learning points.
I've started by resin 3d printing all the parts (model isn't mine, came from Thingiverse) . And here is my first learning point. While I've been 3d printing for some time, I'm very new to resin printing, so I'm still learning how to optimise the settings to get the best outcome. With this I made 2 errors, first I made the supports too thick, and I removed them the wrong way - this left bumps and pitting all over parts of the model.
I've the attacked it with sandpaper and modelling putty to try and solve some of the bumps and pitting. Definitely had some success, but not nearly as much as I wanted. I suspect I'm not using the modelling putty correctly (thinning it too much or something similar) because despite multiple coats, I wasn't able to fill some of the holes.
In the interests of time (and life getting in the way) I pushed forward. I gave everything a airbrushed black primer coat before airbrushing the individual colours on as required before finally gluing it together.
Second major lesson here - the Vallejo black primer doesn't bond perfectly with the resin 3d print and can be removed with masking tape.
It got a couple of coats, with sanding inbetween before I glued everything together.
Also use the right glue, don't just use modelling cement because that's the only thing you've got lying round and realise too late that it will eat away at the paint.....
Given the failures I had and the end result, I decided not to go ahead (at least at the moment) with weathering it, instead focusing my time on other things.
Overall I'm happy with it, it is a nice thing to have on my desk at work as a conversation piece and I suspect I'm the only one who is going to look as critically at it as I am doing.
Was definitely a fun first hit out and learning experience though!