Bowcaster build

propmainiac

Sr Member
RPF PREMIUM MEMBER
Hi All
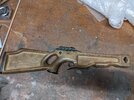
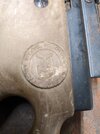
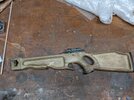
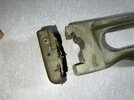
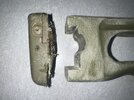
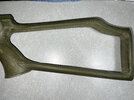
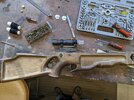
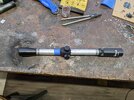
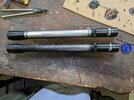
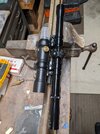
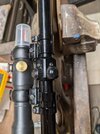
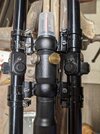
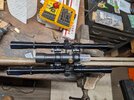
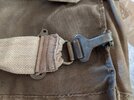
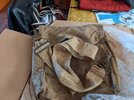
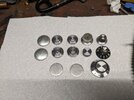
Picked this up on ebay for under 300 bucks! Horton safari magnum. Couldnt pass this up. Spent a couple of hours doing research mainly about the knobs and whats available. Made a list of what i need and gonna start gathering parts
 

Attachments

  • PXL_20221015_223910914.jpg
    PXL_20221015_223910914.jpg
    3.8 MB · Views: 101
  • PXL_20221015_224003262.jpg
    PXL_20221015_224003262.jpg
    2.2 MB · Views: 114
  • PXL_20221015_224014223.jpg
    PXL_20221015_224014223.jpg
    3.4 MB · Views: 100
Ive been pouring through other bowcaster builds and im a little stumped at how the bow will attach. I believe i cut the front off leaving a notch where the bow will sit. I see no bolt hole in that area. Do i drill into the body and thread a bolt in? Just asking cause want to do this the right way
 
Ive been pouring through other bowcaster builds and im a little stumped at how the bow will attach. I believe i cut the front off leaving a notch where the bow will sit. I see no bolt hole in that area. Do i drill into the body and thread a bolt in? Just asking cause want to do this the right way
Exactly like that.

The Safari has a hole at the front (which you cut away), which connects to the plate that secures the prod. Since you cut the front of the Safari´s body away, you need to drill another hole for attaching the front barrel support.

Check Blasterfactories recent pics and videos to see, how it´s done
 
Doing the same. I made cuts based on my understanding of the width of the prod. (After conferring with Markus and others). Hopefully I didn't make a mistake and take too much. Now in the process of squaring everything up with a flat file and sanding block. Then will fill the half-moon shaped depression with putty (along with the other holes) and then will continue filling and sanding before priming. If I didn't take enough, I can always go back. If I took too much...well...it will become less a replica, and more a personal experience.

As to the best method to cut the plastic. I used an angle grinder to cut off the front and different sized paddle bits to drill the radii/corners of the "inset" plastic in the front and in the stock area. That works fine but where I made my mistake was I should have used a scroll saw or band saw or something to cut the rest to get straight lines. Instead I drilled a series of holes with the same paddle bits, and then used various sanding/filing to get the lines straight. Too labor intensive, and difficult to make consistent/even. That said, a couple of skim coats of putty will go a long way to covering mistakes. I'll also use some to build up areas that need it.
 

Attachments

  • image_67161601.JPG
    image_67161601.JPG
    2.6 MB · Views: 72
  • image_67166721.JPG
    image_67166721.JPG
    2 MB · Views: 87
  • BC Stock In Progress.jpg
    BC Stock In Progress.jpg
    2 MB · Views: 73
So here's a question. The scope attachment for the Horton Safari is a little different than the one for the Horton Magnum and all of the replica bowcaster parts. First picture Bowcaster (presumably from all metal Magnum). Second picture Safari. The scope mount on the Safari looks the same, has the four tabs, etc, but it sits in a metal u-channel. It is spring loaded and locked into place by tightening the flat pan head screw on the side. More importantly it DOESNT have the cut out and the thumbscrew adjustment wheel that the Magnum has. So no place for the screw at the back of the barrel mount/brackets to fit across and hold the barrel mount in place.

Propmaniac, I think you are going to have this same issue. What to do? I mean I could cut the u-channel off of the top of trigger cover, pull the scope mount off, and cut it to match the Magnum one. And then some how re-affix the scope mount directly to the trigger cover adding a fake thumb wheel? Markus, did you encounter this issue with your Safari?

Anyone solution this?

s
Scope Rail 2a.jpg


2. Safari:
unnamed2.jpg
20210418_232744.jpg
 
I would simply just drill a hole and pass the screw through. If you're worried about keeping it as original as possible then you would have to fabricate a scope mount with the notch cut out at the back so that you could pass the scope through. Just kicking out ideas here
 
Hi all got my scratch built single point mounted. Used some scope rings i bought on amazon. I made a mistake with the size of the scope ring mount .had to make an adaptor mount from aluminum. I then tapped the two small holes in the horton scope mount and attached my plate.
 

Attachments

  • PXL_20221017_195304394.jpg
    PXL_20221017_195304394.jpg
    3.2 MB · Views: 70
I would simply just drill a hole and pass the screw through. If you're worried about keeping it as original as possible then you would have to fabricate a scope mount with the notch cut out at the back so that you could pass the scope through. Just kicking out ideas here
Yeah, I think you are probably right. The side "plates" are going to cover most of it anyway.
 
Exactly like that.

The Safari has a hole at the front (which you cut away), which connects to the plate that secures the prod. Since you cut the front of the Safari´s body away, you need to drill another hole for attaching the front barrel support.

Check Blasterfactories recent pics and videos to see, how it´s done
Thx MarKus............... i have parts and pieces along with the complete metal build.. this might help with finding all the greeblies.......

 
That is very helpful and it shows me exactly how this piece attaches mine's a little different I may have to notch the back out once I make my parts and attach the screw as you have it in the picture.
So sometimes where I think it's going to be easy to do something or these builds is when I run into trouble. I was working out how to set up my scopes for the bowcaster and realize the new scopes that I bought are too short. I bought these cheapy ones from Amazon cuz they were close in appearance and the price was right The description said they were 11 in long that is incorrect they're about 10 and a half to 10 and 3/4. So what to do? I pretty much disassembled as much as I could of the new scopes. I then cut the threaded end off of the new scopes with a pipe cutter as well as the end piece that does not unscrew. I then cut a piece of aluminum tubing that I had that was the right outer diameter. Made some measurements and with the help of some JB weld created a scope that was the right length. Now this will not function as a scope anymore but lengthwise it will be correct. Tomorrow I will buy some gloss black paint paint it up and we'll see how it looks. I spent about 20 bucks on the scopes so I really didn't lose anything by doing this. I'm still keeping an eye out for some vintage scopes that have the right look and the right length. Trying to do everything on a budget here I know finding the original scopes that are supposed to be on here going to be rather expensive so this is my alternative
 

Attachments

  • PXL_20221023_191255531.jpg
    PXL_20221023_191255531.jpg
    4 MB · Views: 65
  • PXL_20221023_183254824.jpg
    PXL_20221023_183254824.jpg
    3.6 MB · Views: 57
Found an ASI brand 4x15 scope with the correct mounts! Also picked up another vintage scope that will work for my scope array. Mounted it with the correct rings and heres how it looks. The homemade singlepoint is just a stand in for now.
 

Attachments

  • PXL_20221103_010351233.jpg
    PXL_20221103_010351233.jpg
    2.4 MB · Views: 69
  • PXL_20221103_010418097.jpg
    PXL_20221103_010418097.jpg
    2.2 MB · Views: 66
Both scopes installed and vintage scope rings
 

Attachments

  • PXL_20221103_221333903.jpg
    PXL_20221103_221333903.jpg
    2.6 MB · Views: 54
  • PXL_20221103_221317245.jpg
    PXL_20221103_221317245.jpg
    2.5 MB · Views: 51
Just some updates. I have a set of imperial discs, fender knob, rca plug, and generic stereo knobs on the way.. i have a line on an original strap as well. Hoping to get a zorki knob and a kodak knob as well. Waiting to get most of the knobs then i will start making the parts i cant get
 
Hi all. Still gathering parts. These just arrived fresh out of the box. Vintage Zorki camera and vintage Kodak camera
 

Attachments

  • PXL_20221116_223616314.jpg
    PXL_20221116_223616314.jpg
    2.4 MB · Views: 49
This just arrived today. A rare ww2 gasmask bag. Also happens to have the correct shoulder strap for the bowcaster. Missed out on one on ebay. Someone got a steal. Waiting on coiled wire, rca plug and two more imperial discs. One more peice of the puzzle
 

Attachments

  • PXL_20221126_131313292.jpg
    PXL_20221126_131313292.jpg
    2.5 MB · Views: 72
  • PXL_20221126_131304070.jpg
    PXL_20221126_131304070.jpg
    3.4 MB · Views: 56
  • PXL_20221126_131345886.jpg
    PXL_20221126_131345886.jpg
    2.7 MB · Views: 66
  • PXL_20221126_131407174.jpg
    PXL_20221126_131407174.jpg
    3.3 MB · Views: 55

Your message may be considered spam for the following reasons:

If you wish to reply despite these issues, check the box below before replying.
Be aware that malicious compliance may result in more severe penalties.
Back
Top