Your suit is looking great! As far as your cape concerns, I think I understand what you're saying - it does feel like it's closing a bit too much in the front. That or the whole thing is shifted too far forward - hard to tell. Do you have a photo with your arms at your side?
You mentioned your cape is 8 panel, but is its shape a full circle when laid out flat? If you imagine a circle divided into 9 sectors, the cape would be made up of 8 of them, with the 9th sector missing. The edges of the cape should only hang alongside the width of the chest emblem with no overlap behind it. To me your cape almost looks like it would close completely if laid out flat or allowed to hang with your arms down.

89 and Returns originals used a harness system to lock the cape and cowl to the suit and all in proper alignment with each other. The undershirt harness is worn under the suit, and fixes to the suit at the emblem, as do the cape closure plates and emblem flap on the cowl.
There's a really great explainer and tips for a simple cape harness build here (click). The cape has tabs that extend into the missing sector under the emblem as seen on this Returns suit:


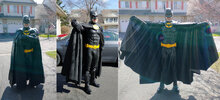
This Propstore 89 suit has another style of cape (not sure if this is a stunt or lightweight version, or assembled from leftover unfinished parts?). It doesn't use a harness so this seems more like yours. No idea how the various parts of this example would have been fixed in place for the movie other than maybe glue, but note again how the cape closure is sized to keep the width of the opening equal to the width of the emblem.


If you can get your cape positioned around the emblem as above, I'm thinking that will improve the look of your suit - even if the cape ends up bunched in the back a little. Maybe add some velcro behind your cowl flap to hold that flat against the chest armor and cape? Not sure what's current best practice here for fanmade suits without the harness.
If you can't make it work out and want to make your own cape, a quick and relatively cheap way is to follow the diagram above, but instead of sewing triangular panels together, use a 132" round banquet tablecloth as your base. Using a polyester tablecloth, the cape ends up a little loud and rustle-y, but the polyester doesn't stretch and supports the latex coating well. I'm curious if a satin tablecloth base might be quieter and even lighter but I haven't tried it.
You'll need the tablecloth and some black liquid latex (a gallon is enough). Monster Makers Black Bat is great:
After ironing out any creases from it being folded, spread the tablecloth out in a large flat area (like a garage). Follow the diagram above and lay out your 9 radial points and scallops with chalk - you'll cut out the missing panel and neck hole, leave some extra fabric as a seam allowance and then use a sewing machine to hem the cut edges. If you are good with a sewing machine you might also want to sew in false panel seams along the radial lines to the points. I left a little room in my front vertical hem to hold removable fiberglass rods for cape spreading as in the opening scene.
Since you don't have a harness system, you might also use extra fabric to make and sew flaps above the emblem as a closure, similar to the 89 suit above. Maybe some velcro to hold the flaps together and aligned with the cowl/emblem?
Then spread it out flat again and use a paint roller to apply the black liquid latex. The texture will be a little bumpier than the inverse pleather texture of the original (IIRC originals were liquid latex sprayed onto pleather and backed with wool fabric, then peeled up), but it will work well enough in a pinch. Make a cardboard guide and use a rotary blade to cut the scallops; no need to hem as the latex coating will prevent fraying. Don't forget to dust the latex with baby powder to prevent it from sticking to itself and that's all!