Bonus pic: I was thrift shopping and came across some very hobbity clothes. So, today, I took a short break and built my next year's Hobbit Bday outfit....

20231204_150817.jpg


I told my wife that I only needed some Hobbit feet and it is done. She said "No, honey, you ARE done. You've ALWAYS had Hobbit feet."
 
My measurement app shows the distance from the notch at end of the bow to the beginning of the leather is 1.5 inch and the leather is 4 inches long from one braid ring to the other. The leather in between is wrapped in one layer and stitched on the front of the bow.

20231206_190053.jpg
 
20231205_220031.jpg


5 cord braid...

20231205_220035.jpg


Other than paint, that center grip is done. I started and finished the two end areas by placing a 4 inch long section of faux leather around the bow. Starting at 1.5 inches from the notch. I stitched this section and then glued braid around both ends. It is now first coat painted and hanging to dry. Touchup paint tomorrow and then only the bowstring is left.

20231206_194303.jpg
 
I picked up a pair of faux leather brown pants at thrift and cut off one leg.

20231207_184106.jpg


I pulled this onto my quiver and continued to sew a parallel seam to make it smaller. Because faux leather is generally elastic when used for pants, I had room for adjustment and could make it smaller on purpose so it would stretch to fit. If you are new to sewing, remember that you turn the pants inside out to sew the seam


20231207_184201.jpg


I need to color a top and bottom section and then add straps. This fake leather pants trick was cheap and easy.

The bottom edge was already rolled and hemmed because.... they were pants. Hurrah!!
 
The top has an extra layer so I am folding the existing sheath of leather over itself and then back up. I will glue this section in place and will color the two sections differently to enhance the line between.

20231210_153551.jpg
20231210_153627.jpg
20231210_153204.jpg
 
Painted, and then clear coated to kill the tacky/sticky. String to go yet.

20231210_200900.jpg


Not perfect but looks good at specific angles so is pose worthy now.
 
Last edited:
And after a few light washes in acrylic leather paints. I did tape off the sections with blue painter's tape.

20231210_224548.jpg
and the comp from a poster...


Bard-the-Bowman-bard-the-bowman-37670604-1920-1200.jpg
 
Just a pointer: The acrylic "leather paints" that were brushed on, not spray can paints, did not have the issue with tackiness that the sprays did. However, this was also on faux leather pants and not the faux leather boot covers from the sticky paint issues on the bow. It could be that one is rubber and the other pvc. I cannot confirm but will test some brush-on paint, on the boot cover material, and will post the results.
 
Updated 12/12/23: My measurement app shows the quiver belt to be 1 inch wide.
Screenshot_20231211-223320_ImageMeter.jpg


I have used ribbon, taped to the appropriate contact points to get a length. I made a loop of tape, doubled it back to make it not sticky and created a loop to let the ribbon slide through.
20231211_224312.jpg


I taped it firmly to the other end and then put it on over my head.
20231211_224316.jpg
20231211_224422.jpg


I pulled on the ribbon until the quiver was sitting correctly and kept that as my marked total length from quiver to quiver. Additions will be made for looping over the ends. I marked the buckle location as it shows in the movie pic. After taking this off, it was 18 inches from the bottom contact point to the buckle (plus fastening loop distances) and 30 total inches from quiver contact to quiver contact. And then realized I needed to be wearing the coat and now the measurements are 32 inches for the top belt half and 19 for the bottom buckle half (both of those are before adding the looped ends for the strap rings). The upper portion, with the belt adjustment holes, goes all the way down. It has a second keeper loop, one at the buckle and one near the very bottom. Refer to jessamygriffin's work for completion pics (linked earlier in thread).
 
Last edited:
I found this random belt I saved from a blanket purchase. The blanket was rolled and the roll had a custom strap on it like it was meant for travel. Two full 32 inch belts with buckles that were attached to each other by a cross section. Both belts wrapped around the blanket and buckled separately. For Bard's quiver you need one belt without the buckle prong and a second belt without any holes but with an additional metal ring at the end.

While taking my custom blanket belt apart, one buckle broke and that forced me to put on an end ring that was more like Bard's anyway. I found an old violin case and took the two carry strap rings and placed them on mine.

Remember the below started out as two identical 32 inch belts with holes and buckles.

20231212_215946.jpg


A is 32 inches but B has been cut back to 19 (21 before folding the end back over the metal ring).

At the green arrow, I punched a few more holes to match Bard's.

One red arrow points to the strap that came with that belt but the other points to the strap taken from the longer belt because Bard's has two on that end.

At the blue arrow, I opened the ring with pliers to place it through the old buckle loop (the one that broke off) and then closed it by squeezing with pliers.

At the yellow arrow, I cut the belt at 21 inches and folded it back over to form the loop to hold the other end ring. This shortened it to the expected 19 inches with no adjustment holes showing.

The purple arrow is pointing to the buckle that I am calling "good enough" and is the correct color. The two metal rings will need to be bronzed to match it.

Both belts will be painted reddish brown with a light pattern of diagonals as the original shows near the adjustable holes end.

Both mount strap points still need to be cut and riveted in place. The ring ends go on these before riveting is completed.

Reference pic below is jessamygriffin 's final quiver pic from her build here on the rpf. This pic is an excellent view of the needed strap contact points where the metal rings loop on.

20231212_224905.jpg


This also shows the shoulder pad portion that I currently do not have completed.
 
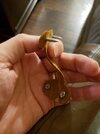
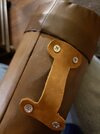
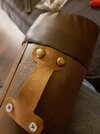
This strap is becoming a color issue. I pierced the attachment holes in the leather mount points and then predrilled some very small pilot holes. This had to be done become the faux leather on the quiver would wrap around the screws if there was not a hole.

20231216_212502.jpg


I left some bend in this so the ring can ride loose away from the faux. I then placed the screws and placed fake rivet caps on them.

20231216_212626.jpg 20231216_212858.jpg 20231216_215300.jpg

I am on paint attempt three on the strap to try to match this odd red leather...

20231216_215524.jpg


Honestly, I am convincing myself it is bad lighting and should be cherry brown.
 
I repainted one more time with a more red cream brown. I then went over that with a furniture stain pen in the cross hatch pattern on his original. It is certainly not perfect but will ring true at pose distance. Assembled but still needs the large shoulder cover leather piece.

20231217_001956.jpg
 
Working through several arrow making videos, I came across this one that accurately portrays the dimensions of Bard's on screen arrows:


Thirty inches long, 3/8 inch shaft thickness, six inch feathers, (on screen but promo poster pic of Bard on Rock, shooting down) bound using silk thread. The only differences I see on Bard's is he does not shape his feathers and his nocks are accessory (added on) and not just notched end shaft.

Because it is unusual to find feathers of this size in Bard's colors, I will be using stain to color them.

I confirmed the onscreen sizes using my picture measurement app.

Update/correction 12_23_23
Bard's arrows in the movie (real arrows, not the cgi ones) are 3 inch feathers but 4 counting tip to farthest tip. The linear measure is 3 inches. This is half of the standard medeival arrow and half of the length of Bard's own promo pics. I believe the promo pics are cgi arrows.
 
Last edited:
OK, we are back to inconsistent movie props again. Several of Bard's promo shots have feathers that are around 9 inches long. The windings of silk string can be counted at 15+. Both the on the rock scene and this promo closeup use these arrows (one is cgi). But you can also see that one quiver has a braided leather, dark brown strap but his in-scene is red leather and not braided.

b424a427fd51f963bbe589dc73b12347.jpg
IMG_2143.jpg


But all of the scenes in the movie are showing the far shorter 4 to 5 inch feathers and they are far wider than those pictured above. I would guess these promo feathers are 3/4 inch but the in scene arrows are at least an inch to inch and a quarter wide. The following are from the movie:

Screenshot_20231223-195327_Gallery.jpg
Screenshot_20231223-195132_Gallery.jpg


The promo feathers are all dark brownish red where the in-scene feathers have two tan red and one striped black and white per arrow. The really obvious give away is that only 9 silk windings can be seen in the interior of the feather bindings compared to over 15 in the promo shots. So now I will be watching the movie ...... again, to see if both sets are used in the film. So far, I only see the 4 inch feathers in the movie.

20231223_204155.jpg
 
Last edited:
Update on arrows: I screwed up, bought 1/2 inch dowel. After cutting them to length my wife pointed out they were wrong. Now I have 3/8 cut to length and painted brown. Note: several scenes show his quiver filled with greenish brown arrows but when he draws and fires, they are always brown.

I dug through my mom's feather collection and have enough feathers to correctly match the reddish tan feathers and the black and white striped.

I found an entire box of silk thread colors in my shop for winding the feathers. I have most of them already cut.

I am working on nocks tonight and am using the plastic handles from small stipple paint brushes. The are carved, heated and shaped and are currently painted hammered bronze and are drying.

20231231_205332.jpg
 
20240101_133058.jpg


Calling it on these. Time for feathers. Note the color span from rust to silver depending on the light angle. The paint is Rustoleum "Oil Rubbed Bronze". These should silhouette well in the quiver.
 
I don't mean to drag this out but wow it takes a long time to make arrows and I am legit not doing it right anyway. So I still need to do the wrap thread and darken the white portions with stain.

20240102_234815.jpg
 

Your message may be considered spam for the following reasons:

If you wish to reply despite these issues, check the box below before replying.
Be aware that malicious compliance may result in more severe penalties.
Back
Top