Alien / Nostromo Uniforms

Ok, getting into the Dallas Nostromo jacket project. I have a couple questions that you guys may be able to answer since most of you have "hands on" materials.

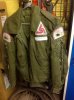
1) I am 5'9" with a 42" chest. Am I correct in guessing that I will require a Size 8, MK3 Cold Weather Flight Jacket? The size 7 shows it goes up to a 40" chest. So before I ship one to the USA for $45 in shipping costs alone, I just want to be sure.

2) Are you guys sewing the laces right over the pen holder on the arm?

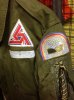
3) What is the size of the pink piping on the collar?

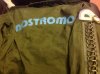
4) Paints or Iron on for "Nostromo" on the back? Lots of guys using stencils from what I can see...

5) Anyone get a hold of laces or have some links to materials to create lacing? (Thanks to Tyler for the template..now I gotta hunt for materials)

6) Aging the patches.. Use cheese grater? I was thinking of sewing a white denim frayed edges material under the patch so just the frayed edges show from under the patch edges. This is of course after weathering the patches themselves a little.

Thanks in advance! Everyone elses jacket pictures just drives me on! Awesome stuff guys! :$
 
1. can't help you on that, 2. yes lacing goes over pen holder, 3. 1/8" (1/2" with the extra edge) Check Wrights Bias Tape Maxi Piping, 4. paints, 5. earlier in the thread there is a list of parts (1/2" Bias Tape works fine for edging and loops), 6. Washing a few times, perhaps a light sanding.
 
Yes, you'll need a size 8. (They grow their pilots on the small side over there!)
I think I went with the 3/8" loops, and I found the lacing at JoAnne's fabrics here in Florida.
 
Yes, you'll need a size 8. (They grow their pilots on the small side over there!)
I think I went with the 3/8" loops, and I found the lacing at JoAnne's fabrics here in Florida.

Thanks for the info guys! Interceptor, I live in the Tampa Bay area! I'll check Jo Anne's here. Thanks!
 
Might be able to find my spare stencil around here someplace too.

Sir, That would be EPIC! :love

EDIT: Just Scored a nice MK3

0xCLGLr.jpg
 
Last edited:
i finally made my Alien Nostromo Chestburster Victim costume! i had wanted to make it last year for Halloween, but just didn't have enough time to make it right. having over a year to prepare for this year's Halloween was nice. i started by acquiring my raf mk3 cold weather jacket, patches, and vinyl model kit last summer. bought most of the patches i needed from the '12 San Diego Comic Con, and ordered the rest online. i almost didn't get the jacket i found and won on ebay, because shipment to the states wasn't provided. after apologizing for not realizing it, and offering more money, the kind Brit shipped it to me anyway. yay!
as for the chestburster kit, i was excited about finding it cheap on ebay, but quickly learned that it was inexpensive because it was a cheap recast, from Thailand. i had no idea legit vinyl model kits could be so expensive! and there didn't seem to be a trace of a better chestburster model. the less detailed, cheaper model would have to do; i had no experience whatsoever with putting one together, anyhow. but all i really needed was the head piece.
i was lucky to get a brand new, digital sewing machine last Christmas from my boyfriend. i learned to sew putting this costume together! it was truly rewarding. and painful, with all the needle-pokes! poked the heck out of my fingers and "chest." more on that later.

the real work on the costume started this summer. i became friends with YuriGagarin61, from Virginia, and he kindly sent me the font stencil for "Nostromo," to put on the back of the jacket. he helped me lots with color decisions, reference photos, and plenty of encouragement! i felt like i didn't know what i was doing at times. this very thread helped sooo much! i was blown away with the thriving culture of Alien fans that have painstakingly figured out how to put together their own Nostromo uniforms. you all basically gave me the blueprint. :) thanks! when i decided i wanted to be a chestburster victim, i wasn't planning on putting in the level of detail i ended up doing. i figured i'd vaguely match the crew uniform look, and then i found this damn thread... thank you guys so much for the inspiration—and pressure!
more than $300 later... :)
 
Last edited:
Flexserve

Definitely go for stencil and paint on the back lettering. For weathering I used a small wire brush then kicked the jacket round the floor of the workshop where I work as a cycle mechanic (really) then brushed it "clean" though the pics I did don't show the weathering too well.

Hope the new joiners to the thread post pics ;)

NP
 

Attachments

  • ImageUploadedByTapatalkHD1383503651.393351.jpg
    ImageUploadedByTapatalkHD1383503651.393351.jpg
    90.7 KB · Views: 191
  • ImageUploadedByTapatalkHD1383503677.521165.jpg
    ImageUploadedByTapatalkHD1383503677.521165.jpg
    88.6 KB · Views: 307
  • ImageUploadedByTapatalkHD1383503692.568625.jpg
    ImageUploadedByTapatalkHD1383503692.568625.jpg
    89.1 KB · Views: 211
my dyeing attempts for the costume overall were quasi successful. i felt like my jacket was too green, and i wanted a little more of a Ripley slate blue gray to it. i dyed it blue and it came out great! here it is compared to some of the extra fabric i removed first. unfortunately, more washes ended up taking away the nice bluish tint i had achieved. i was sad.
bluedyecomparison_zps934eb2b1.jpg

i didn't rely on my sewing machine too much for putting the jacket together, because i knew i wouldn't be able to use it for the sleeves; i didn't want to ruin the integrity of the jacket. so i created the compression lace panels and sewed them onto the sleeves by hand. ouch.
since i didn't know how to sew yet, i cheated by using some liquid latex as glue to put together the loops on the fabric strips. this fabric, btw, came from a previous jacket i had purchased for the costume. before i decided i had to be screen-accurate! after finishing the gluing, i was giddy to finally break out my machine to stitch-finish!
complaceloopcheat_zpse79ac13e.jpg
sewingpanels_zps29f52bc0.jpg

i managed to tone down the pink on the piping for the collar. it was a bitch, but scrubbing it with the abrasive side of a dish sponge with some bleach finally worked! the upper right of this pic shows the original heavy pink. and there's the triangle patch i was torn about not using. i wanted to put it on my pants' butt pocket, but i know they're only seen on the space suits. the characters in the movie are all unique, and so their uniforms all differ, customized by their personalities, so i had wanted to use this excuse. but i decided to leave it out after all. oh, well.
pinkpipingtrianglepatch_zpsed80ec0c.jpg

lace panels, patches, and Nostromo logo complete. i even got to wear my proud jacket out one night during '13 SDCC week!
sewedjacket_zpsd72b84e6.jpg
nightoutjacket_zpsdb521020.jpg
 
Last edited:
i believe it's "Randy in San Diego" who made these pants i emulated! thanks, fellow San Diegan! ;)
oh, the sewing machine madness began! my mom was a seamstress, so all my life, i saw her method and had a little bit of an understanding on how i should proceed, but made my pants with literally no sewing machine experience! i have to say i'm pretty proud of my efforts, although i wish i could have done a better job with the pants. making the quilt-like knee-pads was maddening, but fun! and the lower zippered pockets proved too challenging for me, so i went to mom for some advice, even though she retired from sewing years ago. i also felt clever when i "cheated" one of the pockets!
the dyeing process was kind of scary and unpredictable. there was no beige fabric dye, so i had to figure it out by using brown and tan Rit dye, and then using color remover. the finished product was perfect! except that the pants became extremely tight after all the back-and-forths with dyeing, bleaching, and washing. i ended up having to get a 3rd pair of emergency painter pants and try to color-match it to the pockets i worked so hard on and scavenged off the first pair of pants. i tried so hard, but it didn't work out perfectly. but the end result was acceptable. if anything, the slight color change helped to show the Nostromo pocket creations.
pantsmod2_zps8d03a5cc.jpg
pantsmod3_zps760fa299.jpg
pantsmod1_zps8e9d5f46.jpg
pantsmod4_zps303fda1c.jpg
pantsmod5_zps20a598ab.jpg
pantsmod6_zpsb24f0f0b.jpg
pantsoops_zpsa68820be.jpg
pantsfinished_zps341e396c.jpg
pantsfinished2_zps110d3d33.jpg
 
Last edited:
i know the crew walks around with light olive green shirts under those jackets, but i felt that the blood would best be displayed on white fabric! so i chose to create a "Kane shirt" to wear, and still wear a cool Nostromo jacket! the shirt happened to be too large, so i found out how to bring it down a size. i even modified the collar trim by folding it down, making it more similar to kane's collar.
kaneshirt2_zpscbd1f9d7.jpg
kaneshirt_zps0c78d6ea.jpg

here's some pre-chestburster shots in my finished Nostromo uniform! i realized after the shoot that i forgot to weatherize the pants, so i did it that night.
sansjacket_zpsc5794b93.jpg
kaneshirtpre_zps594eae97.jpg
shoes_zpsab4bfeee.jpg
jacketback_zps496c9709.jpg
frontpose1_zpsf746c41c.jpg
patchpincloseup_zps213c1143.jpg
poseside_zps8b91fa16.jpg
frontpose2_zps0783efe2.jpg
frontpose3_zpsa527b64d.jpg
rearthumbsup_zps75833c7a.jpg
thumbsup_zps150705d3.jpg

as most of you will notice, i don't have a dark Nostromo patch on the Kane shirt sleeve. i didn't bother, since the jacket would conceal it anyway. i also didn't create a crew belt, because i hate tucked shirts, and by the time the chestburster is born, the shirt gets pulled out in the mayhem. ;)

here's the lived-in staining of the pants. achieved by spraying with black tea, and smudging some old garage grease onto the pant legs.
staining4_zpsc5ec6568.jpg
staining2_zps840312f2.jpg
staining1_zps4d1d83af.jpg

- - - Updated - - -

pics with the chestburster will come later tonight! i'm running way late for a baby shower right now. argh.
 
i worked on a chicken wire support system for my chest prop, and also got use out of it as a holder during painting. i did a lot of online research on how to work with vinyl model kits, but felt so nervous about messing it up, that i kept putting it off until i had 2 weeks left. i cut the teeth out and had to shave them down to get them to fit into the tight jaw cavities, using CA glue and green putty. primed it, used Vallejo Game acrylics, and when i wasn't happy with the flat silver paint used on the teeth, tried some enamels. they weren't much of an improvement. but i learned at the hobby store that the way they got the xenomorph's teeth to look so great in the movie is that they must have had the teeth actually dipped into chrome. wish i could have done that! the Testor's gloss lacquer wasn't making my finished model as shiny and "wet" as i wanted it to look, so i found Mod Podge super shiny gloss and that worked amazingly!
vinylmodelkit_zpsde83db0e.jpg
chestbursterprimed_zpse8dc2bba.jpg
modelwork1_zpsfa84743d.jpg
modelwork2_zps2b71cd84.jpg
modelwork3_zpsbec4b758.jpg
modelwork4_zpsefb1cd73.jpg
modelwork5_zps7a7e18f1.jpg
modelwork7_zps6d1dc085.jpg
modelwork8_zps9f28dca2.jpg
vinylmodelstuff_zpsa9729789.jpg

i'm not a painter, but have a vague understanding that you usually start with the dark background colors and work toward the foreground, light colors and details. i was suprised to learn that i probably would have had a more successful paint job had i worked backwards, before finally painting the blood on, of course. i really wish i could have experimented with the Freddy Krueger vinyl kit i got after finding that chestburster to get a feel for how i'd do things before getting my hands on the alien, but i just never got around to it. i made a lot of mistakes on the little chestburster, but i think i fixed them ok. maybe someday, i'll find a real kit and do a better job with it, and have it displayed in the house.
 
Last edited:
finally, i had to do the painful job of attaching the chicken wire mount to the sports bra—while wearing it. i don't know how many times i stabbed myself while hand-sewing, but i had no choice; the bra wouldn't have fit properly if i hadn't been wearing it while incorporating the support system. to conceal the dark, bumpy wire sitting on top of the sports bra, i used 2 layers of the batting i used for the pants' knee-pads. in the end, after much cursing and some starting over, it worked great!
brawire_zpsd2169f2a.jpg
bramount_zps2ac59c5d.jpg
shirtmount_zpscbacd679.jpg

and here's the dress rehearsal for a saturday costume party before halloween!
costume1_zps0a5d3139.jpg
costume2_zps3ed2e9a7.jpg
costume5_zps9c05643c.jpg
costume3_zpse7140998.jpg
costume4_zps63d935a2.jpg

i'm actually displeased with the little amount of blood i added to the costume. i wanted to use way more Mehron stage blood on my costume, 'cause that Kane death scene is pretty gnarly. the gnarlier the Halloween costume, the better, in my opinion, but it was a battle with my boyfriend, who was offended at the idea of getting blood all over my cool jacket. he loved it so much, he wants me to wear it regularly, and even wants me to make him one some day! from previous experience (30 Days of Night) with a massive amount of the coagulated blood, i learned that after a few hours, body heat starts melting the stuff and it slowly starts sliding down your skin. all the blood i had envisioned dotting my neck and face with would have eventually ended up on the collar of my shirt. if i revisit the costume in the future, i think i'll say "to hell with it" and spread much more blood around!

anyway, here are my final pictures of my costume, taken on Halloween night. i ended up adding more blood to the shirt.
it seems like less than half of all the people i encountered while wearing my costume recognized what it was from, and only ONE person realized on his own that my outfit was as screen-accurate as i could get! "you even got the knee-pads!" he proclaimed. that made me so happy and made this year's Halloween that much more exciting. :D

thanks, THERPF, for making this costume possible! hope you enjoy my little Giger baby! :)

final3_zps7d808ea4.jpg
final4_zps75dc97b3.jpg
final1_zps7509e8e1.jpg
final2_zps786ff2ba.jpg
 
Last edited:
Might try building the space suite they were wearing
haha! i joked that next year's project would be building the Nostromo space suit, but there's no way!! what a huge undertaking.
i'd rather build an Alien version xenomorph suit for some long, thin person. but i'm not much of an artist. :b
did you make yours yourself? if so, it's bitching!
 
Last edited:
My body pieces are the Giger design from Alien the head is the Cameron design from Aliens. Plan on completing the Giger head with dome after the holidays. Already had the one head so I used it. Hobby Lobby has areally good metallic paint. It is with their airbrushes. It is by Wicked Colors. Has a really good shine to it. I was going to chrome dip the teeth and nails, but they are latex so I just painted them with decent results. Plan on casting some next year and chroming them.
 
Last edited:

Your message may be considered spam for the following reasons:

If you wish to reply despite these issues, check the box below before replying.
Be aware that malicious compliance may result in more severe penalties.
Back
Top