Hardsuit
New Member
Yep. Was waiting on my electronics to show up before making any new posts (plus was being a bit lazy on the build...)
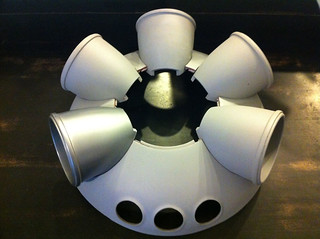
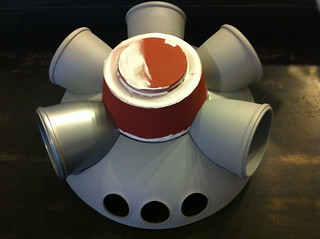
New printed parts being finished for the lower body: The center "post" and the leg joint covers:
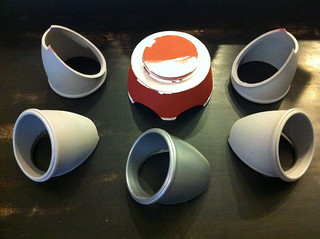

I'm using Testors Metalizer buffable Stainless Steel spraypaint on the leg joint covers. It's looking really good after
a light application of steel wool.
The lower body parts will not be permanently attached, they will interlock together and be held in place by the
center post cap, which is held in place with a single central threaded rod. This is to allow easy dissasembly
when I need to get into the guts to change wiring or fix things.
For Sapporo's guts, we got in all kinds of new toys...
To start, power:
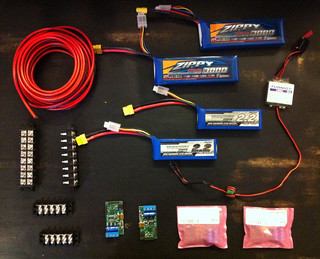
I will be running one pair each of 11.1v(3s) and 7.4v(2s) LiPo batteries. The 11.1v batteries will provide power for the motors
and sound system. The 7.4v batteries will use the UBEC (top right hand side) regulate the voltage to a steady 5.0v,
and will be used to power the servos and video transmitter. The coil of 14 gauge wire will be used to run the power,
and I will be using XT60 connectors. The 4 circuit boards on the bottom right are the motor controllers (from Pololu)
which are capable of handling a steady 15 amps at up to 18 volts.
Locomotion:
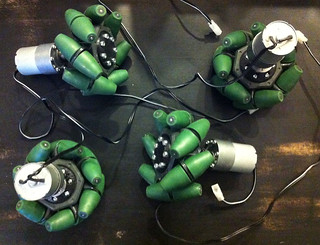
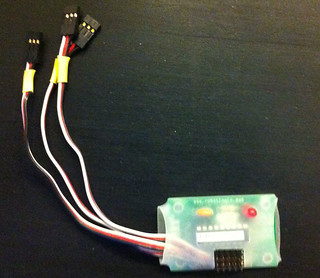
Here are the 4" VEX mecanum wheels, mounted on 37mm gearmotors (from Pololu again). The circuit board is a
pre-programmed mixer board for mecanum wheels. It takes three R/C inputs (forward/back, turn left/right,
strafe left/right) and outputs to the 4 leads for each motor/wheel.
Servos:
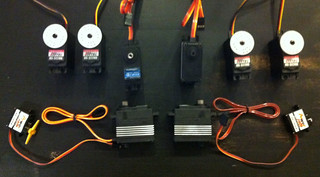
The center four servos are "robotic" servos, which basically means they have a mounting point on both sides
of the servo instead of just one side. You still only get power/motion from one side, but it makes for a much more
stable joint. I still need to get 2 more of the larger regular servos that are at the top of the image.
FPV and audio:
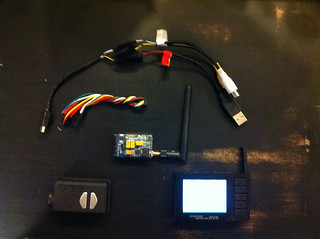
I will be using a 5.8gHz transmitter (center) to send back video to a small combo receiver/monitor/recorder (bottom right).
I am using a Mobius ActionCam (bottom left) which can do 1080p at 30 fps, or 720p at 60 or 30fps. The monitor will be
mounted to the carry handle on the R/C controller.
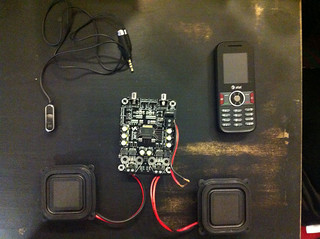
Audio output is using a 15watt stereo amp from Sure, with two 12 watt full range 2" driver speakers. I will be using a cel
phone for the two-way audio, so I'll just have the amp plugged into the headphone jack of the phone, along with a remote
microphone to get the audio back to me on the other end of the call.
New printed parts being finished for the lower body: The center "post" and the leg joint covers:
I'm using Testors Metalizer buffable Stainless Steel spraypaint on the leg joint covers. It's looking really good after
a light application of steel wool.
The lower body parts will not be permanently attached, they will interlock together and be held in place by the
center post cap, which is held in place with a single central threaded rod. This is to allow easy dissasembly
when I need to get into the guts to change wiring or fix things.
For Sapporo's guts, we got in all kinds of new toys...
To start, power:
I will be running one pair each of 11.1v(3s) and 7.4v(2s) LiPo batteries. The 11.1v batteries will provide power for the motors
and sound system. The 7.4v batteries will use the UBEC (top right hand side) regulate the voltage to a steady 5.0v,
and will be used to power the servos and video transmitter. The coil of 14 gauge wire will be used to run the power,
and I will be using XT60 connectors. The 4 circuit boards on the bottom right are the motor controllers (from Pololu)
which are capable of handling a steady 15 amps at up to 18 volts.
Locomotion:
Here are the 4" VEX mecanum wheels, mounted on 37mm gearmotors (from Pololu again). The circuit board is a
pre-programmed mixer board for mecanum wheels. It takes three R/C inputs (forward/back, turn left/right,
strafe left/right) and outputs to the 4 leads for each motor/wheel.
Servos:
The center four servos are "robotic" servos, which basically means they have a mounting point on both sides
of the servo instead of just one side. You still only get power/motion from one side, but it makes for a much more
stable joint. I still need to get 2 more of the larger regular servos that are at the top of the image.
FPV and audio:
I will be using a 5.8gHz transmitter (center) to send back video to a small combo receiver/monitor/recorder (bottom right).
I am using a Mobius ActionCam (bottom left) which can do 1080p at 30 fps, or 720p at 60 or 30fps. The monitor will be
mounted to the carry handle on the R/C controller.
Audio output is using a 15watt stereo amp from Sure, with two 12 watt full range 2" driver speakers. I will be using a cel
phone for the two-way audio, so I'll just have the amp plugged into the headphone jack of the phone, along with a remote
microphone to get the audio back to me on the other end of the call.
Last edited:


")

