my Captain America shield build FINISHED!!!

GF

Sr Member
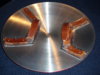
Started working on my shield, I had mine made with a 25" diameter and a 9.5" center.

The brackets are glued in place using JW weld, the most tedious of the process was to shorten one of the brackets to match original design, by doing so I had to fix the bracket tip angles to match countour of the shield, by shortheing the bracket the "V " bracket opening becomes wider affecting tip angles.

I also replaced all the threaded posts to accept proper size and model hex screws, I won't be using any chicago screws here, on the original they used anti theft hex screws, which is a hex screw with a pin in the center so they can't be tampered with, I will also add flush simulated rivets on brackets to ressemble one of the original shield, and all leather straps will have stitched edges. Stay tuned for more progress photos.

GFollano
 
Last edited:
Re: my Captain America shield build

I'm going to making one or two of these after i finish my current project. Can't wait to get started, Look forward to seeing how yours turns out.
 
Re: my Captain America shield build

Looking awesome. Did you get the disk custom made or is there a supplier who sells them?


you can get the blank shield off ebay, but he does the 26" with 10" center, i asked him to make mine 25" per original I'm replicating, you can get the metal brackets and leather staps kits here on the rpf.
 
Re: my Captain America shield build update!

Installed my nicely edge stitched leather on my shield, I will have the 2 main buckles machined, I used Hex screws for accurate look and found some pretty accurate loop metal rings which will do for now, next I will be adding the simuated rivets, stay tuned!!!

Gerardo
 
Re: my Captain America shield build new photos!!!

Added simulated flush rivets to match original, really like the overall effect.

Gerardo
 
Last edited:
Re: my Captain America shield build

i asked him to make mine 25" per original I'm replicating,

I haven't followed the Cap threads for awhile. Has it been confirmed the screen used shields were 25" with a 9.5" center? I've got one of these on my long list of projects, so the more accurate the better.

Looking beautiful, by the way! How are you simulating the rivets?
 
Re: my Captain America shield build UPDATE rivets added!

There were actually several different shields in different diameters. 25" and 26" were both used :thumbsup
 
Re: my Captain America shield build UPDATE rivets added!

There were actually several different shields in different diameters. 25" and 26" were both used :thumbsup


Correct both 25" and 26" were used, I went with 25" since the one that was auctioned off was listed as a 25" and when I scaled it up the center came up to 9" I'm happy I went with 25" it's already pretty big as it is.

Gerardo
 
Last edited:
Re: my Captain America shield build

Looking beautiful, by the way! How are you simulating the rivets?


I used real brushed aluminum finish decal sheet and punched little discs from it using a hole puncher, I then made a template with masking tape which I placed on the brackets for proper spacing, so each rivet is perfectly spaced from each other and from edge for a nice clean looking finish.

Gerardo
 
Finally finished my shield, just waiting for the accurate main buckles, very satisfied how duplicolor anodized paint turned out, you can see how the light reflection from painted to bare aluminum is pretty concistent, will take outside photos when weather permits.

Gerardo
 

Attachments

  • CA GF shield  (2).JPG
    CA GF shield (2).JPG
    1.3 MB · Views: 680
  • CA GF shield  (6).JPG
    CA GF shield (6).JPG
    1.6 MB · Views: 285
  • CA GF shield  (7).JPG
    CA GF shield (7).JPG
    1.1 MB · Views: 408
  • CA GF shield  (8).JPG
    CA GF shield (8).JPG
    1.3 MB · Views: 520
Last edited:
I love the first picture, how the light seamlessly transitions from the star across surface of the shield. :love
 
GF,

I am about to paint my shield as well and I would like to try your technique of one Heavy coat as your shield looks amazing! Did you afix your star first and then paint or did you tape off the area where the star would stick and then paint. I have seen people do both and was wondering which would be better. Also I have a Valor star as well (Awesome work on those btw) but how did you seal the small hole in the center? On your pictures I did not see it there anymore. And finally could you explain the 1 heavy coat method? Did you do it horizontal or vertical, how far away from the shield and how many passes? I'm a little scared at starting but I got a big gallon of acetone waiting for my mistakes :)

Thanks!

Roquefert
 
This thread is more than 10 years old.

Your message may be considered spam for the following reasons:

  1. This thread hasn't been active in some time. A new post in this thread might not contribute constructively to this discussion after so long.
If you wish to reply despite these issues, check the box below before replying.
Be aware that malicious compliance may result in more severe penalties.
Back
Top