Arc Reactor scratch build (old version, check first post for link to new version)

Dynofiend

Well-Known Member
*This build was my first attempt at the Reactor. You can read about how I went about this below, but if you want to skip to the second (and much better) attempt then here is the link to that thread.*

I have finally managed to make the first pieces of my latest project.

The design is based off a set of stl files supplied to me kindly by another rpf user whom I wont name for fear of them being inundated by requests, but if they are reading they know who they are, and thank you again!

I had to remake all the files to make them suitable for a laser cutter, but being able to see each piece individually really did help.

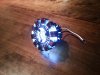
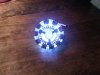
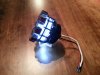
So far I have the pieces for a prototype of the rear heatsink designed and cut.

I also have the pieces for the clear ring, brass rings, vent ring drawn up, but not cut yet.

Still to go are the tri-wing, the transformers and the inner silver ring. These might be better off being 3d printed/turned on a lathe respectively to really finish the piece off with as much accuracy as possible.

Once finished, it should be a very close replica of the auction version RT. Id not go so far as to assign a percentage of accuracy, but to most non prop-obsessed observers it will appear identical.

2013-07-25 21.52.24.jpg2013-07-25 21.52.50.jpg
 
Last edited:
Re: Mk1 Arc Reactor scratch build (auction version)

Man that looks good :)

One of the missingpieces for my arc that I hope to someday acquire.
 
Re: Mk1 Arc Reactor scratch build (auction version)

Thanks mate, would be happy to cut you a kit once I've finished mine. I already have two extra 'cage' kits cut. Anyway, this aint the JY, so here's another update!

Got most of the front parts done now. Just the tri wing and transformers to go. The outer 'clear' ring here is a place holder just to test for size. The 'vented' ring was cut too tight (no kerfing allowance) so fell apart and was hastily glued together. As such, these are all just prototype pieces to check fit and scaling.

2013-08-11 14.59.04.jpg2013-08-11 14.59.18.jpg
 
Re: Mk1 Arc Reactor scratch build (auction version)

Man thatis looking spectacular! That brass ring assembly is looking great, seamless :) btw 3D printing is a good way to go for the center details and I agree, turning on a lathe is the best way to make the aluminum ring in the center

-Mili
 
Re: Mk1 Arc Reactor scratch build (auction version)

Thanks mate!

Here's is the result of the last few week's work.

Inner light source is done (10 SMD LEDs in a ring), the diffuser is done, as is the clear outer ring. The only way I could get the clear ring done was in three layers as the correct colour acrylic (greenish glass) was not thick enough. This is one compromise I have to make. Maybe one day I will find the right material and can replace it with a solid ring, but this is still very nice to look at!

2013-08-29 19.32.58.jpg2013-08-29 19.33.05.jpg2013-08-29 19.33.15.jpg
 
Re: Mk1 Arc Reactor scratch build (auction version)

Hey man I dunno how I missed this for so long but that is great progress :) good job!

What are you gonna do for the transformers?

-Mili
 
Re: Mk1 Arc Reactor scratch build (auction version)

Slow progress, sorry!

Figured out the internal electrics. A rechargeable 9v battery powers the light ring and is activated by a hidden tiny switch on the rear of the arc. The switch is bi pole so in one configuration the light is on, and in the other, the light is off and the battery is configured to recharge. Recharging will be done via the replica 6 pin plug, two pins of which are 'working' and plug into a set of jumpers which will connect to a battery charger.

The transformers were made from 15mm staples and laser cut sides. The staples eradicated the need to cut a complex set of parts to make each transformer, they are just made from 3 pieces each. Oh and of course they'll be painted and wrapped with real wire!


2013-09-11 20.50.05.jpg2013-09-11 20.50.14.jpg
 
Re: Mk1 Arc Reactor scratch build (auction version)

Haha, no I'm not going to be selling these. They woudn't make financial sense to sell given how long each one would take to put together!
 
Re: Mk1 Arc Reactor scratch build (auction version)

Great idea with the battery! That's the same thing I did on mine, and it works like a charm :)

The transformer ring looks amazing by the way, I've always been partial to that piece as my favorite in the whole design I think.

Keep up the great work man!

-Mili
 
Re: Mk1 Arc Reactor scratch build (auction version)

Really beautiful work ..I love it...wish I could do anything with mine, but since I am , out of a job , this project will be a while for me to get started on...I really like what you did with the center rings....awesome work my friend
 
Re: Mk1 Arc Reactor scratch build (auction version)

A friend of mine borrowed a 3d printer for the weekend, and I tried printing out the tri wing. Unfortunately this printer simply doesnt have a high enough resolution or quality of print to get what I needed. Instead I decided to resort to the tried and tested method of scratch building one. I used some ribbon cable cut up, a margarine tub lid, and an offcut from the laser cutting process. On the right is the 3d printed effort, on the left, my scratch build one.

2013-09-21 18.41.19.jpg
 
Re: Mk1 Arc Reactor scratch build (auction version)

That is looking great man :) I can't wait to see you finish and light it up!

-Mili
 
Re: Mk1 Arc Reactor scratch build (auction version)

And painted, with the silver 'focus ring' attached. Just the bolts to go, need to source some the right size...

2013-09-22 16.49.29.jpg
 
Re: Mk1 Arc Reactor scratch build (auction version)

I used 4 0-80 screws and 2 4-40 screws. They are the same size as what was used on the original.

That is looking truly phenomenal!

-Mili
 
Re: Mk1 Arc Reactor scratch build (auction version)

I found an international ebay seller that can supply the right screws!

My final mission is to properly replicate the colour of wire used. I have the gauge nailed at 30awg, but the colour is quite tricky. It's like a very dark red enamel coating, or, a patina that's been applied to bare copper wire. I'm unsure which at the moment. Certainly it's not just normal copper coloured, or, as a lot of people use, simply bright red or brown. I achieved the colour in my picture above by applying a black wash to the normal red wire, but it's still not quite right. I think I might get some normal copper colour wire and experiment with trying different patinas using household chemicals!
 
Re: Mk1 Arc Reactor scratch build (auction version)

Good idea! From what I have seen you get different shades of red depending on the company that makes the wire. I have found some similar colors in hobby shops but it has always been much too thick to be useable. Good luck!

-Mili
 
Re: Mk1 Arc Reactor scratch build (auction version)

Got the arc charged up and took some photos of it all illuminated (minus the soon to arrive bolts)
 

Attachments

  • 2013-09-25 22.27.15.jpg
    2013-09-25 22.27.15.jpg
    1.5 MB · Views: 165
  • 2013-09-25 22.27.22.jpg
    2013-09-25 22.27.22.jpg
    1.4 MB · Views: 236
  • 2013-09-25 22.27.36.jpg
    2013-09-25 22.27.36.jpg
    768 KB · Views: 156
Last edited:
Re: Mk1 Arc Reactor scratch build (auction version)

Man that looks great! :) I'm working on a new version now, for halloween. This is just the push I need to finally work on it some more :p

-Mili
 
This thread is more than 10 years old.

Your message may be considered spam for the following reasons:

  1. This thread hasn't been active in some time. A new post in this thread might not contribute constructively to this discussion after so long.
If you wish to reply despite these issues, check the box below before replying.
Be aware that malicious compliance may result in more severe penalties.
Back
Top