I decided to go as an At-At walker this year for Halloween and Comicon. I knew it wouldn't be easy.
First thing I had to do was brain storm ideas on how to pull it off with my costume loving friend Klay. We went back and forth on possibilities of how to fit inside and make it maneuverable.
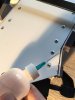
Next step was to take my design and cut it out and make sure that all the pieces would work and fit when assembled. I used Klay's laser cutter to make it precise and quick.
Once cut out and assembled I took the same pieces and worked on enlarging them with a projector to fit my body.

I decided to use 1/8th inch thick polystyrene for its rigidity and ability to score with a blade and snap off in a straight line without having to use a bandsaw too often.
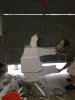
I advise starting with the torso first and getting that to fit properly and then scaling all the others one piece at a time. If you cut out all pieces at once you'll find out that they might not work right once you start tinkering with the harnessing and other parts. I used plastic L braces on the inside of the body at the seams and pop riveting the pieces together. I used a baby carrier for the torso to keep it in place and attached to my body.


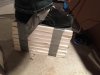
The legs work best if you take the two outer panels and glueing small segments of L braces down against the edge. Then using the pop rivets because the glue is mainly just to hold it in place. The pop rivets is really what holds it all together. Once you get the braces in lay it face down and clamp the side panels to the edge and apply glue at the seams. Once set drill the holes into the pieces and L braces, slide the pop rivets and washers in place and put a dab of glue between right before you tighten the pop rivet. If you get a little assembly line going of the different stages and segments of the legs you can get them done much quicker while the glue sets.


 (not sure why these photos are not orientated right)
When putting the segments of the legs together you will want to double check your measurements and make sure that the joint is right on your knee. I had to move the pivot on the inner segment farther up so it would pivot right. I used some of the left overs to make big washers so the rivets didn't catch and lock up. I put the crutch inside the bottom of the front legs so that my arms would be as long as my legs. I screwed the crutch to the knee joint to make it more stable. I went with rigid foam for the feet to give me the height needed for the platform feet and softer foam for the exterior of the feet. You have to make somewhat of a half circle for the feet since your legs are closer together than the original at-at walker.


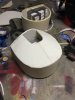
The head was my favorite part of the entire costume. I took a lot of time to make sure that it was able to move and had working lasers. I went with 1/16th inch polystyrene to keep the weight down except for the back and bottom which would take on the weight and support. I glued braces inside to keep the head rigid. The hardest part was making a pivoting I-beam that was inside the neck. I knew that would be the only way to make it rigid and still be able to move side to side. I attached the i-beam to the head with glue and metal L braces and screws. I attached that to the body with just screws so I could take the head off for easy transportation and storage. The lasers are car LED strips that come pre-programmed with different patterns. I have them housed inside acrylic tubes that I sanded to a frosted look. I ran the wiring from the head through the neck and went to a 12v battery I had strapped to my body to keep the weight off the costume. I used an accordion garden drain for the neck.


Once all the segments are done it will take a lot of tinkering to make sure everything moves just right and is well balanced on your body and you can move easily. I use the word easily LIGHTLY. Because this thing is neither comfortable nor easy to maneuver in and your back will be WRECKEDDDDD by the end of the night. BUT it's worth it when you win those prizes. I haven't been able to get the detail work done yet because I ran out of time. That will have to wait till the Emerald City Comicon.
In all I spent about $400-$500 on supplies and materials (the polystyrene being the most of that). You could substitute for rigid foam but it wont be as durable. It took me about 100 hours but a lot of that was designing, brainstorming, and trouble shooting. If you follow these directions it should save you a lot of time.
Here is what I have so far. and here is a link to me moving in it. http://instagram.com/p/u36g_4Odbc/
First thing I had to do was brain storm ideas on how to pull it off with my costume loving friend Klay. We went back and forth on possibilities of how to fit inside and make it maneuverable.
Next step was to take my design and cut it out and make sure that all the pieces would work and fit when assembled. I used Klay's laser cutter to make it precise and quick.
Once cut out and assembled I took the same pieces and worked on enlarging them with a projector to fit my body.
I decided to use 1/8th inch thick polystyrene for its rigidity and ability to score with a blade and snap off in a straight line without having to use a bandsaw too often.
I advise starting with the torso first and getting that to fit properly and then scaling all the others one piece at a time. If you cut out all pieces at once you'll find out that they might not work right once you start tinkering with the harnessing and other parts. I used plastic L braces on the inside of the body at the seams and pop riveting the pieces together. I used a baby carrier for the torso to keep it in place and attached to my body.
The legs work best if you take the two outer panels and glueing small segments of L braces down against the edge. Then using the pop rivets because the glue is mainly just to hold it in place. The pop rivets is really what holds it all together. Once you get the braces in lay it face down and clamp the side panels to the edge and apply glue at the seams. Once set drill the holes into the pieces and L braces, slide the pop rivets and washers in place and put a dab of glue between right before you tighten the pop rivet. If you get a little assembly line going of the different stages and segments of the legs you can get them done much quicker while the glue sets.
(not sure why these photos are not orientated right)When putting the segments of the legs together you will want to double check your measurements and make sure that the joint is right on your knee. I had to move the pivot on the inner segment farther up so it would pivot right. I used some of the left overs to make big washers so the rivets didn't catch and lock up. I put the crutch inside the bottom of the front legs so that my arms would be as long as my legs. I screwed the crutch to the knee joint to make it more stable. I went with rigid foam for the feet to give me the height needed for the platform feet and softer foam for the exterior of the feet. You have to make somewhat of a half circle for the feet since your legs are closer together than the original at-at walker.
The head was my favorite part of the entire costume. I took a lot of time to make sure that it was able to move and had working lasers. I went with 1/16th inch polystyrene to keep the weight down except for the back and bottom which would take on the weight and support. I glued braces inside to keep the head rigid. The hardest part was making a pivoting I-beam that was inside the neck. I knew that would be the only way to make it rigid and still be able to move side to side. I attached the i-beam to the head with glue and metal L braces and screws. I attached that to the body with just screws so I could take the head off for easy transportation and storage. The lasers are car LED strips that come pre-programmed with different patterns. I have them housed inside acrylic tubes that I sanded to a frosted look. I ran the wiring from the head through the neck and went to a 12v battery I had strapped to my body to keep the weight off the costume. I used an accordion garden drain for the neck.
Once all the segments are done it will take a lot of tinkering to make sure everything moves just right and is well balanced on your body and you can move easily. I use the word easily LIGHTLY. Because this thing is neither comfortable nor easy to maneuver in and your back will be WRECKEDDDDD by the end of the night. BUT it's worth it when you win those prizes. I haven't been able to get the detail work done yet because I ran out of time. That will have to wait till the Emerald City Comicon.
In all I spent about $400-$500 on supplies and materials (the polystyrene being the most of that). You could substitute for rigid foam but it wont be as durable. It took me about 100 hours but a lot of that was designing, brainstorming, and trouble shooting. If you follow these directions it should save you a lot of time.
Here is what I have so far.
and here is a link to me moving in it. http://instagram.com/p/u36g_4Odbc/Attachments
Last edited:
")

