Darth Lars
Master Member
Several years ago, Hasbro released a reasonably accurate Rebel Trooper Blaster toy, but only the US. I wanted to get one to convert, and I waited and waited for it to be sold in Europe. Then it went off the market and became expensive... but, it was re-released early this year - and at last in Europe also, so I bought two.
I decided to try to build one into a ANH version, and the other into an ESB version.
My ESB blaster is practially done, while the scope and greeblies for the ANH blaster are still unfinished.
I began in late April and posted a build log over on the Blaster Builder's Club forum, but the forum went down and my thread there is lost. It is about time that I posted here as well, anyway.")
I may have gone overboard with these... If you want to build a ESB DH-17, then it would be much less work to start with accurate resin casts of Sterling parts and a Singlepoint instead of resculpting Hasbro parts as I have done.
As far as I know, all DH-17 blaster props in the movies were resin casts, and my aim has been to replicate the resin props, and not to do idealized versions that mimic the original metal British Sterling machine guns too much.
I also intend to troop with at least the ESB blaster, as a Rebel. Nerf suction cup darts stick quite well to Stormtrooper armour, so I wanted to retain the shooting mechanism.

First thing I did was to cut the blasters apart and accurize the trigger assemblies with pieces of styrene. The trigger guard on the Hasbro blaster does in fact have an accurate shape, only in the wrong position, so I reused part of them when building the new ones ... and then I filed them thinner.
I opted to extend the receivers only in the back and not in the front, so as not to disturb the dart-shooting barrel. The electronics are completely removed.
I measured in photos how much I had to extend the back, and I found that the pulling handle was actually dimensioned to the real prop: The first bar on the pulling handle just touches the end cap!
I found cheap small "travel bottles" of shampoo that fit perfectly inside the receiver.
My old E-11 / Sterling patterns from iambubby came to good use when replicating the Sterling parts, such as the new triggers and the ESB blaster's mag well. They also told me to widen the front sights.

I found that the trigger's sliding action did not work properly with a lowered trigger, so I modified them to have a rotating action instead. In this picture I have modified one but not the other.
I think that the new action is smoother than the original. :cool
Because I do not extend the blasters in the front, details on the section between the trigger and front sight had to be made smaller than accurate in order to retain proportions. I have therefore also moved the ESB blaster's front sight forward a bit. I also cut a small bit off the trigger assemblies and filled that in.
The endcaps did not have the correct shape, so I added bulk with pieces of styrene and auto body filler.

Before the first layer of primer.
All barrels ribs were not the same -- or there would be undercuts in the moulding, so I added bulk to four of them on each barrel. I shortened the muzzles a bit to show more of the barrel tip.
After the blasters halves had been glued together, I cut and filled the bottom of the handles. I also added some detail below the trigger guard to make it more authentic to a Sterling. The "bolt heads" in the grips were on the wrong side, so I dremelled them down and drilled the opposite side.
I made a new box on top of the ANH blaster. There aren't many reference pictures, and I could not get anyone who owned a real (nth gen) cast to post detailed pictures, so I am not exactly sure that I got things right. I suspect that the walls of the box should slope, maybe even be parallel to the sides of the front sight.
The rear sight was too high, and had to be lowered. The half-spheres on the are sight were made from Sculpey cast inside metal half-sphere rivets (for leather).
I cut the scopes apart and glued them back together, extended. I did not want to cut the bell parts off their "scope rings", so the position of the scope within the rings is not entirely accurate.
Details of the scope rings were filled with Milliput and the edges sharpened.

A lot of time between the last picture to this one. Most of that time has been spent on detail stuff such as priming, sanding and filling, though, then the paint job ruined all that...
Unfortunately, I could not find the spray paint I wanted to use right away, and I ended up with a water-based Matton paint, that turned out to be crap. It is not matte, as it says on the label, and it stays tacky for days, absorbing dust from the air into the paint. It is reactive with the glue on my pink masking tape (which I think is more gentle than blue tape) and it dissolves easily with water. I will probably have to repaint it, or at least add a layer of clear coat.
Well, at least it makes the blasters look a bit old, dirty and battered, like the original props do now ... :unsure
If I keep the paint, the ESB blaster is almost done. I just need to install the reflector into the scope.
The square greeblies that look like rubber bumpers are rubber bumpers, painted. I know that the bumpers on the back sight are the wrong size, but they can be replaced later.

The sidewinder missile and crank shaft are resin, that I cast from authentic model kit parts. The bomb holder parts and pistons are bought casts. I do not want to use rare authentic model kit parts on a Hasbro toy, and they were resin on the real props.
Unfortunately, I had cast the crank shaft in the wrong orientation, so I had to file it a bit and fill when I installed it.
The trickiest parts of the ESB blaster was of course the scope "rail".
I believe that the "rail" on the original blaster is likely to have been a metal ski pole that tapers slightly. I used a beechwood dowel in 14 mm diameter. The tip was made from the threaded part off one of the shampoo bottles and a couple of push-buttons.
I had painted the barrel and the tip before installing it. I cut grooves in the dowel for the scope rings, but that was not enough. In the end, I glued and screwed small blocks of wood on top and slid the scope assembly onto that with thickened epoxy as glue/filler to adhere and close the gaps. It took me several hours just to attach it straight, but it is sturdy.

The part on the tip of the scope can be seen on the blaster that is shown in exhibitions. It is probably just a pour spout, but the protrusions were symmetric enough for me to think that it might not be.

The ANH blaster so far. I thought about thickening the trigger guard, but that would be weird with the trigger.
I do not have any picture of the port before painting, so you can't see here that I have moved it back a few mm, made the opening narrower in the front and resculpt the wedge behind it to sit symmetrically on the receiver (as it does in all reference photos of the real prop .. but not on MR's blaster ... that the Hasbro was based on).
The safety switch has been turned back a notch and a resin cast Imperial disc has been glued on. The disc can be seen in screenshots.
I will post more images when I have built more, which should be next weekend.
I decided to try to build one into a ANH version, and the other into an ESB version.
My ESB blaster is practially done, while the scope and greeblies for the ANH blaster are still unfinished.
I began in late April and posted a build log over on the Blaster Builder's Club forum, but the forum went down and my thread there is lost. It is about time that I posted here as well, anyway.
I may have gone overboard with these... If you want to build a ESB DH-17, then it would be much less work to start with accurate resin casts of Sterling parts and a Singlepoint instead of resculpting Hasbro parts as I have done.
As far as I know, all DH-17 blaster props in the movies were resin casts, and my aim has been to replicate the resin props, and not to do idealized versions that mimic the original metal British Sterling machine guns too much.
I also intend to troop with at least the ESB blaster, as a Rebel. Nerf suction cup darts stick quite well to Stormtrooper armour, so I wanted to retain the shooting mechanism.
First thing I did was to cut the blasters apart and accurize the trigger assemblies with pieces of styrene. The trigger guard on the Hasbro blaster does in fact have an accurate shape, only in the wrong position, so I reused part of them when building the new ones ... and then I filed them thinner.
I opted to extend the receivers only in the back and not in the front, so as not to disturb the dart-shooting barrel. The electronics are completely removed.
I measured in photos how much I had to extend the back, and I found that the pulling handle was actually dimensioned to the real prop: The first bar on the pulling handle just touches the end cap!
I found cheap small "travel bottles" of shampoo that fit perfectly inside the receiver.
My old E-11 / Sterling patterns from iambubby came to good use when replicating the Sterling parts, such as the new triggers and the ESB blaster's mag well. They also told me to widen the front sights.
I found that the trigger's sliding action did not work properly with a lowered trigger, so I modified them to have a rotating action instead. In this picture I have modified one but not the other.
I think that the new action is smoother than the original. :cool
Because I do not extend the blasters in the front, details on the section between the trigger and front sight had to be made smaller than accurate in order to retain proportions. I have therefore also moved the ESB blaster's front sight forward a bit. I also cut a small bit off the trigger assemblies and filled that in.
The endcaps did not have the correct shape, so I added bulk with pieces of styrene and auto body filler.
Before the first layer of primer.
All barrels ribs were not the same -- or there would be undercuts in the moulding, so I added bulk to four of them on each barrel. I shortened the muzzles a bit to show more of the barrel tip.
After the blasters halves had been glued together, I cut and filled the bottom of the handles. I also added some detail below the trigger guard to make it more authentic to a Sterling. The "bolt heads" in the grips were on the wrong side, so I dremelled them down and drilled the opposite side.
I made a new box on top of the ANH blaster. There aren't many reference pictures, and I could not get anyone who owned a real (nth gen) cast to post detailed pictures, so I am not exactly sure that I got things right. I suspect that the walls of the box should slope, maybe even be parallel to the sides of the front sight.
The rear sight was too high, and had to be lowered. The half-spheres on the are sight were made from Sculpey cast inside metal half-sphere rivets (for leather).
I cut the scopes apart and glued them back together, extended. I did not want to cut the bell parts off their "scope rings", so the position of the scope within the rings is not entirely accurate.
Details of the scope rings were filled with Milliput and the edges sharpened.
A lot of time between the last picture to this one. Most of that time has been spent on detail stuff such as priming, sanding and filling, though, then the paint job ruined all that...
Unfortunately, I could not find the spray paint I wanted to use right away, and I ended up with a water-based Matton paint, that turned out to be crap. It is not matte, as it says on the label, and it stays tacky for days, absorbing dust from the air into the paint. It is reactive with the glue on my pink masking tape (which I think is more gentle than blue tape) and it dissolves easily with water. I will probably have to repaint it, or at least add a layer of clear coat.
Well, at least it makes the blasters look a bit old, dirty and battered, like the original props do now ... :unsure
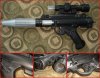
If I keep the paint, the ESB blaster is almost done. I just need to install the reflector into the scope.
The square greeblies that look like rubber bumpers are rubber bumpers, painted. I know that the bumpers on the back sight are the wrong size, but they can be replaced later.
The sidewinder missile and crank shaft are resin, that I cast from authentic model kit parts. The bomb holder parts and pistons are bought casts. I do not want to use rare authentic model kit parts on a Hasbro toy, and they were resin on the real props.
Unfortunately, I had cast the crank shaft in the wrong orientation, so I had to file it a bit and fill when I installed it.
The trickiest parts of the ESB blaster was of course the scope "rail".
I believe that the "rail" on the original blaster is likely to have been a metal ski pole that tapers slightly. I used a beechwood dowel in 14 mm diameter. The tip was made from the threaded part off one of the shampoo bottles and a couple of push-buttons.
I had painted the barrel and the tip before installing it. I cut grooves in the dowel for the scope rings, but that was not enough. In the end, I glued and screwed small blocks of wood on top and slid the scope assembly onto that with thickened epoxy as glue/filler to adhere and close the gaps. It took me several hours just to attach it straight, but it is sturdy.
The part on the tip of the scope can be seen on the blaster that is shown in exhibitions. It is probably just a pour spout, but the protrusions were symmetric enough for me to think that it might not be.
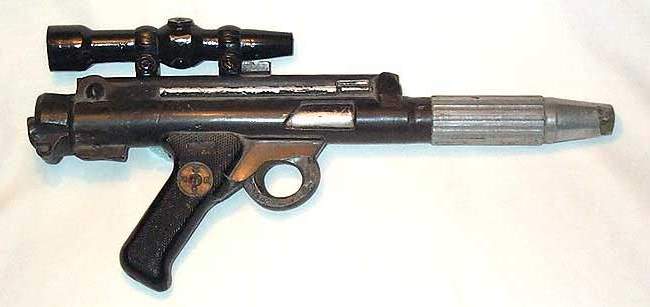
The ANH blaster so far. I thought about thickening the trigger guard, but that would be weird with the trigger.
I do not have any picture of the port before painting, so you can't see here that I have moved it back a few mm, made the opening narrower in the front and resculpt the wedge behind it to sit symmetrically on the receiver (as it does in all reference photos of the real prop .. but not on MR's blaster ... that the Hasbro was based on).
The safety switch has been turned back a notch and a resin cast Imperial disc has been glued on. The disc can be seen in screenshots.
I will post more images when I have built more, which should be next weekend.
Last edited: