You are using an out of date browser. It may not display this or other websites correctly.
You should upgrade or use an alternative browser.
You should upgrade or use an alternative browser.
Steampunk Ironman Helmet WIP - 5/31 update
- Thread starter indiefilmgeek
- Start date
electraflier
Well-Known Member
Re: Steampunk Ironman Helmet WIP - Lens Test Fit Pics!
That looks so fierce! You are obviously enjoying the heack out of yourself! Thanks for the updates!
That looks so fierce! You are obviously enjoying the heack out of yourself! Thanks for the updates!
MightyJohn
Active Member
Re: Steampunk Ironman Helmet WIP - Lens Test Fit Pics!
Amazing!! You have an incredible imagination and an equal amount of handy work to make these costumes work. Love it!!
Amazing!! You have an incredible imagination and an equal amount of handy work to make these costumes work. Love it!!
Judge Spartan
Sr Member
Re: Steampunk Ironman Helmet WIP - Lens Test Fit Pics!
WOW!! I like this version and the eye looks really good. I agree with you, a little bit of tinkering and the eye will be spot on")
WOW!! I like this version and the eye looks really good. I agree with you, a little bit of tinkering and the eye will be spot on
indiefilmgeek
Sr Member
Re: Steampunk Ironman Helmet WIP - Lens Test Fit Pics!
Thanks for all the positive comments! It sure makes the work worth it when folks I deeply respect and admire provide that type of feedback. :$
*****
The delay in posting was due to the end of my time on family vacation in Florida, our 11 hour drive home with four kids in the car and finally getting back to a pile of work at the day job.
As some of you know, I work for a rather larger theatre chain where I coordinate with the studios regarding the placement of their materials in our theatres. This includes the trailers you see before the movies and I'll tell you honestly that Prometheus is killing me (I'll be SO glad when it's finally opens!). Also, as a shameless plug, if you happen to be planning a trip to see Prometheus at Midnight on Thursday, try to hit your local IMAX screening. Most of them are handing out exclusive promotional prints available just to folks going to those screenings!thumbsup
Anyway... I'm back at home and in between everything I've finally gotten time to hit the helmet with a round of Finishing Putty (or glazing putty). Here's the ugly red and grey and black monstrosity after this application!
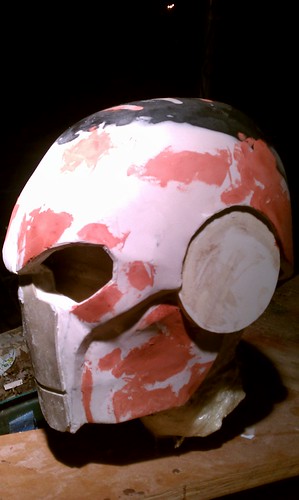
After sanding this, I plan to hit it with a coat of Filling Primer before taking it over for a rough fitting. From there, I'll make any adjustments (hopefully minor ones) and re-bondo any areas that need major work. Spot bondo any areas that just need to be smoothed and then re-prime it again.
The test-fitting (tentatively scheduled for Saturday evening) will also let me know if we can use the eye-assembly I designed. Digitizit will be in charge of the LED/wiring part of the eye assembly, so we just need to get my lens work and his electronics to fit in the space we have available. :confused
I'm off to bed for the evening! I'll update the build when I get another chance! Nite all!:thumbsup
Thanks for all the positive comments! It sure makes the work worth it when folks I deeply respect and admire provide that type of feedback. :$
*****
The delay in posting was due to the end of my time on family vacation in Florida, our 11 hour drive home with four kids in the car and finally getting back to a pile of work at the day job.
As some of you know, I work for a rather larger theatre chain where I coordinate with the studios regarding the placement of their materials in our theatres. This includes the trailers you see before the movies and I'll tell you honestly that Prometheus is killing me (I'll be SO glad when it's finally opens!). Also, as a shameless plug, if you happen to be planning a trip to see Prometheus at Midnight on Thursday, try to hit your local IMAX screening. Most of them are handing out exclusive promotional prints available just to folks going to those screenings!
thumbsupAnyway... I'm back at home and in between everything I've finally gotten time to hit the helmet with a round of Finishing Putty (or glazing putty). Here's the ugly red and grey and black monstrosity after this application!
After sanding this, I plan to hit it with a coat of Filling Primer before taking it over for a rough fitting. From there, I'll make any adjustments (hopefully minor ones) and re-bondo any areas that need major work. Spot bondo any areas that just need to be smoothed and then re-prime it again.
The test-fitting (tentatively scheduled for Saturday evening) will also let me know if we can use the eye-assembly I designed. Digitizit will be in charge of the LED/wiring part of the eye assembly, so we just need to get my lens work and his electronics to fit in the space we have available. :confused
I'm off to bed for the evening! I'll update the build when I get another chance! Nite all!
:thumbsupindiefilmgeek
Sr Member
Re: Steampunk Ironman Helmet WIP - Lens Test Fit Pics!
A bit more work done this afternoon.
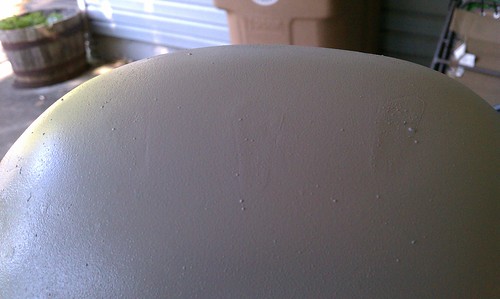
Cut out the second eye-hole and sanded down the finishing bondo. Here's what it looks like.
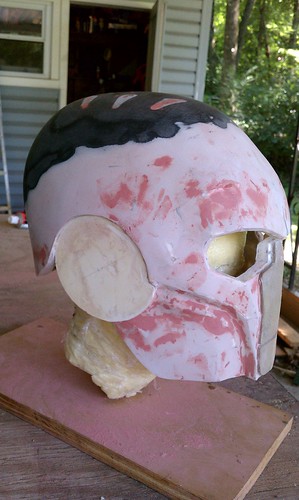

To make it easier to see what still needs to be done, I also hit this with a few coats of filling primer.

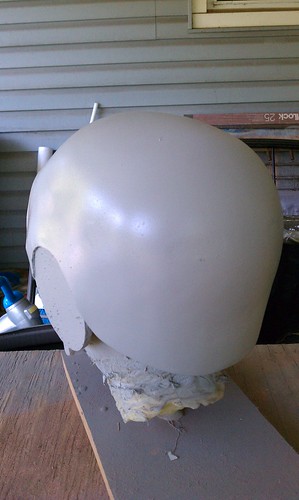
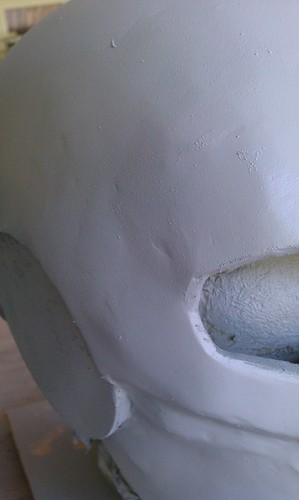
The back is looking pretty good, but there's plenty of work still to do. In addition to the check areas and all the edges, here are some 'trouble' spots that will need some work...
Left temple area:
Skateboard holes that filled in still need to be touched up:
Tomorrow evening is the schedule test-fitting, so Digitizit and I will be updating you after that meet-up.:thumbsup
A bit more work done this afternoon.
Cut out the second eye-hole and sanded down the finishing bondo. Here's what it looks like.
To make it easier to see what still needs to be done, I also hit this with a few coats of filling primer.
The back is looking pretty good, but there's plenty of work still to do. In addition to the check areas and all the edges, here are some 'trouble' spots that will need some work...
Left temple area:
Skateboard holes that filled in still need to be touched up:
Tomorrow evening is the schedule test-fitting, so Digitizit and I will be updating you after that meet-up.
:thumbsupThe Ronin
Well-Known Member
Re: Steampunk Ironman Helmet WIP - Lens Test Fit Pics!
Transitions from one material to the next are always a pain to get "just right." You're probably going to have to rely on some good filler primer and a lot of sanding time to get things to blend without a noticable line in the paint.
Otherwise, this is STILL my favorite IM build, ever. Looking great.
Blackwindpep87
Member
Dude this is awesone i cant wait to get as good as u. My iron man help is okay i guess ill post picks later. Just finished glassin n resining it. Gona bondo tomorrow. But dude steam punk ironman looks awesome cant wait to see the whole suit. Can u pm me the pdos i wanna take a crack at it after i finish my .mk3
Sent from my MB855 using Tapatalk 2
Sent from my MB855 using Tapatalk 2
indiefilmgeek
Sr Member
Re: Steampunk Ironman Helmet WIP - Lens Test Fit Pics!
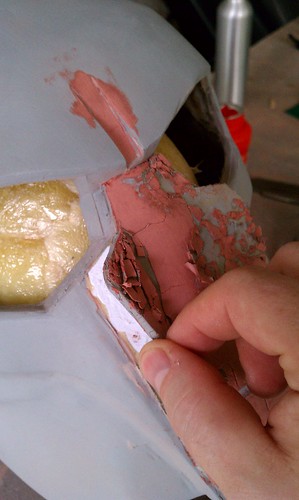
I've always tried to document both my successes AND failures. So, today you get to see one of my set-backs.
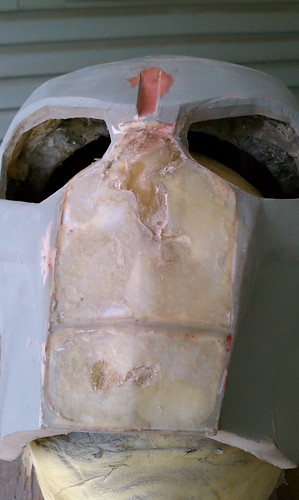
From the onset of the build I intended to get the 'nose-plate' to look like the image, which clearly shows two plates attached to a flat plate that runs from the bridge of the nose to the chin. As the surface is curved, I figured some 3mm EVA foam would do the trick; however, after trying to harden it with resin and even after hitting with auto primer, it still cracked my finishing bondo. :confused

That's obviously not going to work at all, so I traced it (for I reference for the eventual replacement piece) and pulled it off.
NOSE JOB:
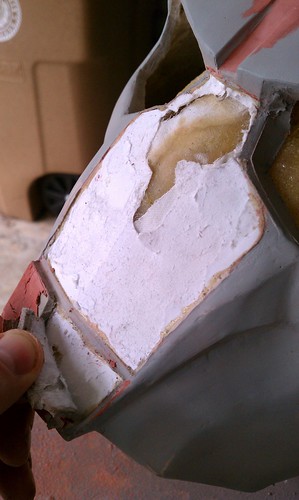
It now looks like this:
The plan now, is to harden it with resin (painted on like the rest of the outside was done). Then bondo and sanding to smooth it completely. AFTER that process, I'll work on making a new nose-piece that will fit onto this area.
I'm heading over to Digitizit's house for a test fitting and some planning for the eye pieces. So, we'll have some more for you by the end of the night!
:thumbsup
I've always tried to document both my successes AND failures. So, today you get to see one of my set-backs.
From the onset of the build I intended to get the 'nose-plate' to look like the image, which clearly shows two plates attached to a flat plate that runs from the bridge of the nose to the chin. As the surface is curved, I figured some 3mm EVA foam would do the trick; however, after trying to harden it with resin and even after hitting with auto primer, it still cracked my finishing bondo. :confused
That's obviously not going to work at all, so I traced it (for I reference for the eventual replacement piece) and pulled it off.
NOSE JOB:
It now looks like this:
The plan now, is to harden it with resin (painted on like the rest of the outside was done). Then bondo and sanding to smooth it completely. AFTER that process, I'll work on making a new nose-piece that will fit onto this area.
I'm heading over to Digitizit's house for a test fitting and some planning for the eye pieces. So, we'll have some more for you by the end of the night!
:thumbsupRe: Steampunk Ironman Helmet WIP - Lens Test Fit Pics!
Eh. just means battle damage and it looks cool anyway :lol
One hell of a build man! Love the design, and that setup with the eyes looks pretty cool!
It's going to make one awesome display piece when it's not at the conventions.
Chris
Eh. just means battle damage and it looks cool anyway :lol
One hell of a build man! Love the design, and that setup with the eyes looks pretty cool!
It's going to make one awesome display piece when it's not at the conventions.
Chris
indiefilmgeek
Sr Member
Re: Steampunk Ironman Helmet WIP - Lens Test Fit Pics!
It fits!:thumbsup
Digitizit slid it right on with no trouble. We also determined that there WILL be room for my lens design and that he'll have limited (but functional) vision with the faceplate down and eyes lit.
I've officially handed over the the two goggle lenses for Digitizit to work on the LED wiring. We'll get these parts back to together toward the end of the helmet build. For now, I'm back to resin, bondo and sanding. :love
It fits!
:thumbsupDigitizit slid it right on with no trouble. We also determined that there WILL be room for my lens design and that he'll have limited (but functional) vision with the faceplate down and eyes lit.
I've officially handed over the the two goggle lenses for Digitizit to work on the LED wiring. We'll get these parts back to together toward the end of the helmet build. For now, I'm back to resin, bondo and sanding. :love
indiefilmgeek
Sr Member
Re: Steampunk Ironman Helmet WIP - Set Backs & Nose Jobs
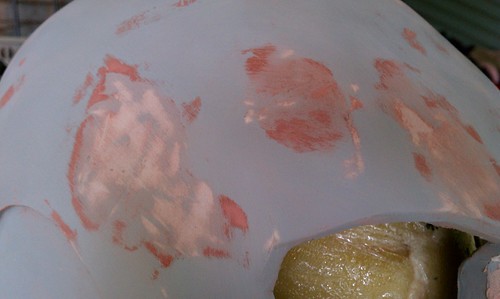
So, this morning prior to church I sanded the rough nose area and hit it with a coat of fiberglass resin. I also re-enforced the inside of the nose with some t-shirt material and more resin.
From there, it got it's first coat of bondo...
After that I had some time, so I started to work on some areas that needed to filled with my finishing or glazing putty. AGAIN, I ran into cracking in several places! :angry
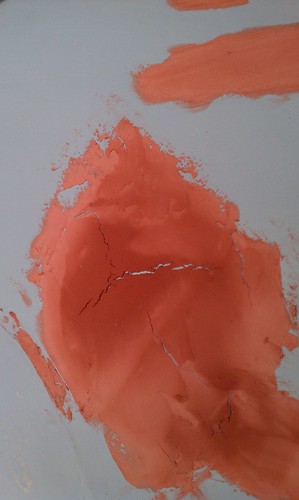
At that point I used a 'life-line' and choose to 'phone a friend.' In this case it is someone with a LOT of professional prop-making experience and quickly isolated my problem!
Turns out the finishing putty I've been using is for VERY small scratches or tiny dings. It's NOT designed to be used at any real thickness - or it cracks (as it shrinks over time). He suggested 'flow-able putty' which is self-leveling and a joy to sand (sounds wonderful, eh?)... except it's only sold in specialty auto paint shops (and I don't have access to them today). Guess I get to just use the supply of basic bondo I have. Well, heck... :facepalm
After some scrapping, sanding and crying I had the thick areas reduced back down to the 'real' bondo and primer.
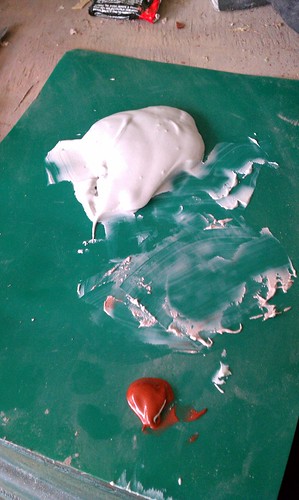
Now, another suggestion my friend offered was a GREAT way to not waste much bondo as you work. Simply layout: the bondo and hardener on separate sides of a mixing matte. Then, as you need a bit of bondo, you just take a small amount of bondo and a touch of hardener into the middle of the matte and mix it just before applying it. In this way, the bondo that is unused, doesn't harden and can even been replaced into it's original container when you're done.
I used this method for all of my last coat of bondo for the day. Here's my set up:
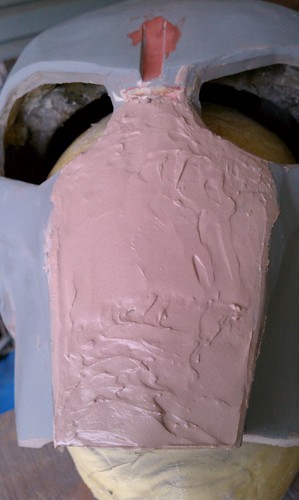
So, after sanding down the first coat of bondo on the nose, I started up another round of basic bondo application.
nose after sanding - prior to 2nd bondo application:

2nd bondo application (front):

That's what I've gotten done today.
So, this morning prior to church I sanded the rough nose area and hit it with a coat of fiberglass resin. I also re-enforced the inside of the nose with some t-shirt material and more resin.
From there, it got it's first coat of bondo...
After that I had some time, so I started to work on some areas that needed to filled with my finishing or glazing putty. AGAIN, I ran into cracking in several places! :angry
At that point I used a 'life-line' and choose to 'phone a friend.' In this case it is someone with a LOT of professional prop-making experience and quickly isolated my problem!
Turns out the finishing putty I've been using is for VERY small scratches or tiny dings. It's NOT designed to be used at any real thickness - or it cracks (as it shrinks over time). He suggested 'flow-able putty' which is self-leveling and a joy to sand (sounds wonderful, eh?)... except it's only sold in specialty auto paint shops (and I don't have access to them today). Guess I get to just use the supply of basic bondo I have. Well, heck... :facepalm
After some scrapping, sanding and crying I had the thick areas reduced back down to the 'real' bondo and primer.
Now, another suggestion my friend offered was a GREAT way to not waste much bondo as you work. Simply layout: the bondo and hardener on separate sides of a mixing matte. Then, as you need a bit of bondo, you just take a small amount of bondo and a touch of hardener into the middle of the matte and mix it just before applying it. In this way, the bondo that is unused, doesn't harden and can even been replaced into it's original container when you're done.
I used this method for all of my last coat of bondo for the day. Here's my set up:
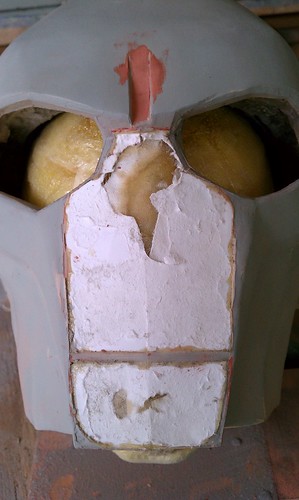
So, after sanding down the first coat of bondo on the nose, I started up another round of basic bondo application.
nose after sanding - prior to 2nd bondo application:
2nd bondo application (front):
That's what I've gotten done today.
Judge Spartan
Sr Member
Re: Steampunk Ironman Helmet WIP - Set Backs & Nose Jobs
Hey Indie, Still looking really good and not too bad of a set back. That type of a set back actually gives you better knowledge for future projects and you will probably wind up with something better. Best of luck and I'm subscribed because I can't wait to see more on your build. Keep up the great work.
Hey Indie, Still looking really good and not too bad of a set back. That type of a set back actually gives you better knowledge for future projects and you will probably wind up with something better. Best of luck and I'm subscribed because I can't wait to see more on your build. Keep up the great work.
pRoJectEarth7
Well-Known Member
Re: Steampunk Ironman Helmet WIP - Set Backs & Nose Jobs
Been watching your progress on this from the very start and you know I'm a big fan of yours...
This is what I really like in all your build thread - YOU LEARN, WE LEARN... it is really cool and you my friend is one of the awesome members here that is well looked upon...:thumbsup
Your helm is really coming along very nicely and your build is such a site for sore eyes (my eyes is already flooded with too much same IM build here...LOL:lol)... yours being a steampunk version is so refreshing... hehe (y'know what I mean:thumbsup)
Keep building my friend... cheers!
Been watching your progress on this from the very start and you know I'm a big fan of yours...
This is what I really like in all your build thread - YOU LEARN, WE LEARN... it is really cool and you my friend is one of the awesome members here that is well looked upon...
:thumbsupYour helm is really coming along very nicely and your build is such a site for sore eyes (my eyes is already flooded with too much same IM build here...LOL:lol)... yours being a steampunk version is so refreshing... hehe (y'know what I mean
:thumbsup)Keep building my friend... cheers!
Re: Steampunk Ironman Helmet WIP - Set Backs & Nose Jobs
Do you know exactly what kind of "flowable putty" to get? What do you ask for?
I think I need something between Evercoat Rage and Bondo Spot Putty.
Thanks for posting your setbacks. Sometimes I see these perfect examples (like Finhead's IM3 thread :facepalm) and then look at my pock-marked, lumpy, full of pin-hole POS and get a bit discouraged.
indiefilmgeek
Sr Member
Re: Steampunk Ironman Helmet WIP - Set Backs & Nose Jobs
Thank you each for the very kind word! I've gained SO much from this community and I just want to do my small part to pay it back. I definitely take advantage of other builders who provided me the same benefit, so I welcome you to learn from my mistakes... it's certainly more efficient than making them yourself! :behave
Also... I know I've said this before, but... PE7, you're helmet came out SO spectacularly great! For anyone just joining the forum, totally check out PROJECTEARTH7's build thread: Truly remarkable! :love
*****
Onto flowable putty!!!
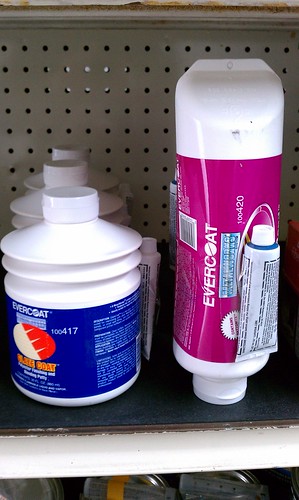
So, I stopped by my local auto paint supply store (this local store is pretty specialized) and found four different products.
Here are some pictures...
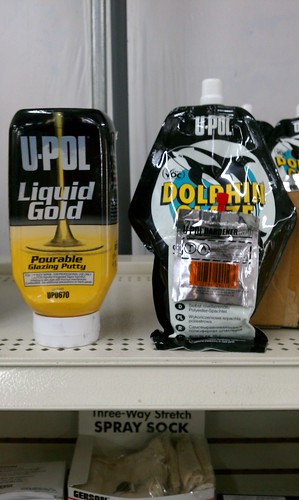
I went with the Evercoat MetalWork EASY SAND... can you blame me? It had 'easy sand' in the NAME for goodness sake! :lol
Actually, the sales guy had worked with a couple of these flowable putties and recommended this one. He TOTALLY agreed with my friend's assessment of the 'finishing' or 'glazing' putty. In fact, he said that technology was outdated and wouldn't recommend using it at all.
He also confirmed that this EASY SAND product works just like standard bondo. Still mix the hardener with the product on cardboard or other smooth surface and use a putty knife (or plastic pieces like I do) for application. He said it does tend to self-level.
Although I asked, the sales guy said this particular shop won't do mail orders. So if you can't find it online, you might need to find a local place that specializes in auto paint and check with them directly.
24oz set me back $30... So, be warned it's probably not the cheapest solution. :unsure
If you'd like to see it in action, I'll try to get some pics and maybe even some video this evening.
Thank you each for the very kind word! I've gained SO much from this community and I just want to do my small part to pay it back. I definitely take advantage of other builders who provided me the same benefit, so I welcome you to learn from my mistakes... it's certainly more efficient than making them yourself! :behave
Also... I know I've said this before, but... PE7, you're helmet came out SO spectacularly great! For anyone just joining the forum, totally check out PROJECTEARTH7's build thread: Truly remarkable! :love
*****
Onto flowable putty!!!
So, I stopped by my local auto paint supply store (this local store is pretty specialized) and found four different products.
Here are some pictures...
I went with the Evercoat MetalWork EASY SAND... can you blame me? It had 'easy sand' in the NAME for goodness sake! :lol
Actually, the sales guy had worked with a couple of these flowable putties and recommended this one. He TOTALLY agreed with my friend's assessment of the 'finishing' or 'glazing' putty. In fact, he said that technology was outdated and wouldn't recommend using it at all.
He also confirmed that this EASY SAND product works just like standard bondo. Still mix the hardener with the product on cardboard or other smooth surface and use a putty knife (or plastic pieces like I do) for application. He said it does tend to self-level.
Although I asked, the sales guy said this particular shop won't do mail orders. So if you can't find it online, you might need to find a local place that specializes in auto paint and check with them directly.
24oz set me back $30... So, be warned it's probably not the cheapest solution. :unsure
If you'd like to see it in action, I'll try to get some pics and maybe even some video this evening.
rosskow
Sr Member
Re: Steampunk Ironman Helmet WIP - Set Backs & Nose Jobs
good to see you're making progress after your set back and i'll thank you for myself and other for sharing your experiences, i have learnt many helpful tips from people's builds, without people like you'd i'd be making 10 times more mistakes than i already do in order to find the right way to do or a better way.
keep up the build
electraflier
Well-Known Member
Re: Steampunk Ironman Helmet WIP - Set Backs & Nose Jobs
Your patience is amazing! I can only imagine your frustration at having to strip your helmet back down, but as I was just saying to another friend on his build, "sometimes its an easy problem to solve, other times its back to the drawing board!" You are doing awesome work! I am watching your build closely because I am on my first MK3 build and also because the SteamPunk Iron Man is so wicked cool, i have to see it finished!
Your patience is amazing! I can only imagine your frustration at having to strip your helmet back down, but as I was just saying to another friend on his build, "sometimes its an easy problem to solve, other times its back to the drawing board!" You are doing awesome work! I am watching your build closely because I am on my first MK3 build and also because the SteamPunk Iron Man is so wicked cool, i have to see it finished!
Similar threads
- Replies
- 10
- Views
- 414
- Replies
- 3
- Views
- 957
- Replies
- 10
- Views
- 1,355
- Replies
- 4
- Views
- 1,749