You are using an out of date browser. It may not display this or other websites correctly.
You should upgrade or use an alternative browser.
You should upgrade or use an alternative browser.
Steampunk Ironman Helmet WIP - 5/31 update
- Thread starter indiefilmgeek
- Start date
indiefilmgeek
Sr Member
Re: Steampunk Ironman Helmet WIP - Marking for Faceplate Cut
Thanks, guys! Staring at this thing for hours at a time can throw off my perspective -- it's nice to hear that you think they look good (and represent the artwork well). :confused
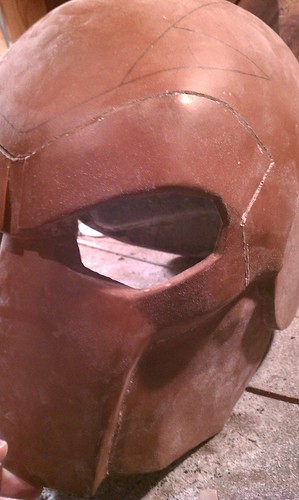
Here is what my full evening of line-drawing produced last night. Both sides 'look' pretty symmetrical and measure out equally (as close as I can get).
Again, here is the reference:
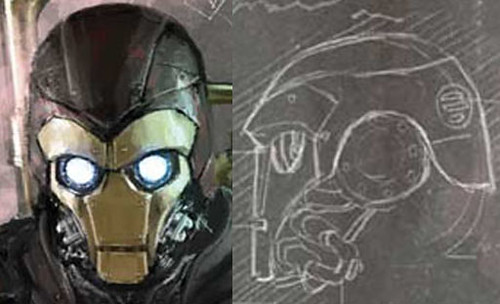
And here is what the top lines look like...
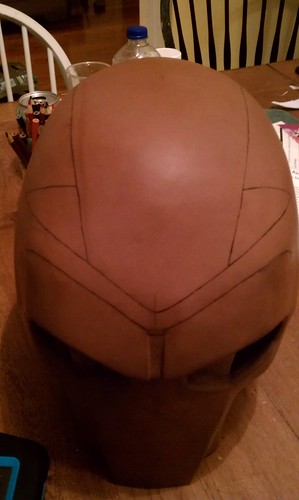
So, now that I've got both side of the faceplate marked out.....
I'M CUTTING THE FACEPLATE OUT! :love
I'm off work this afternoon so, with no kids to keep up with my wife off getting a massage, I'll have the house to myself (very rare these days). So, I'm gonna spend my time taking a power tool and cutting this bucket into pieces (hopefully in a good way).
I'll try to do everything I can to document it. This is an area I DIDN'T cover in Mikey's build, and it's one of the 'scariest' steps in this type of IM build, so I really want to do what I can to provide some pictures (and maybe video?!) of the process.
*****
Prior to starting I wanted to prep you with some reference pictures I haven't shown you yet. These are all INSIDE helmet pictures (where no clean-up has happened).
The reason I'm showing you these is to identify one of the issues I'll have to deal with when removing THIS particular faceplate. See, the TOP of the faceplate 'eye-brows' is high enough that it crosses over from the fiberglassed pep onto the plastic protective helmet that we used as a base for the build.
That means, that some of the cutting will be straight-up fiberglass with bondo on top. And some of the cutting will be figerglass pep with bondo on top AND plastic helmet (and 3/4" styrofoam padding).
First off, I'm worried about about HOW to cut through all that stuff. In some places air-gaps were pour-filled with resin (so they will be VERY THICK). Other places may not be as dense to cut, but present some challenges for my dremel blade length. Secondly, I'm very interested in what affect having all these materials and thicknesses might have on the shape/look of the helmet post cut (particularly the 'face' opening on main helmet side of things).
I'm sure it will all be manageable, but I wanted to prep you all with some photos of what things looked like pre-cut.
Here are the reference picture so you know what I'm looking at when making these cuts....
Looking straight down into the base of the helmet (faceplate to the left), you can see the skateboard helmet/padding starts RIGHT above the eye-holes.
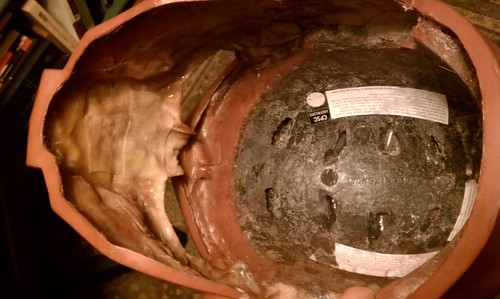
Here's a close-up...
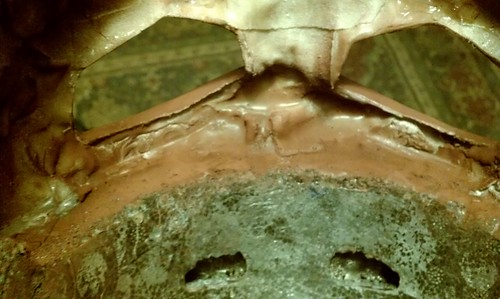
In connecting the pep to the helmet, resin got filled into the space between the paper pep and the plastic helmet surface, but also between the helmet plastic and the hard foam padding and along the top edge of the padding itself. That's an inch THICK in places. :confused
Anyway... Stay tuned - I should have a nice big updated coming with LOTS of details about the cut and how it went!
Thanks!") :thumbsup
:thumbsup
Thanks, guys! Staring at this thing for hours at a time can throw off my perspective -- it's nice to hear that you think they look good (and represent the artwork well). :confused
Here is what my full evening of line-drawing produced last night. Both sides 'look' pretty symmetrical and measure out equally (as close as I can get).
Again, here is the reference:
And here is what the top lines look like...
So, now that I've got both side of the faceplate marked out.....
I'M CUTTING THE FACEPLATE OUT! :love
I'm off work this afternoon so, with no kids to keep up with my wife off getting a massage, I'll have the house to myself (very rare these days). So, I'm gonna spend my time taking a power tool and cutting this bucket into pieces (hopefully in a good way).
I'll try to do everything I can to document it. This is an area I DIDN'T cover in Mikey's build, and it's one of the 'scariest' steps in this type of IM build, so I really want to do what I can to provide some pictures (and maybe video?!) of the process.
*****
Prior to starting I wanted to prep you with some reference pictures I haven't shown you yet. These are all INSIDE helmet pictures (where no clean-up has happened).
The reason I'm showing you these is to identify one of the issues I'll have to deal with when removing THIS particular faceplate. See, the TOP of the faceplate 'eye-brows' is high enough that it crosses over from the fiberglassed pep onto the plastic protective helmet that we used as a base for the build.
That means, that some of the cutting will be straight-up fiberglass with bondo on top. And some of the cutting will be figerglass pep with bondo on top AND plastic helmet (and 3/4" styrofoam padding).
First off, I'm worried about about HOW to cut through all that stuff. In some places air-gaps were pour-filled with resin (so they will be VERY THICK). Other places may not be as dense to cut, but present some challenges for my dremel blade length. Secondly, I'm very interested in what affect having all these materials and thicknesses might have on the shape/look of the helmet post cut (particularly the 'face' opening on main helmet side of things).
I'm sure it will all be manageable, but I wanted to prep you all with some photos of what things looked like pre-cut.
Here are the reference picture so you know what I'm looking at when making these cuts....
Looking straight down into the base of the helmet (faceplate to the left), you can see the skateboard helmet/padding starts RIGHT above the eye-holes.
Here's a close-up...
In connecting the pep to the helmet, resin got filled into the space between the paper pep and the plastic helmet surface, but also between the helmet plastic and the hard foam padding and along the top edge of the padding itself. That's an inch THICK in places. :confused
Anyway... Stay tuned - I should have a nice big updated coming with LOTS of details about the cut and how it went!
Thanks!
:thumbsupWarpfrenzy
New Member
Re: Steampunk Ironman Helmet WIP - I'm going to cutout the Faceplate TODAY!
Steampunk everything
Steampunk everything
digital509
Well-Known Member
Re: Steampunk Ironman Helmet WIP - I'm going to cutout the Faceplate TODAY!
Good luck with the cut!! I'm digging the detail lines.
Good luck with the cut!! I'm digging the detail lines.
propnoob74
Well-Known Member
Re: Steampunk Ironman Helmet WIP - I'm going to cutout the Faceplate TODAY!
Amazing job brother!!!! good luck there, can't wait to see the end product
Amazing job brother!!!! good luck there, can't wait to see the end product
timelordjedi777
Sr Member
Re: Steampunk Ironman Helmet WIP - I'm going to cutout the Faceplate TODAY!
Good luck.
Good luck.
Rysjin7717
Well-Known Member
Re: Steampunk Ironman Helmet WIP - I'm going to cutout the Faceplate TODAY!
Good luck on th' cutting brah but I think that you can do it!!!!!cool
Good luck on th' cutting brah but I think that you can do it!!!!!
coolindiefilmgeek
Sr Member
Re: Steampunk Ironman Helmet WIP - I'm going to cutout the Faceplate TODAY!
It's done! The faceplate and helmet are now two separate pieces!:thumbsup
Unfortunately it took me over 2 hours to do it this evening and I'm too tired to post an update tonight. First thing tomorrow, I promise full details, pictures and even a few VIDEOS! hurrah!
Nite all!
It's done! The faceplate and helmet are now two separate pieces!
:thumbsupUnfortunately it took me over 2 hours to do it this evening and I'm too tired to post an update tonight. First thing tomorrow, I promise full details, pictures and even a few VIDEOS! hurrah!
Nite all!
digital509
Well-Known Member
Re: Steampunk Ironman Helmet WIP - I'm going to cutout the Faceplate TODAY!
Congrats on a clean separation! Can't wait to see it.
Congrats on a clean separation! Can't wait to see it.
electraflier
Well-Known Member
Re: Steampunk Ironman Helmet WIP - I'm going to cutout the Faceplate TODAY!
Good Luck I am waiting with breathless excitement for you and cant wait to see it!!!
Good Luck I am waiting with breathless excitement for you and cant wait to see it!!!
indiefilmgeek
Sr Member
Re: Steampunk Ironman Helmet WIP - I'm going to cutout the Faceplate TODAY!
Thanks for your patience. Last night was LONG, but I'm thrilled with the outcome!:thumbsup
I'm not sure how helpfully they will be, since I was dealing with some 'unique' design issues on this cut, but I video taped quite a bit last night (4 ten minute videos plus one this morning showing the final cut pieces). Hopefully, some of the info I tried to include will help folks that haven't done this particular step in the process.
So, here we go....:thumbsup
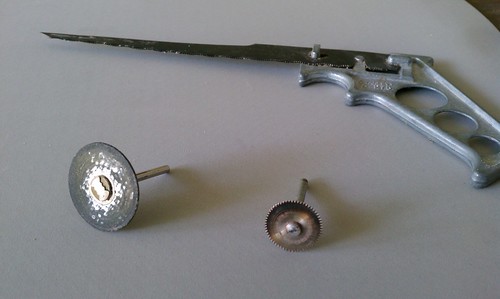
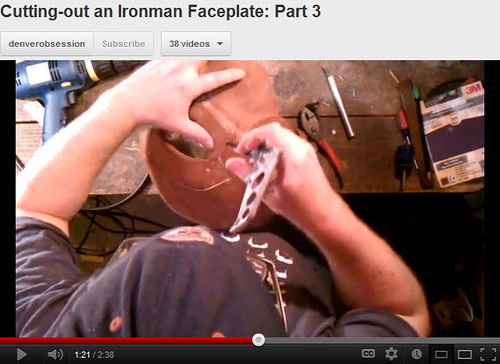
First off, here is a picture of the cutting tools I used. There are two different cutting wheels for my Dremel. The smaller one is just perfect for the thickness of normal fiberglassed paper pep helmets. It is a specialty blade you have to purchase separately, but since it's all metal with very fine teeth - it make VERY clean cuts. The larger cutting wheel is a common type. It's wider than the tiny blade, but it can cut deeper... which will be important for this project. The last tool is my little hand saw. If you can find a small saw like this (with a cutting width no wider than the bigger cutting wheel for my dremel), it's a MUST for this work - especially in those right angle corners!
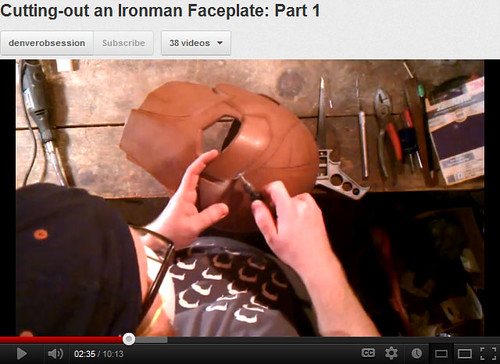
So, starting with the tiny cutting blade, I traced my cut-lines for the faceplate.
Here's the videos of these cuts:
And here is a closer look at what those cut looks like:
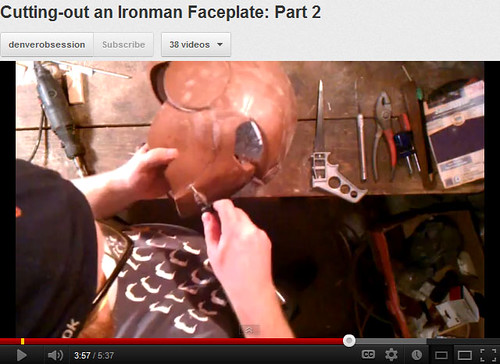
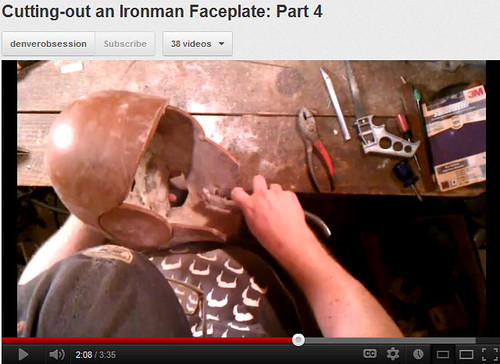
After this, I started using the larger cutting wheel that can make a deeper cut. And while this still won't come close to cutting through all the stuff at the brow, it was enough to cut through some of the thicker areas at the temple of the helmet.
In this video, I show you that work and also give you an idea of how I use that hand-saw.
At this point, I concentrated on that brow area and started out by drilling very small holes in the cut-lines that I then pushed wire into. That wire punched through to the inside so I could identify how much of the interior padding I need to remove in order to 'find' my cuts. With that material removed, I was able to finally work the thickness down to a point where I could get my hand-saw into the cut. From there is was pretty straight-forward to cut along the lines I had started.
Here a video update of this part (and a tip on how to deal with any areas on the inside that might be slightly too thick for a shallow blade like my tiny wheel).
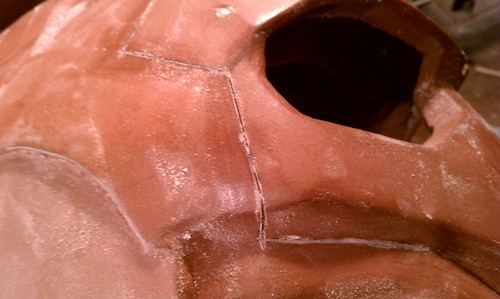
Here is a close-up picture of what this cut looked like:
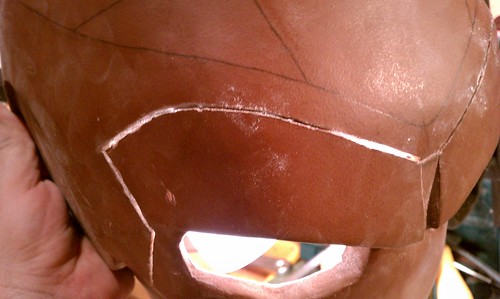
At this stage the same work just had to be done on the other side of the faceplate. This went pretty quickly as I had already figured out what had to be done and how to do it.
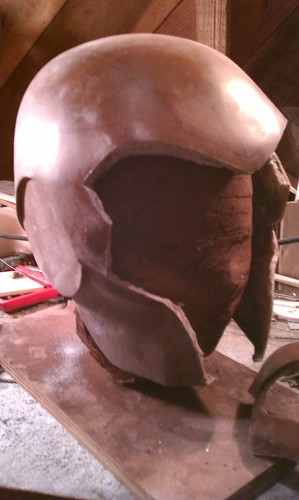
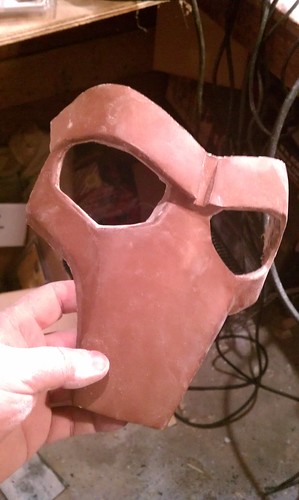
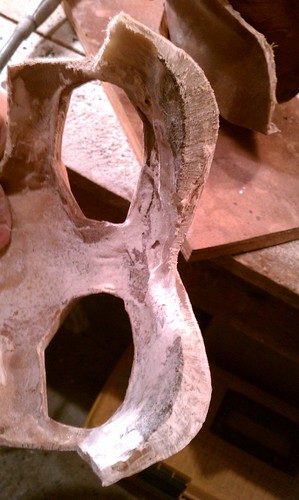
The end result of all the work was a final separation of the faceplate from the main body of the helmet around midnight last night.
Here's what the pieces looks like RIGHT after the cut was complete...
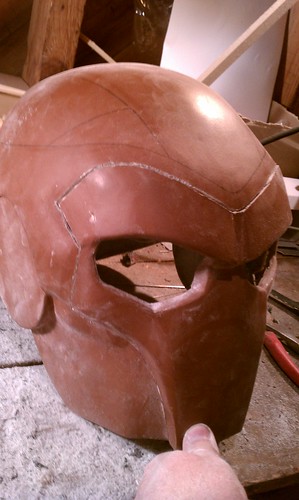
Main Helmet:
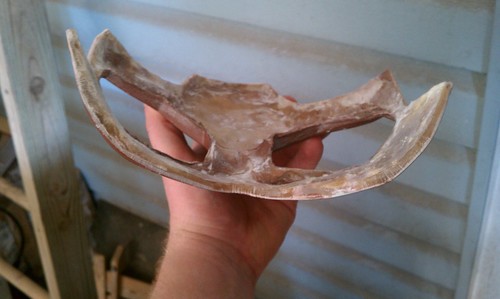
Faceplate:
Faceplate (at the brow - showing thickness):
Faceplate open with Helmet:
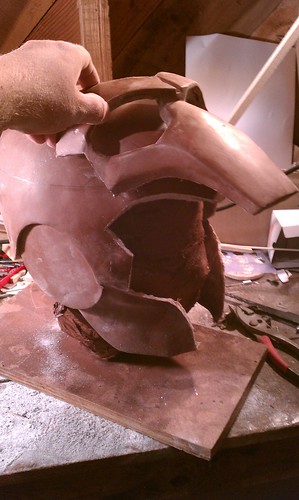
Overall, I'm thrilled with the results! It is a nice clean cut that I was able to do while keeping the gap between pieces relatively narrow.
The next steps will be to clean this up with my dremel sanding attachment and then begin building the overlapping lips for the faceplate to 'sit' against. I Build these out of card-stock which I fiberglass and resin (just like you do for the pepakura helmet).
Until then, I'll leave you with a wrap-up video I did this morning walking you through what the pieces looks like right now (without any clean-up).

:thumbsup
Thanks for your patience. Last night was LONG, but I'm thrilled with the outcome!
:thumbsupI'm not sure how helpfully they will be, since I was dealing with some 'unique' design issues on this cut, but I video taped quite a bit last night (4 ten minute videos plus one this morning showing the final cut pieces). Hopefully, some of the info I tried to include will help folks that haven't done this particular step in the process.
So, here we go....
:thumbsupFirst off, here is a picture of the cutting tools I used. There are two different cutting wheels for my Dremel. The smaller one is just perfect for the thickness of normal fiberglassed paper pep helmets. It is a specialty blade you have to purchase separately, but since it's all metal with very fine teeth - it make VERY clean cuts. The larger cutting wheel is a common type. It's wider than the tiny blade, but it can cut deeper... which will be important for this project. The last tool is my little hand saw. If you can find a small saw like this (with a cutting width no wider than the bigger cutting wheel for my dremel), it's a MUST for this work - especially in those right angle corners!
So, starting with the tiny cutting blade, I traced my cut-lines for the faceplate.
Here's the videos of these cuts:
And here is a closer look at what those cut looks like:
After this, I started using the larger cutting wheel that can make a deeper cut. And while this still won't come close to cutting through all the stuff at the brow, it was enough to cut through some of the thicker areas at the temple of the helmet.
In this video, I show you that work and also give you an idea of how I use that hand-saw.
At this point, I concentrated on that brow area and started out by drilling very small holes in the cut-lines that I then pushed wire into. That wire punched through to the inside so I could identify how much of the interior padding I need to remove in order to 'find' my cuts. With that material removed, I was able to finally work the thickness down to a point where I could get my hand-saw into the cut. From there is was pretty straight-forward to cut along the lines I had started.
Here a video update of this part (and a tip on how to deal with any areas on the inside that might be slightly too thick for a shallow blade like my tiny wheel).
Here is a close-up picture of what this cut looked like:
At this stage the same work just had to be done on the other side of the faceplate. This went pretty quickly as I had already figured out what had to be done and how to do it.
The end result of all the work was a final separation of the faceplate from the main body of the helmet around midnight last night.
Here's what the pieces looks like RIGHT after the cut was complete...
Main Helmet:
Faceplate:
Faceplate (at the brow - showing thickness):
Faceplate open with Helmet:
Overall, I'm thrilled with the results! It is a nice clean cut that I was able to do while keeping the gap between pieces relatively narrow.
The next steps will be to clean this up with my dremel sanding attachment and then begin building the overlapping lips for the faceplate to 'sit' against. I Build these out of card-stock which I fiberglass and resin (just like you do for the pepakura helmet).
Until then, I'll leave you with a wrap-up video I did this morning walking you through what the pieces looks like right now (without any clean-up).
:thumbsuppRoJectEarth7
Well-Known Member
Re: Steampunk Ironman Helmet WIP - Faceplate Cutting Video & Pics!
PERFECT cut! Patience and steady hands paid off :thumbsup
congrats!
PERFECT cut!
Patience and steady hands paid off :thumbsupcongrats!
Rysjin7717
Well-Known Member
Re: Steampunk Ironman Helmet WIP - Faceplate Cutting Video & Pics!
Indie, congrats on gettin' th' faceplate cut especially th' brow areas man that was some thick stuff brah. Keep up th' good work on this.:smokincool:cool
Indie, congrats on gettin' th' faceplate cut especially th' brow areas man that was some thick stuff brah. Keep up th' good work on this.:smokincool:cool
indiefilmgeek
Sr Member
Re: Steampunk Ironman Helmet WIP - Faceplate Cutting Video & Pics!
Got a bit more work do today...
Here is a look at the top of the faceplate after sanding (with my dremel) that crazy thickness down.
I also started the process of creating my overlap for the faceplate to rest on. To create this I just take card-stock paper which I cut and glue around the edges of the cut. This paper will be fiberglassed (just like the main helmet), and then I'll use some of my new flowable putty to smooth these edges out (just like you would with bondo).
Here are the first couple of pieces I hot-glued into place...
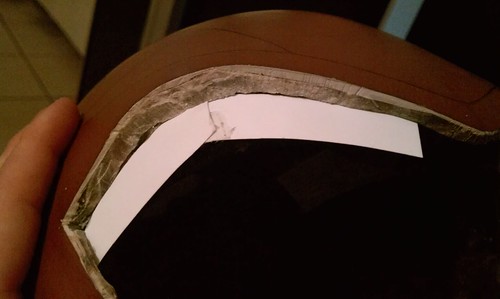
To make sure the paper I'm gluing into place won't push the faceplate out of alignment, I tend to check the fit even as the glue is cooling. I just put the faceplate into place and then check out the inside. If the paper has just a bit of an air gap between it and the faceplate, we're golden!
Here is a look at the overlap flap as I test the fit with the faceplate...
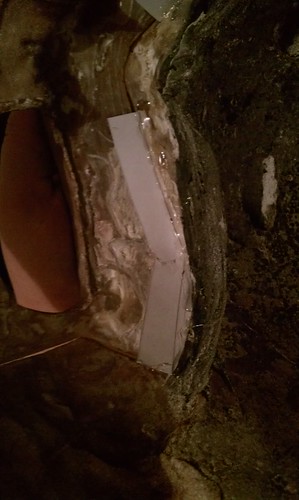
After a bit more cutting and gluing, here is the full brow-ridge done...

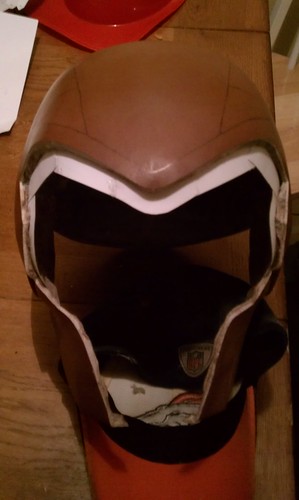
And HERE is what it looks like at the end of the night...
Now, before I finished this up and applied a coat of resin... I got to thinking about the space over Victorian Inventor Anthony Stark's nose and mouth. I believe, I'd like to do something more than just a bit of overlap material in this space (even though it's behind the faceplate most of the time).
After sketching some things up, my favorite idea is to create a 'metal-looking' frame/mount for a round microphone/speaker unit. With the faceplate down, you will see nothing, but when the faceplate is opened, we can then all see some of the mechanics of the internal parts (and a round heavy metal mircophone/speaker assembly will work to fill this space as well as give the costume a nice additional touch of detail.
...it will also allow Digitizit to still easily get a straw into his mouth for water (if he's too lazy to just pull the darn helmet off). :lol
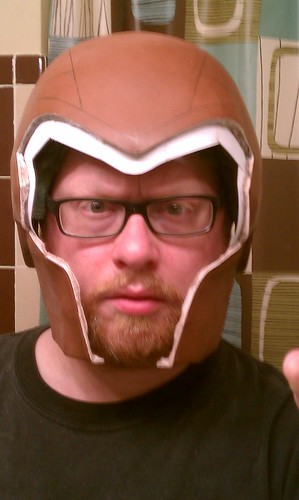
And, just for fun, here's a pic of me in the helmet (mind you my skull is much smaller than Digitizit -- on him, it fits without adding additional padding like I need to do! :facepalm
Have a great night!
Got a bit more work do today...
Here is a look at the top of the faceplate after sanding (with my dremel) that crazy thickness down.
I also started the process of creating my overlap for the faceplate to rest on. To create this I just take card-stock paper which I cut and glue around the edges of the cut. This paper will be fiberglassed (just like the main helmet), and then I'll use some of my new flowable putty to smooth these edges out (just like you would with bondo).
Here are the first couple of pieces I hot-glued into place...
To make sure the paper I'm gluing into place won't push the faceplate out of alignment, I tend to check the fit even as the glue is cooling. I just put the faceplate into place and then check out the inside. If the paper has just a bit of an air gap between it and the faceplate, we're golden!
Here is a look at the overlap flap as I test the fit with the faceplate...
After a bit more cutting and gluing, here is the full brow-ridge done...
And HERE is what it looks like at the end of the night...
Now, before I finished this up and applied a coat of resin... I got to thinking about the space over Victorian Inventor Anthony Stark's nose and mouth. I believe, I'd like to do something more than just a bit of overlap material in this space (even though it's behind the faceplate most of the time).
After sketching some things up, my favorite idea is to create a 'metal-looking' frame/mount for a round microphone/speaker unit. With the faceplate down, you will see nothing, but when the faceplate is opened, we can then all see some of the mechanics of the internal parts (and a round heavy metal mircophone/speaker assembly will work to fill this space as well as give the costume a nice additional touch of detail.
...it will also allow Digitizit to still easily get a straw into his mouth for water (if he's too lazy to just pull the darn helmet off). :lol
And, just for fun, here's a pic of me in the helmet (mind you my skull is much smaller than Digitizit -- on him, it fits without adding additional padding like I need to do! :facepalm
Have a great night!
tonykch
Well-Known Member
Re: Steampunk Ironman Helmet WIP - Faceplate Cutting Video & Pics!
I'd just like to say, that's an awesome Magneto helmet!
And, just for fun, here's a pic of me in the helmet (mind you my skull is much smaller than Digitizit -- on him, it fits without adding additional padding like I need to do! :facepalm
Have a great night!
I'd just like to say, that's an awesome Magneto helmet!
indiefilmgeek
Sr Member
Re: Steampunk Ironman Helmet WIP - Faceplate Cutting Video & Pics!
Yep! I've actually been running around all evening trying to levitate metal objects around the house with it.... no luck so far! :facepalm
I'd just like to say, that's an awesome Magneto helmet!
Yep! I've actually been running around all evening trying to levitate metal objects around the house with it.... no luck so far! :facepalm
chimmera30
Well-Known Member
Re: Steampunk Ironman Helmet WIP - Faceplate Cutting Video & Pics!
Simply Brilliant!!!!!!
beautiful work!
Simply Brilliant!!!!!!
beautiful work!
Similar threads
- Replies
- 11
- Views
- 491
- Replies
- 3
- Views
- 970
- Replies
- 10
- Views
- 1,376
- Replies
- 4
- Views
- 1,764