My Star Wars helmets workbench

ColKel

Active Member
Hi guys. I had such a good response in my Pepakura Ironman Helmet thread that I thought I would share some pics of my Star Wars helmets i've been working on. They are all custom made.

My Ironman helmet thread can be found here :

http://www.therpf.com/f24/my-styrene-pepakura-ironman-helmet-158412/

The Clonetrooper and Boba Fett are made from styrene plastic and the ROTS Darth Vader reveal and Stormtrooper were the traditional clay sculp, molded in plaster and the bits and pieces on the reveal scratch built in styrene plastic. The Stormtrooper pictured is a not so successful first attempt at vacuum forming in ABS plastic.

I'll try adding pics of all the helmets during the week, but thought I would start off with the Clonetrooper.

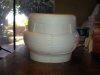
I wanted to make the Clonetrooper with a removable base so that it can have an accurate base with the neck ring for display and a base with the neck ring cut out so it's wearable. The whole helmet was modeled from 1mm and 0.5 mm styrene sheets with only the dome part vacuum formed.

I'm happy to answer any questions you guys may have. Remarks and critiques are more than welcome.

Onto the pics :

The second pic is the reference pic I used and the look I was going for.
 
Hey there
As a fellow South African I understand where you come from with the cardstock/fibreglass/bondo issues, cant seem to find it anywhere :/.
If you could spend just an hour or so of your time creating a video for all of us to see just HOW you use styrene to construct your work I'd really appreciate it.

Too bad you aren't in Cape Town to show me personally.
Eagerly awaiting your response and also some of your latter work.

Could you also pm me your email or something - it would be easier to contact you then - dvnjoubert0@gmail.com :)
 
Very nice job on the helmets. Will you mold and cast them? Paint them?

I myself, am not unfamiliar with the clone helmet. That is a beautiful neck ring, but you must cut it one more time to get your head in there. Historically, we have cut the ring from one side to the other, and either the back half, or the front half becomes a door to get your head in there. Using the front half of the ring as the door works better if you are wearing armor, as it is impossible to install the door in the rear if you are wearing armor!

I have often wondered if it would be benificial to cut the neck ring front to back, as possibly a less noticible seam to the onlooker.

Just something to think about if you plan to mold these.
 
Hi guys. My apologies for bumping an old thread but figured I might as well update this thread with my latest project instead of starting a new one. I started the biker scout helmet about a year and a half ago and finally got it to a stage that it is about 80% done. The only thing left is basically to round the corners and edges to make it look vacuumformed and fill in all the uneven spots.

The helmet is modeled out of styrene plastic using Pepakura. You can check out my Iron Man helmet thread which has bit of a tutorial on how I did it :

http://www.therpf.com/f24/my-styrene-pepakura-ironman-helmet-158412/

I'll try and give a little explanation of my progress along with the pics. Unfortunately I kept forgetting to take pics of my progress so there are a lot of gaps in my progress but I'll try and fill in the blanks the best I can.

1) The 3d model I used below was modeled in Metasequoia. I like using Metasequoia because it is fairly easy to use especially for somebody like me with a limited 3d modeling ability. I don't really know what Metasequoia means but in my case I suspect it might mean 3d modeling for dummies.

Image1.jpgImage2.jpgImage3.jpgImage4.jpgImage5.jpgImage6.jpg

2) I thought I'd better start off with the face plate. It seemed like the most difficult part of the helmet and I figured if I couldn't pull off the face plate there was no point in continuing. One thing I learned from making the Iron Man helmet was that enough supports make things a lot easier. Usually I would use 2mm styrene for the supports but I knew that there was going to be a point where I would have to remove most of the supports so I could fit the faceplate onto the main part of the helmet. So I opted for 1mm styrene instead.

Biker Scout 1.jpgBiker Scout 2.jpgBiker Scout 3.jpgBiker Scout 058.jpgBiker Scout 059.jpg
 
Last edited:
3) After getting the face plate to a stage where I thought this might work I decided to do the nose piece before continuing on to the main part of the helmet. The nose piece was scratch built from 0.5mm and 1mm styrene. I'm quite happy with the result although I may make some minor changes in the future.

Biker Scout 053.jpgBiker Scout 055.jpgBiker Scout 057.jpg

4) Onto the main part of the helmet. The dome seemed like a logical place to start. I started making the support structure for the dome using 2mm styrene and covered it using 1mm styrene. I decided to cover the dome in quadrants which made adjustments easier instead of trying to do it in one or two big pieces. I ended up doing 3 layers of 1mm styrene.

Biker Scout 12.jpgBiker Scout 11.jpgBiker Scout 13.jpgBiker Scout 14.jpgBiker Scout 15.jpgBiker Scout 12.jpgBiker Scout 16.jpgBiker Scout 19.jpg
 
5) Once again I decided to go with the 2mm styrene for the support structure for the main part of the helmet.

Biker Scout 23.jpgBiker Scout 20.jpgBiker Scout 22.jpgBiker Scout 21.jpg

Here's a pic with the face plate fitted onto the main part. It's starting to look like a biker scout.

Biker Scout 24.jpg

Halfway through I decided to try a different technique than previously. Instead of doing the sections with Pepakura and then gluing them onto the supports, I would try and glue the individual pep strips directly onto the support structure. To do this I had to double up on the supports. A bit more work but in the end probably saved a lot of time because I could adjust where needed as I went along instead of trying to modify an already built section to fit onto the structure.

Biker Scout 29.jpgBiker Scout 30.jpgBiker Scout 28.jpgBiker Scout 27.jpg

6) The following series of pics are basically just progress shots of the pep strips being glued onto the support structure. Again, I ended up mainly doing 3 layers of 1mm strips with a layer or two added here and there to get a more accurate shape. I find that 3mm of styrene gives you enough thickness to sand the curved areas without sanding through the layers of styrene.

Biker Scout 31.jpgBiker Scout 32.jpgBiker Scout 33.jpgBiker Scout 35.jpgBiker Scout 37.jpgBiker Scout 38.jpg

In the next couple of pics you'll notice strips of styrene I glued in between the pep strips to fill the gaps. One problem with doing layers of styrene is the more layers you do the less the pepakura strips fit, especially on curved areas. Strips of styrene makes an ideal way to fill in all the gaps and once sanded it's almost invisible.

Biker Scout 39.jpgBiker Scout 41.jpgBiker Scout 42.jpg
 

Attachments

  • Biker Scout 40.jpg
    Biker Scout 40.jpg
    245 KB · Views: 182
Last edited:
7) The next couple of pics are of the back of the helmet sanded. I wasn't too happy with the shape of the ear vent sections. They seemed too flat so I had to add a layer or two of styrene to give it a better shape. Also in the pics below you'll notice that I added about a centimeter onto the depth of the face plate.

Biker Scout 47.jpgBiker Scout 48.jpgBiker Scout 49.jpg

The following pic just shows the ear vent area tidied up a bit.

Biker Scout 077.jpg

8) The following series of pics shows the recessed vent area on the back of the helmet. Nothing too exciting.

Biker Scout 079.jpgBiker Scout 081.jpg

9) As I was finishing the vent area I noticed that the neck area of the helmet seemed too long so I decided to remove about 1 cm.

Biker Scout 086.jpgBiker Scout 088.jpgBiker Scout 089.jpg

10) The visor posed another problem. I didn't want to glue tabs onto to pep strips because I wanted a smooth surface on the inside. So I got the idea to do one layer of pep strips in one direction and the unfold the following layer in the opposite direction. That way I can glue the one strip on top of another and keep the inside smooth. For the visor I used four layers of 0.5mm styrene for a total thickness of 2mm. Also, I had planned from the beginning to use the face plate as a base to do the visor on. That is why the face plate extends all the way back to where it attaches to the back part of the helmet. I spot glued the bottom pep sections onto the face plate and removed it after doing the other layers. Turned out pretty good.

Biker Scout 085.jpg

This is what it looks like with the visor attached.

Biker Scout 093.jpgBiker Scout 094.jpgBiker Scout 095.jpgBiker Scout 096.jpgBiker Scout 097.jpg

11) This is what it looks like up to date. I removed the eye section because I brought the middle part of the eye area forward by about 3/4 of a centimeter to give it more of a curve. It seemed too flat. I'm quite happy with how it looks so far.

Biker Scout 102.jpgBiker Scout 101.jpgBiker Scout 100.jpgBiker Scout 099.jpgBiker Scout 098.jpg


Only a couple minor things to sort out as well as rounding the corners and edges to make it look vacuumformed before I can start the final filling and sanding.

Any critique is welcomed and I'm happy to answer any questions.

Thanks.

Colin
 
Last edited:
This thread is more than 7 years old.

Your message may be considered spam for the following reasons:

  1. This thread hasn't been active in some time. A new post in this thread might not contribute constructively to this discussion after so long.
If you wish to reply despite these issues, check the box below before replying.
Be aware that malicious compliance may result in more severe penalties.
Back
Top