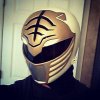
MMPR - White Ranger Costume 2014 , Kibaranger

alejoloaizam5

New Member
Hey guys!

I decided to build a new helmet for this halloween, and since I'm a power rangers fan, then I'm gonna build the whole white ranger suit for this year!!! :)

I hope you guys give your opinions during the process.

OK, let's start.

Well, the first thing that I had to build was the helmet -- of course! -- so I looked for some free PDO files on websites and posts/threads (like this), but I only got the one from eyeofsauron, which is really good by the way!!.... but this version is similar to the one that Tommy wore in the first MMPR movie... anyways.. I said " I'll give it a shot and if I have to change it, then I'll do it -- that's why you use bodyfiller hahahaha"...but to be honest, I ended up looking for another file! (after 20 days of hard work) -- So, I got a really good one from PROPZONE...this version is pretty close to the tv show one...


This is eyeofsauron's file. I used rondo (body filler + polyester resin) on the inside, and wood filler on the outside. (I didn't take any picture while I was coating the inside with rondo).

DSC01515.JPG DSC01569.JPG DSC01592.JPG DSC01596.JPG

At this stage, I noticed the helmet wasn't the version I wanted so I started to add wood filler like a maniac :p and try to sculpt it... Wrong decision!! I'll keep the photos for myself hahaha.

Same weekend, I started again and like I said, I got another file from www.propzone.be ..... and once I finished my helmet, I felt so motivated!!! hell yeah! ... I only spent 6 hours building it. Once again, I used rondo (inside) but I put some bondo on the outside because I had to save time and catch up on another things. ;) Things that you're gonna know anyway!!! hahaha ----- Ok, I'm building the 6 MMPR helmets!!! ... That's why I have to hurry up! ....:)

I also used wood filler on the outside to cover some imperfections and obtain the shape that I wanted.

DSC01643.JPG DSC01649.JPG DSC01653.JPG

After this, I drew and fixed the tiger pattern over the helmet.
Now it's ready to be filled with wood filler.

DSC01661.JPG DSC01665.JPG

See u soon guys!
I hope you like it!
 
Last edited:
Hey Devilblades,
That's awesome!!
What is the helmet made of? (The one you are selling)

By the way, the one u haven't done painting, it's going great too!
 
Hey guys!
This my update...

So, after drawing all the tiger pattern, I decided to add some wood filler... It worked so good...because u can use a blade to cut or add more details...It's awesome...
After doing that, I sanded it down...added more filler, sanded it down again, added more filler...etc etc....
This is what I got.

DSC01668.JPG DSC01672.JPG DSC01673.JPG IMG_2597.JPG

Well, at this stage... I noticed something... the pattern was too "orbed" ... so I fixed it again...

DSC01682.JPG

I fixed it again with some masking tape, drew it on the helmet, added more wood filler....
and of course, I sanded what I needed...Then, I just cut out the visor....

I'm preparing myself for more details...but, I haven't had the enough time to sculpt them or fix them....
anyways...

This is my helmet...(for now)-..

DSC01687.JPG DSC01688.JPG

I Hope u like it!!
See ya!
 
Hey guys!!

I've been kind of busy!!! Working a lot and trying to get this thing done :)

Anyways, here's my update.

After some corrections, I coated my helmet for first time..., then I cut it in a half...and started fixing some bumps and holes (again)...

This is what I got...

DSC01706.JPG DSC01708.JPG DSC01712.JPG

more sanding and 2nd coat of primer...

DSC01717.JPG

Now, the tricky part....

To be honest, I don't like the regular locking system of the MMPR helmets...so, I though using magnets was a great idea...

I bought some kitchen cabinets magnets to experiment and see if it worked ok...and It did!...

I tried to take out the magnets and get rid of the plastic piece...but they were too small to work with and the contact surface wasn't big enough to keep (safetly) the helmet in one piece... I also tried to fix this putting a metalic part between the two magnets and it didn't work either...

I knew I could had bought different magnets but i didn't have too much money to do it....Remember, I'm working on 6 helmets...(by the way, I have to upload the photos...but it'll be in a different post)

Any ways... I drew some patterns and glued the magnets with some tape and a glue gun...

DSC01719.JPG DSC01720.JPG DSC01723.JPG
 
Last edited:
After this, I used rondo to set the magnets and some metallic guides....These guides will avoid the magnets to slide... I had to cut them a little bit with my dremel.... they were too long and I couldn't close my helmet easily.

DSC01730.JPG DSC01729.JPG there are more photos about this part, but they're kind of boring.. hahahha :)

I used some eva foam and "Dril" fabric to replace the hinge from the top of the helmet.... They work good and they're cheaper! ;) ... Look!!

DSC01732.JPG DSC01733.JPG DSC01761.JPG


Notice that I made a "sandwich" with the parts ... hahahha :p...(eva foam + fabric + eva foam). This will help to glue them to the interior rondo surface...


Now I'm ready to work on more details...(wood filler, sanding)

DSC01751.JPG DSC01754.JPG DSC01755.JPG
 
Last edited:
Ok,

Here's my helmet after a third and last coat of primer :)
by the way, I've been using the Rust Oleum Clean metal primer ;)


DSC01762.JPG DSC01756.JPG DSC01758.JPG DSC01757.JPG

IMG_2941.JPG IMG_2942.JPG IMG_2943.JPG

I will use some shoulder pad and soft fabric to cover the interior....but that will be after I glue the visor...
so guys, please wait a little bit more... :)

I'll be painting this week..you'll see ;)

for now, I'm gonna post the shield... :)
 
Last edited:
OK,


I believe the shield is tricky… the details, the curves, the pattern, etc… :cry but it isn't impossible!!! ;)

I used EVA foam (6mm). It’s flexible,light and pretty comfortable!!

I used my measures for this. I didn’t get any template at all

DSC01690.JPG DSC01691.JPG

I covered the part that will be facing my chest with black "Dril" fabric. I used contact cement.

IMG_2848.JPGIMG_2849.JPGIMG_2850.JPGIMG_2851.JPG

Then, I glued the 3 pieces together with more contact cement but I also added some fabric strips.
IMG_2860.JPG

I drew all the shield pattern over black leatherette, cut it and glued it all. (this is the part that wil be facing outwards)

IMG_2861.JPG IMG_2865.JPG IMG_2863.JPG IMG_2864.JPGIMG_2866.JPG
 
Guys!!
Since I wanted this shield to last a couple of events and conventions, then I had to use a sewing machine to make it durable!! :) This way, neither the fabric nor the foam will separate.

I also put some velcro strips, and there you have it!

IMG_2862.JPG IMG_2908.JPG

I had a lot of options for the cord, but I went with the red one (it was nicer and solid). Covered it with Golden fabric leatherette. (almost 10 mts)

IMG_2664.JPG IMG_2867.JPGIMG_2868.JPGIMG_2869.JPG

I drew the arms and legs patterns, cut them, and covered them with fabric & leatherette.

IMG_2858.JPG IMG_2872.JPG IMG_2871.JPG IMG_2875.JPGIMG_2877.JPG

enjoy!! :)
 

Attachments

  • IMG_2854.JPG
    IMG_2854.JPG
    601.6 KB · Views: 171
  • IMG_2909.JPG
    IMG_2909.JPG
    1.7 MB · Views: 181
Last edited:
So here's the hardest part!!

the cord!! hahahaha :(

IMG_2910.JPG IMG_2911.JPG IMG_2912.JPG IMG_2913.JPGIMG_2914.JPG IMG_2916.JPG IMG_2917.JPG

it isn't done yet..

I know I have to add the shoulders divisions, the "squares" over them, the symbol (big coin)...etc...

But there you have it...

I hope you guys like it!!

Happy day.
 
Hey guys!!!


it's been a while since my last post.... anyways... here's my update.


The first thing I did was...well, I did a lot of things...hahahaha


I had to add the shoulders divisions...it loooked like a Dragon Ball Z shield hahahah ... it didn't have the shoulder strips and it didn't have the symbol either...

IMG_2950.JPG IMG_2951.JPG


oh, by the way...I had to cover all the glue imperfections and ugly pieces with a thin strip of golden fabric...
This took a lot of time... because I also covered all the joints.. Now they look really good! :)
I'm proud of them... hahaha.. you can take a look...

DSC01776.JPG DSC01777.JPG DSC01782.JPG

IMG_2965.JPG
 
Last edited:
Then I printed out the Symbol, cut it and separated the parts...


I built the main symbol with 4mm eva foam, I used 2mm eva foam for the ring... and the base was a circular piece of golden fabric.


I covered all the pieces with golden fabric... and boom!..it was done...

DSC01781.JPG DSC01783.JPG

DSC01796.JPG DSC01791.JPG

IMG_2975.JPG

Time to glue it to the shield... :)

DSC01797.JPG IMG_2977.JPG DSC01798.JPG
 
I built my shoulder templates and drew them over eva foam (6mm), cut them into pieces...
put some numbers and started to cover them...This was pretty boring... :/... I don't know why, but the leatherette got peeled easily.. I had to do this 2 and even 3 times... :(

I also had a problem with the size...they were too small (pretty weird!... The template was ok)

DSC01812.JPG DSC01807.JPG DSC01811.JPG

IMG_3062.JPG

- - - Updated - - -
 
I glued some fabric (leatherette) strips to cover the spaces between the shoulder parts... this way, everything would look gold instead of black.. ;)


DSC01833.JPG DSC01835.JPG


see?


DSC01834.JPG DSC01837.JPG


gluing pieces...


DSC01842.JPG DSC01844.JPG


gluing again....

DSC01845.JPG DSC01846.JPG


last piece....:D

DSC01850.JPG
 
Last edited:
Finally, my homemade White ranger shield....

DSC01853.JPG DSC01856.JPG IMG_3073.JPG


IMG_3082.JPGIMG_3083.JPG

DSC01862.JPG DSC01860.JPG

I'm Still working on this.... please wait a little bit more!! :)

I'll post it as soon as I can...;)

I'm sure I'll get my boots and gloves this week...I have to sew them...(gold & black pieces)...
 
Last edited:
This thread is more than 9 years old.

Your message may be considered spam for the following reasons:

  1. This thread hasn't been active in some time. A new post in this thread might not contribute constructively to this discussion after so long.
If you wish to reply despite these issues, check the box below before replying.
Be aware that malicious compliance may result in more severe penalties.
Back
Top