Mass Effect 2 N7 Armor Builds

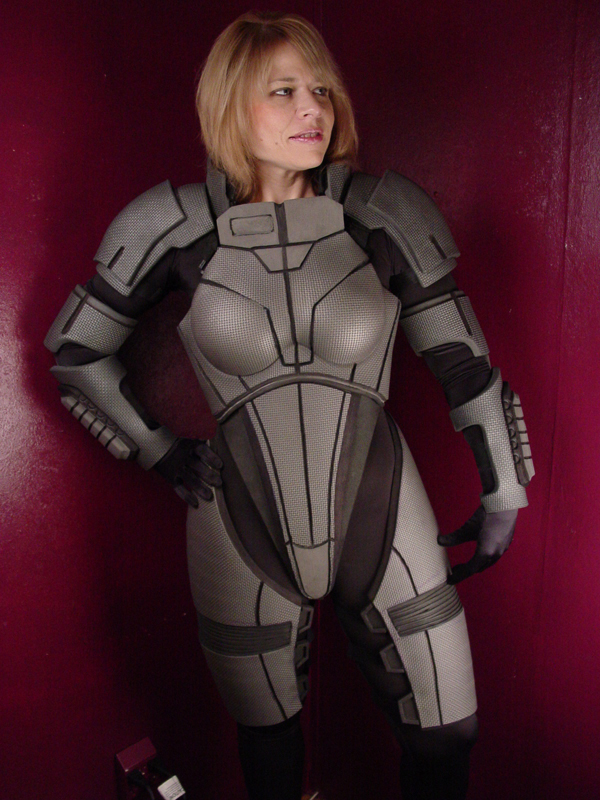
Im really interested in how you were able to keep your curves so smooth ? IE breast area and fore arms?

Agreed. Is there a substructure that's keeping the foam in place and rigid? Or are you heatforming the foam over a buck so that when it cools it keeps a particular shape?
 
Agreed. Is there a substructure that's keeping the foam in place and rigid? Or are you heatforming the foam over a buck so that when it cools it keeps a particular shape?

Most is just heat formed and shaped with a heat gun and my hands, but for the more complex curves like the female hips and breastplate I built and used forms to stretch it over. Check out the earlier postings on my N7 Armor blog to see how I went about it.
 
Doing minor tweaks and alterations to the various parts of the suits. One of the things I have learned from wearing costumes for long periods of time is they need to be comfortable and properly fitted to ensure they hold up well and don't have any malfunctions while wearing them. So basically I've just been doing some minor alterations and adjustments to them. Once I get that out of the way the only things left are the lower legs and feet, then it's coloring/painting time!

Here is a photo from a recent test fit of the female. No belt installed on it yet so she had to hold the legs in place for the photo.
dsc01898a.jpg
 
You better be planning on painting those the most garish shade of orange that was an option in the game (no not really)

But the super dark red chest stripes is what I went with, and that was baller.
 
You better be planning on painting those the most garish shade of orange that was an option in the game (no not really)

But the super dark red chest stripes is what I went with, and that was baller.

I had considered painting mine a bright pink camo like I used in game. :lol

If you look at the first posting on my blog I show the proposed color schemes for each suit.
 
I'm really glad I came across this thread! I had never heard of EVA foam - it looks very promising.

Your Guyver suit is one of the earliest costumes I remember seeing... I probably owe some of my love for the hobby to you. Thanks!
 
Hay Evil, love this post!, your incredable use of floor mats and attention to detail are astounding. I have known about these mats nad used them, but have gotten only about 2% out of them compared to you. My I ask how you connected the foam to its self?, and are all the edges just dremeled and sanded? Lastly what thickness did you use? Thank you for your very infomative blog, a great read!. Good luck at the in my amp suit con!, Sorry I cannot join you in my Amp Suit, they would look great togeather!
 
Day 27: I got the hand armor attached to the gloves and have started to work on the shoes and the N7 Logos that will go on the armor. I used E6000 to attach the pieces to the fronts of the boots (still have to do some detailing to the toes and attach the rest of the coverings) For the logos I have painted the logos onto some heavy card stock and will cut them out and surface coat them with a clear resin to give them a nice glossy 3-D finish effect. The hand armor parts are simply glued onto the gloves. The hands are the only part of the suit that the armor is actually attached to the under suit, since they are so small this is really the only way to attach them. All other parts of the armor are held in place using harnesses and strapping and worn just like real armor would be.

dsc01900a.jpg
 
I ask how you connected the foam to its self?, and are all the edges just dremeled and sanded? Lastly what thickness did you use?

I use hot glue to attach the foam together, making sure to sand away and backing that may be on it for a solid foam to foam joint. (hot glue wont adhere as well to the rubber coating on the foam)

For the sanding of the edges check the eariler postings on my N7 Armor blog and I show the dremil tips I use most. I have found that using a somewhat dull sanding bit works best as it buffs the foam more so than sanding it.

The thickness of the foam varies but most are between 1/2 and 5/8 inch thick.
 
Day 28: Emblem test done. Had some bleeding with the type of paint I used under the resin so going to redo them tomorrow. Couldn't resist starting to paint stuff. Put the first coat of paint for the stripes on the right arms, still have to put on another coating of base colors plus the luster and sealants.

dsc01904a.jpg


dsc01906a.jpg


dsc01909a.jpg
 
This thread is more than 12 years old.

Your message may be considered spam for the following reasons:

  1. This thread hasn't been active in some time. A new post in this thread might not contribute constructively to this discussion after so long.
If you wish to reply despite these issues, check the box below before replying.
Be aware that malicious compliance may result in more severe penalties.
Back
Top