cavx
Master Member
I have been working on and off on this for quite some time and have decided to post this as I finally am making some progress and thought I would share.
After reading all the posts about casting latex in a light diffuser, I thought there had to be an easier way to get the diamond pattern on the vest portion of this jacket.
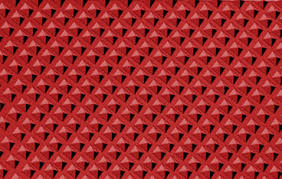
A few years back (for another project), I discovered a PVC "Pyramid" matting in my local hardware store. The matting they carried was grey and for that other project, grey was fine. Clear would have been perfect") When I googled the stuff, I discovered that it comes in a few different colours including this nice red.
When I googled the stuff, I discovered that it comes in a few different colours including this nice red.
Anyway, the company would not order in red for me to buy just 2 metres. The only way they would order this in for me would be for me to buy an entire roll (10m I think) at about $20/ meter. Not that $200 is a big outlay, just what would I do with the other 8m? I knew then I would be up for the challenge of changing the colour later on. As turned out, when I went to buy my matting, I discovered that they only had two meters left on the roll. I have not seen this stuff in store since. The matting was rolled up and left to sit for while whilst I carried on other projects.
The first step was to design the vest portion that actually fits me. I searched on line for patterns but could not find one that would suit, so I used a photographers vest I had in the wardrobe as a base for the pattern and modded that to be closer the shape I wanted. I made my first wearable version out of card stock so I could trim and mod various parts before transferring the pattern onto the PVC matting.

The diamond pattern on the vest is turned 45 degrees and this unfortunately wastes allot of material. So I got just one vest from 2m (920mm wide) of this matting.

The frustrating part about this is that the pyramids themselves are not "square" rather slightly rectangular and this throws off the symmetry. I laid this out 4 times before asking my wife for help. She suggested that I line the centre of the collar up and cop the error that would occur towards to the waist.

So after marking out the back and the two fronts, I now had the start of my vest.

I tacked it together using some 50mm webbing (left over from the TK build) and hot glue. It kind of allowed me to test fit but broke one side so i was left to look for another way to join it together. Then I decided to test so scraps with PVC pipe solvent cement I had in the garage. SUCCESS! After 20 minutes, the two parts were fused.

Maximum bond time is 24 hours, so the vest sat clamped for about 2 days before I did my next test fit. It won't break now
So onto the colour change. A while back I discovered this paint.

This is the paint I used with the two small panels that will become the pockets. The paint dries fast (about 20 minutes) and can not be removed with mineral turpentine. You have to use acetone to remove the stuff. This point will come in handy soon.

So I quickly rigged up a spray rack to proceeded to paint my grey vest red.

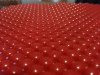
Nice and red, but a little too clean. This photo was taken at about 2PM is full sun.

This is what it tends to look like under artificial lighting.
Now back to the acetone thing. Because turps won't remove the red paint, my plan to make this jacket look "dirty" is to mist coat the vest in a more traditional black spray paint that can be cleaned up using turps. I am hoping that as I wipe the black sprayed surface that it leaves the black in the grooves and only cleans the tops of the pyramids. That is the plan anyway. That stage will need to be completed before I attach the sleeves.
So after I 'dirty this up", the next up is designing the sleeves. I want these to have the bellows so they can extend.
After reading all the posts about casting latex in a light diffuser, I thought there had to be an easier way to get the diamond pattern on the vest portion of this jacket.
A few years back (for another project), I discovered a PVC "Pyramid" matting in my local hardware store. The matting they carried was grey and for that other project, grey was fine. Clear would have been perfect
When I googled the stuff, I discovered that it comes in a few different colours including this nice red. Anyway, the company would not order in red for me to buy just 2 metres. The only way they would order this in for me would be for me to buy an entire roll (10m I think) at about $20/ meter. Not that $200 is a big outlay, just what would I do with the other 8m? I knew then I would be up for the challenge of changing the colour later on. As turned out, when I went to buy my matting, I discovered that they only had two meters left on the roll. I have not seen this stuff in store since. The matting was rolled up and left to sit for while whilst I carried on other projects.
The first step was to design the vest portion that actually fits me. I searched on line for patterns but could not find one that would suit, so I used a photographers vest I had in the wardrobe as a base for the pattern and modded that to be closer the shape I wanted. I made my first wearable version out of card stock so I could trim and mod various parts before transferring the pattern onto the PVC matting.
The diamond pattern on the vest is turned 45 degrees and this unfortunately wastes allot of material. So I got just one vest from 2m (920mm wide) of this matting.
The frustrating part about this is that the pyramids themselves are not "square" rather slightly rectangular and this throws off the symmetry. I laid this out 4 times before asking my wife for help. She suggested that I line the centre of the collar up and cop the error that would occur towards to the waist.
So after marking out the back and the two fronts, I now had the start of my vest.
I tacked it together using some 50mm webbing (left over from the TK build) and hot glue. It kind of allowed me to test fit but broke one side so i was left to look for another way to join it together. Then I decided to test so scraps with PVC pipe solvent cement I had in the garage. SUCCESS! After 20 minutes, the two parts were fused.
Maximum bond time is 24 hours, so the vest sat clamped for about 2 days before I did my next test fit. It won't break now
So onto the colour change. A while back I discovered this paint.
This is the paint I used with the two small panels that will become the pockets. The paint dries fast (about 20 minutes) and can not be removed with mineral turpentine. You have to use acetone to remove the stuff. This point will come in handy soon.
So I quickly rigged up a spray rack to proceeded to paint my grey vest red.
Nice and red, but a little too clean. This photo was taken at about 2PM is full sun.
This is what it tends to look like under artificial lighting.
Now back to the acetone thing. Because turps won't remove the red paint, my plan to make this jacket look "dirty" is to mist coat the vest in a more traditional black spray paint that can be cleaned up using turps. I am hoping that as I wipe the black sprayed surface that it leaves the black in the grooves and only cleans the tops of the pyramids. That is the plan anyway. That stage will need to be completed before I attach the sleeves.
So after I 'dirty this up", the next up is designing the sleeves. I want these to have the bellows so they can extend.
Last edited: