You are using an out of date browser. It may not display this or other websites correctly.
You should upgrade or use an alternative browser.
You should upgrade or use an alternative browser.
Space 1999 Eagle Transporter Build Club (PIC HEAVY!)
- Thread starter Atlanthia
- Start date
LMFAOSchwarz
Sr Member
Re: Space 1999 Eagle Transporter Build Club UPDATE 09/03 (PIC HEAVY!)
Might be of use? MIGHT be of use? Deck5, that is wonderful! It answers a couple of questions I've been puzzling over! Very nice, and thank you! :thumbsup
Might be of use? MIGHT be of use? Deck5, that is wonderful! It answers a couple of questions I've been puzzling over! Very nice, and thank you! :thumbsup
LMFAOSchwarz
Sr Member
Re: Space 1999 Eagle Transporter Build Club UPDATE 09/03 (PIC HEAVY!)
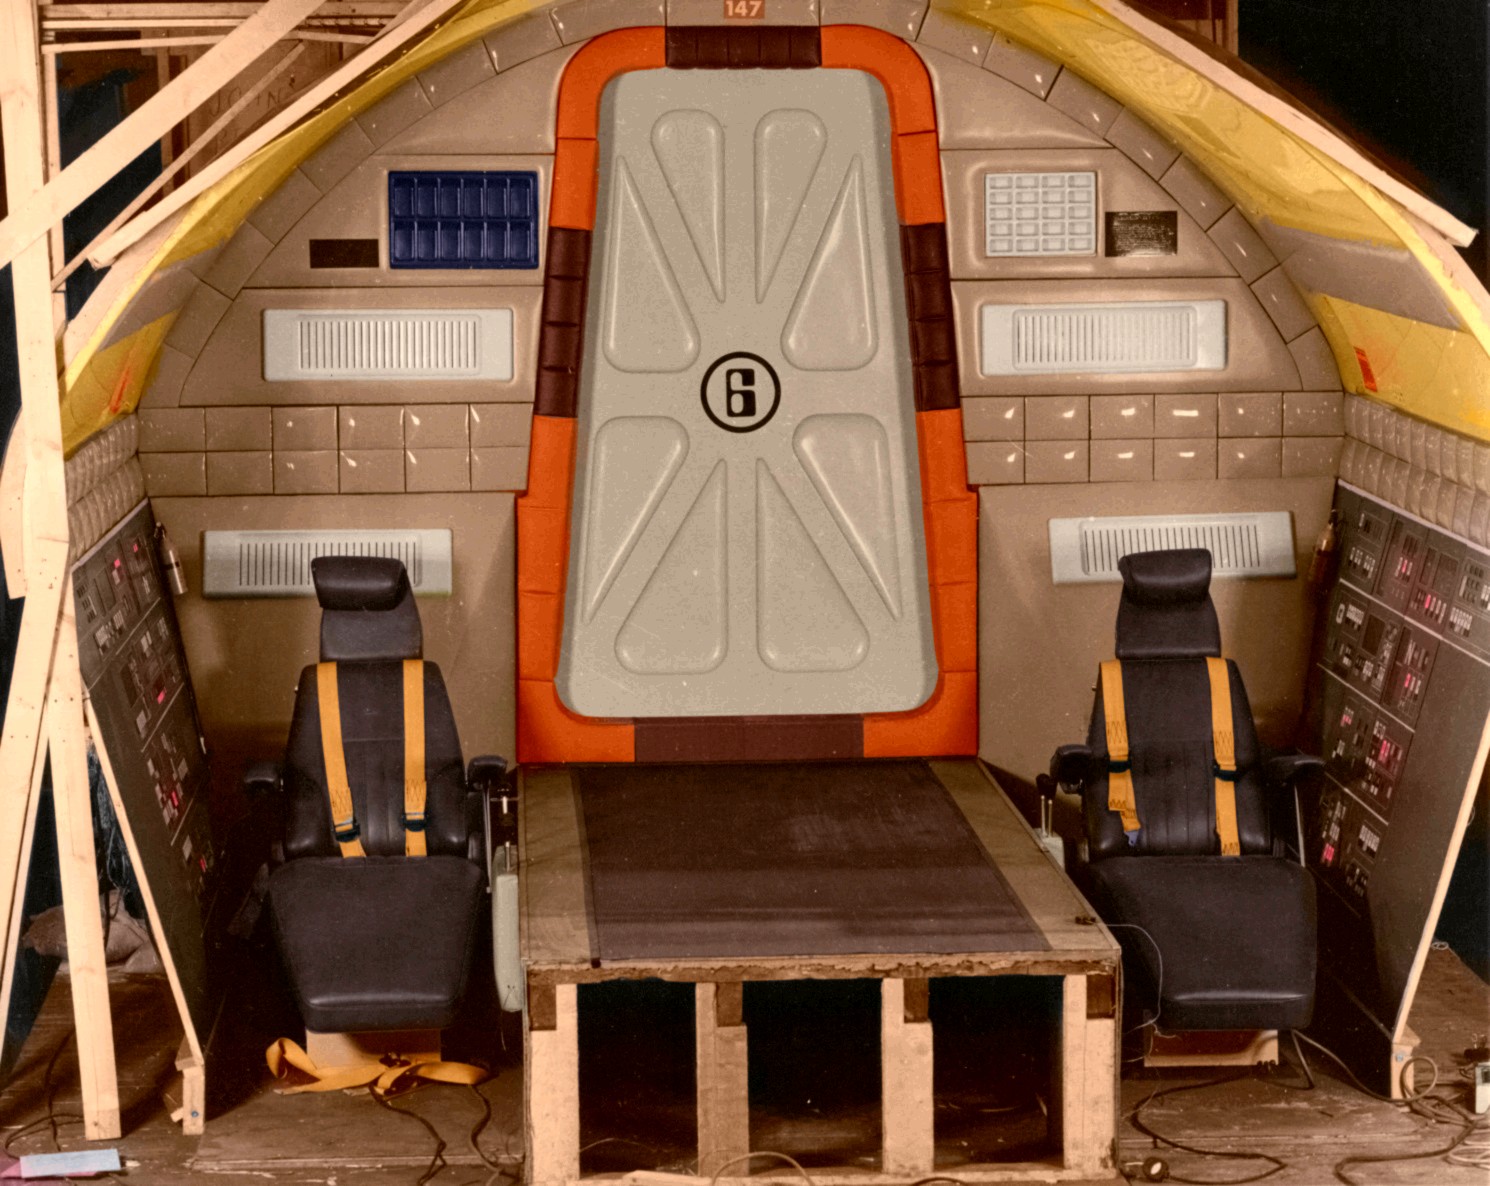
You know, the more I look at Deck5's picture, the more I wonder if there's a bit of art imitating life going on here (in this thread, I mean). Observe...
View attachment 86833
If you look at the center raised platform, there are 2 by 4's running horizontally along its length underneath it. It is then built higher by means of studs on the end. Now it's entirely possible it was simply made this way. But is it not also possible it was originally built to be just above the floor level, and it was after decided to raise it higher?
I just was intrigued by the possibility!
Re: Space 1999 Eagle Transporter Build Club UPDATE 09/03 (PIC HEAVY!)
How would that explain the height of the door? It's a good two feet above the 'ground level'
You know, the more I look at Deck5's picture, the more I wonder if there's a bit of art imitating life going on here (in this thread, I mean). Observe...
View attachment 86833
If you look at the center raised platform, there are 2 by 4's running horizontally along its length underneath it. It is then built higher by means of studs on the end. Now it's entirely possible it was simply made this way. But is it not also possible it was originally built to be just above the floor level, and it was after decided to raise it higher?
I just was intrigued by the possibility!
How would that explain the height of the door? It's a good two feet above the 'ground level'
LMFAOSchwarz
Sr Member
Re: Space 1999 Eagle Transporter Build Club UPDATE 09/03 (PIC HEAVY!)
Sure, the door is like 2 feet off the 'ground', but it might not have been before the set was finished.
I've noticed over the years a tendency on television shows for the entrance to rooms (living rooms, typically) are elevated above the floor level (the old Mary Tyler Moore Show, Dick Van Dyke Show, Green Acres, Three's Company, and many more). I always assumed that it keeps the spot (normally at or near the backside of the stage) from having diminished significance, such as when guests arrive or series regulars enter the scene, it elevates the importance of it. I could be all wet: I'm not a stage designer. I just wondered if maybe the Eagle cockpit was getting the same treatment, so someone entering wouldn't be obscured by the pilots. Just a wacky, late-night theory: I've got to do something waiting for glue to dry!
Aztek Dummy
Well-Known Member
Re: Space 1999 Eagle Transporter Build Club UPDATE 09/03 (PIC HEAVY!)
this is the same logic that was used on Star Trek for the positiioning of the turbo lift. You needed a single camera setup where you could see Kirk plus whoever was coming out of the lift
Sure, the door is like 2 feet off the 'ground', but it might not have been before the set was finished.
I've noticed over the years a tendency on television shows for the entrance to rooms (living rooms, typically) are elevated above the floor level (the old Mary Tyler Moore Show, Dick Van Dyke Show, Green Acres, Three's Company, and many more). I always assumed that it keeps the spot (normally at or near the backside of the stage) from having diminished significance, such as when guests arrive or series regulars enter the scene, it elevates the importance of it. I could be all wet: I'm not a stage designer. I just wondered if maybe the Eagle cockpit was getting the same treatment, so someone entering wouldn't be obscured by the pilots. Just a wacky, late-night theory: I've got to do something waiting for glue to dry!
this is the same logic that was used on Star Trek for the positiioning of the turbo lift. You needed a single camera setup where you could see Kirk plus whoever was coming out of the lift
LMFAOSchwarz
Sr Member
Re: Space 1999 Eagle Transporter Build Club UPDATE 09/03 (PIC HEAVY!)
I thought about Star Trek later on myself, imagining if the bridge had been on one level. It amazed me how many other shows did something similar, and figured there had to be some staging logic to it. For some reason, though, I could only think of a handful of examples. It must be because I don't watch much television anymore...that, or early senility!
Speaking of Star Trek, it did bring to mind the Eagle window "debate", and while we all go on and on about it no one ever mentions the Star Trek shuttlecraft windows. They are at a considerable height themselves, and certainly of little use to the pilot!
View attachment 86860
I guess the difference is that Star Trek would frequently show the front end interior relative to the actors, whereas S:1999 never did
Re: Space 1999 52" Eagle Transporter Scratch Build (PIC HEAVY!)
Wow. This process is very close to the way I layed out the upper and lower primary hull for the 1/350th TOS, even down to the paper mache' Nice, really confirms some more of my methodology. I've got a boatload of refs for this ship, wish I could help. I hate to ask, it may have already been covered, but what size / scale are you working in? I've been wanting to do one of these for a loooooooong time.
Wow. This process is very close to the way I layed out the upper and lower primary hull for the 1/350th TOS, even down to the paper mache' Nice, really confirms some more of my methodology. I've got a boatload of refs for this ship, wish I could help. I hate to ask, it may have already been covered, but what size / scale are you working in? I've been wanting to do one of these for a loooooooong time.
07/03/12
Hi Guys!
Thanks for your patience on this one. I appreciate it very much.
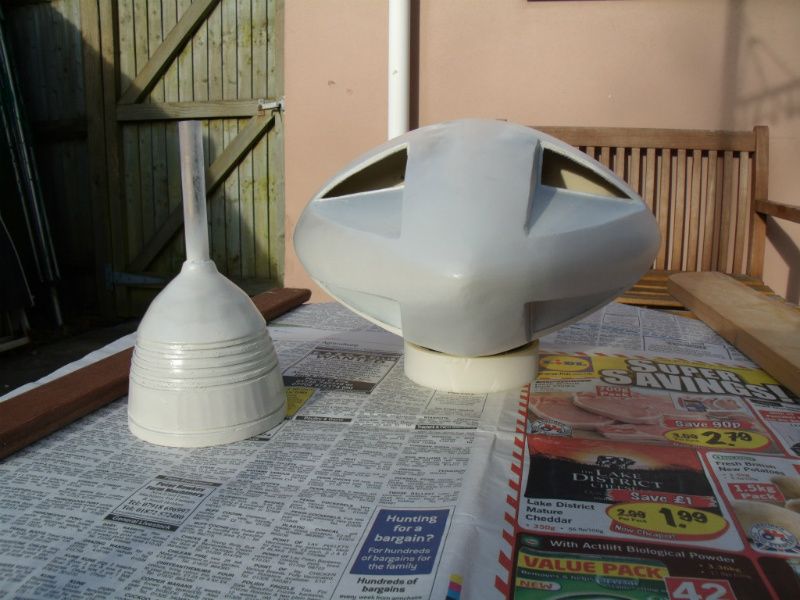
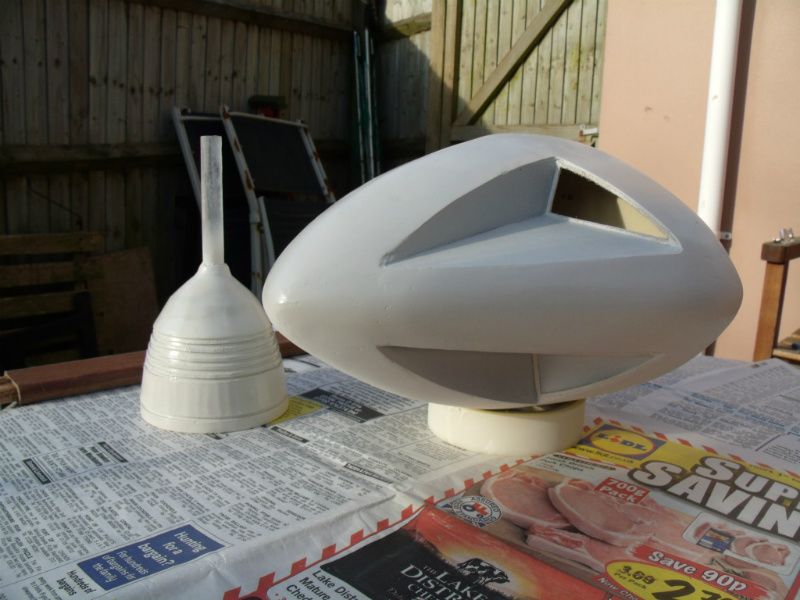
Ok, so I have managed to finish the ribbing on the front end and I am really pleased with the result. They are evenly spaced and all follow a uniformed curve line, which will make it easier to layer with papier mache.
I then started construction of the back half of the command module. I took a leaf out of LMFAOSchwarz's book here and used a slightly different approach, as suggested by him earlier in this thread....the lengths I have to go to just to keep people happy! JUST KIDDING Bob!!!lol:lol i tried it because I liked the concept and it worked a treat. Here's how it looked...
The ribbing then went over this, as per the front half...
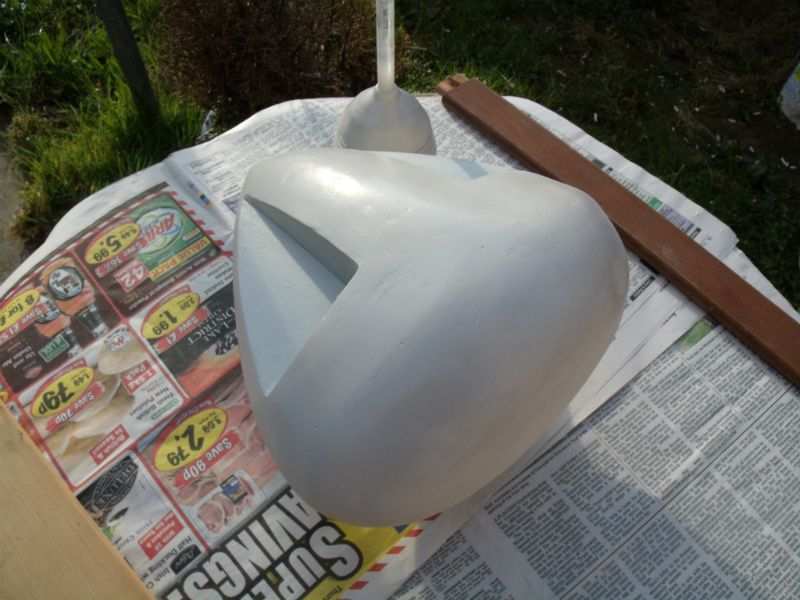
So, next was the Papier Mache. When doing this, I always cut my newspaper into strips about 4 or 5 cm long and about 1cm wide. (2"x1" approximately) I use the same PVA wood glue that I use during the rest of the construction, but I add 50% water. I tend to do a small area and then hit it with a hair dryer to dry it out really quickly. Then I can concentrate on the next area without having to worry about disturbing what I have already done.
This is where the thin little strips come into their own. They lie flat, even on a sharp curve that bends both ways..
The result is better than I would have hoped for. Normally, it gets left to the filler to do most of the the work in getting an even surface, but here, its looking reasonably smooth. Some bumps and dips obviously, but on the whole, pretty good.
The next stage was to smack coat of household filler over the dry papier mache and when that dries, rub it down to really start to knock it into shape. Tomorrow's weather permitting, I will get a coat primer on and then a layer of car body filler/bondo on top of that. I made a start on the preliminary filler coat, and I will finish it tomorrow. Here are a couple of pics to finish off this installment with, and to show you how she looks with a nice smooth(ish) white surface. Not sanded yet, obviously.
I hope you enjoyed this update on my Eagle Transporter build progress. I will post again soon!
By the way, total outlay so far =£0/$0
Last edited by a moderator:
Re: Space 1999 Eagle Transporter Build Club UPDATE 09/03 (PIC HEAVY!)
Hey, Underdog! Good to see you about the place! It's also good to know that you can confirm the method used. Please, feel free to contribute in any way you want to this thread. If you want to post pics, discuss all aspects of the Eagle, or even join us on here building your own, then you are absolutely welcome!
I am building my Eagle to just over 52 inches, which I believe is about 1/18th scale. LMFAOSchwarz is, I believe, building his to 39 inches, which would come in at about 1/23rd scale.
Thanks for the great pics BTW! awesome detail.
LMFAOSchwarz
Sr Member
Re: Space 1999 Eagle Transporter Build Club UPDATE 09/03 (PIC HEAVY!)
You are correct, Darren, in your 39 inch figure. I can't remember how I arrived at that scale now...but I'm committed to it now!
Sunday is fun day:
Cutting and gluing the foam core for the top starboard side of the command module, just a mirror image of the last step. I'm hoping today to finish shaping the whole nose section, top and bottom.
View attachment 86897View attachment 86898View attachment 86899View attachment 86900View attachment 86901View attachment 86902View attachment 86903View attachment 86904
Started out the day with a mild headache, so I got a bit of a delayed start. Going to take a household chore break, give the dog a bath, and get back to the Eagle. This evening will be the bottom front half of the module
View attachment 86905
And in case anyone was going to ask, let me answer you first: "Why, no, this isn't the least bit monotonous!"
Re: Space 1999 Eagle Transporter Build Club UPDATE 09/03 (PIC HEAVY!)
That looks bloody GREAT!!! It's really starting to come together now...I put a few coats of paint on mine today and that really helps me to see the areas that need attention. Nevertheless, my shell is getting pretty near to where it needs to be. Can I ask you Bob, what is the width of your command module at its widest? I am guessing that it should be almost exactly the same measurement as the length. My reason for asking is that if you would be able to supply me with four simple measurements, it would help me greatly to size the cockpit interior for mine by simply scaling up the ratios.
I would need length, width and height of the cockpit apperture that you cut out and the width of the shell at it's widest part. Any chance you could bang those over to me when you find a minute? Thanks in advance, Mate.
LMFAOSchwarz
Sr Member
Re: Space 1999 Eagle Transporter Build Club UPDATE 09/03 (PIC HEAVY!)
Your guess was correct, at 6 3/4" wide (at its widest point) and 6 3/4" long!
Bear in mind I started out subtracting about 1/8" from the overall dimensions to account for the outer layering, which I figured when added would make the CM swell to oversized dimensions. So, 1/16" +1/16" (accounting for both sides) would be 1/8". Bottom line is, my measurements provided take that 1/8" into account.
Cockpit aperture: Width: 4 3/4". Length (front to back): 2 3/4". Height (at deepest point) 2 15/16".
Anything else, just ask!
Oh, and thanks for the kind words! The CM is just starting to accumulate a little weight
Re: Space 1999 Eagle Transporter Build Club UPDATE 09/03 (PIC HEAVY!)
Thanks. I've got a few short term projects to finish up, but I've got a contract I have to get out next week and of course there's still the Refit, however, I will give it some thought, though I am late to the game and not sure what scale I'd like to go with yet. Thanks again.
Hey, Underdog! Good to see you about the place! It's also good to know that you can confirm the method used. Please, feel free to contribute in any way you want to this thread. If you want to post pics, discuss all aspects of the Eagle, or even join us on here building your own, then you are absolutely welcome!
I am building my Eagle to just over 52 inches, which I believe is about 1/18th scale. LMFAOSchwarz is, I believe, building his to 39 inches, which would come in at about 1/23rd scale.
Thanks for the great pics BTW! awesome detail.
Thanks. I've got a few short term projects to finish up, but I've got a contract I have to get out next week and of course there's still the Refit, however, I will give it some thought, though I am late to the game and not sure what scale I'd like to go with yet. Thanks again.
Re: Space 1999 Eagle Transporter Build Club UPDATE 09/03 (PIC HEAVY!)
Excellent ribbing and build up. Yeah, monotony is part of it. Every once in awhile I have to get away from a big project and run through a small one, just to change the pace and alleviate the monotony.
Excellent ribbing and build up. Yeah, monotony is part of it. Every once in awhile I have to get away from a big project and run through a small one, just to change the pace and alleviate the monotony.
You are correct, Darren, in your 39 inch figure. I can't remember how I arrived at that scale now...but I'm committed to it now!
Sunday is fun day:
Cutting and gluing the foam core for the top starboard side of the command module, just a mirror image of the last step. I'm hoping today to finish shaping the whole nose section, top and bottom.
View attachment 86897View attachment 86898View attachment 86899View attachment 86900View attachment 86901View attachment 86902View attachment 86903View attachment 86904
Started out the day with a mild headache, so I got a bit of a delayed start. Going to take a household chore break, give the dog a bath, and get back to the Eagle. This evening will be the bottom front half of the module
View attachment 86905
And in case anyone was going to ask, let me answer you first: "Why, no, this isn't the least bit monotonous!"
Re: Space 1999 Eagle Transporter Build Club UPDATE 09/03 (PIC HEAVY!)
Well, a very slow day for me, unlike Bob who is going great guns!
I managed to finally get the CM to a stage where I felt it was time to put a coat of paint on the see how she looks. There is nothing quite like a solid coat of white to show up all and any imperfections! It did exactly that, and I now know what needs to be improved. The good news is that, if anything, it needs more filler in places to build it out, rather than having to sand down high spots. So I will get to that tomorrow. Here are a few pics of today's work, just to keep you all up to date...
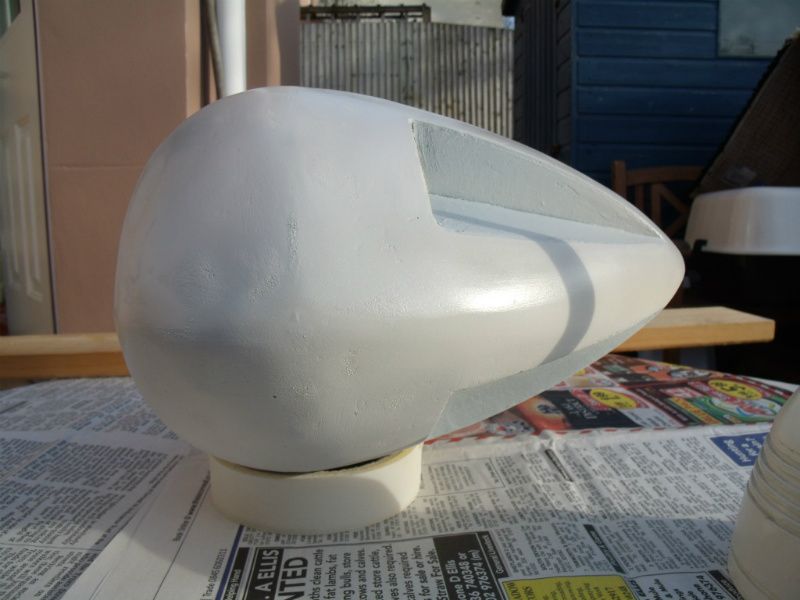
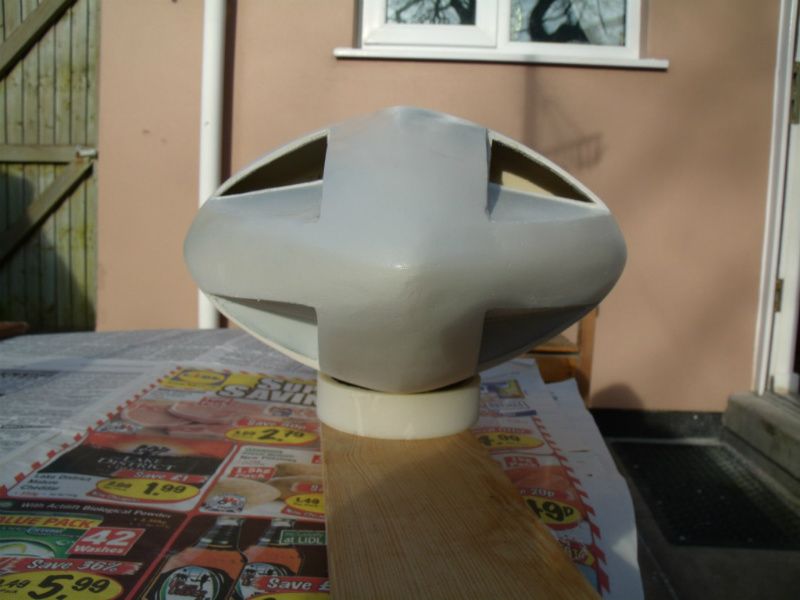
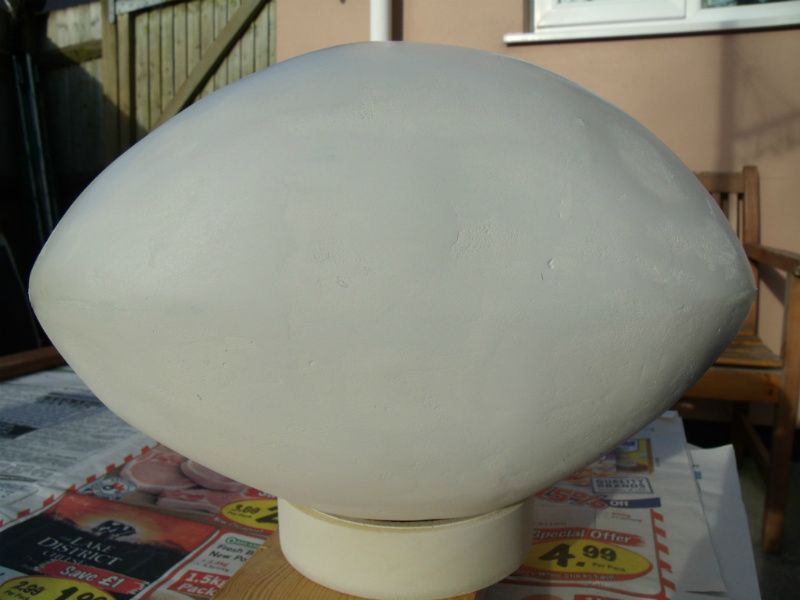
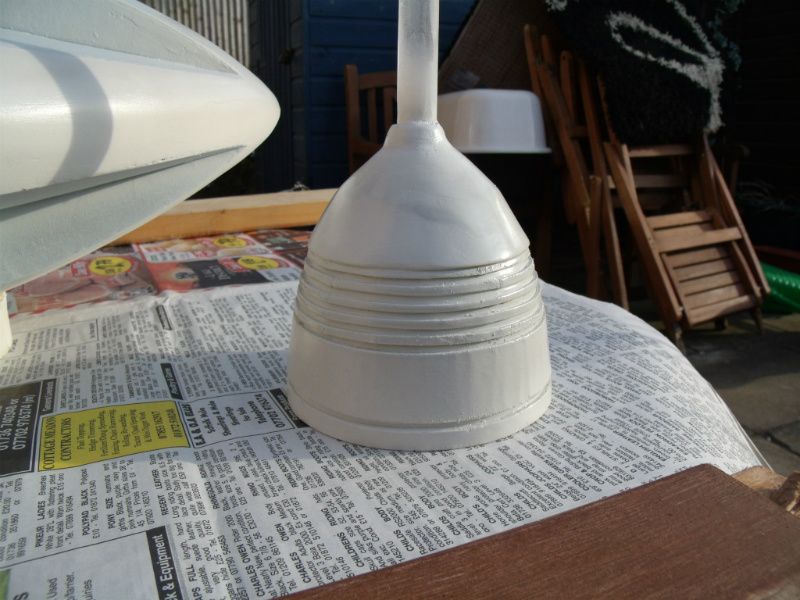
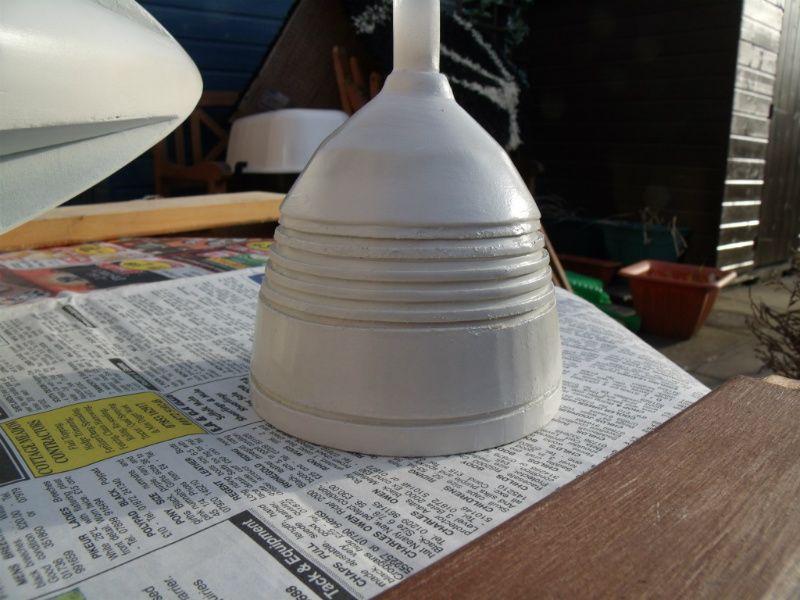
Atleast I know now what I have to achieve. I also bashed a coat over the Engine bell to see what it gives.......hmmm....I am not so sure that this system is going to work! Time will tell...
Well, a very slow day for me, unlike Bob who is going great guns!
I managed to finally get the CM to a stage where I felt it was time to put a coat of paint on the see how she looks. There is nothing quite like a solid coat of white to show up all and any imperfections! It did exactly that, and I now know what needs to be improved. The good news is that, if anything, it needs more filler in places to build it out, rather than having to sand down high spots. So I will get to that tomorrow. Here are a few pics of today's work, just to keep you all up to date...
Atleast I know now what I have to achieve. I also bashed a coat over the Engine bell to see what it gives.......hmmm....I am not so sure that this system is going to work! Time will tell...
Re: Space 1999 Eagle Transporter Build Club UPDATE 09/03 (PIC HEAVY!)
Looking smoother all the time. Nice work on the engine bell too. I like the way you used existing shapes to create something new. I try to do that when I can. The sanding and the puttying and the priming...... the infinite loop fo labor that eventually pays off. Still, it's a lot more satisfying than plugging data into a CNC, or Prototyper.
Looking smoother all the time. Nice work on the engine bell too. I like the way you used existing shapes to create something new. I try to do that when I can. The sanding and the puttying and the priming...... the infinite loop fo labor that eventually pays off. Still, it's a lot more satisfying than plugging data into a CNC, or Prototyper.
LMFAOSchwarz
Sr Member
Re: Space 1999 Eagle Transporter Build Club UPDATE 09/03 (PIC HEAVY!)
Thank you! I always try to compete with monotony using percentage mind games. So with the CM, I'm at about the 75 percent point. Just as when I shovel snow, I'll shovel away what I figure to be fifty percent, then 50 percent of the remaining amount brings me to 75 percent. Then 50 percent of that, and so on! Doesn't get it done any faster, but it gives me little goals to strive for. Otherwise, I'd be "Wow, that's a lot of snow *shovel, sweat* boy, this is never going to get done *shovel, sweat* I'm cold *shovel sweat* wow I hate winter *shovel sweat*...etc!
Excellent ribbing and build up. Yeah, monotony is part of it. Every once in awhile I have to get away from a big project and run through a small one, just to change the pace and alleviate the monotony.
Thank you! I always try to compete with monotony using percentage mind games. So with the CM, I'm at about the 75 percent point. Just as when I shovel snow, I'll shovel away what I figure to be fifty percent, then 50 percent of the remaining amount brings me to 75 percent. Then 50 percent of that, and so on! Doesn't get it done any faster, but it gives me little goals to strive for. Otherwise, I'd be "Wow, that's a lot of snow *shovel, sweat* boy, this is never going to get done *shovel, sweat* I'm cold *shovel sweat* wow I hate winter *shovel sweat*...etc!