"BATA" HLMF / HRMF Decals 90% done (95% hasbro parts HRMF build)

EM, another 'new' one with another instance of #90.
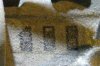
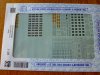
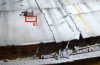
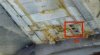
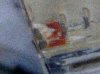
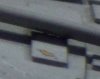
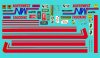
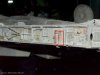
New #91 is the small 'APSC registration code string that appears on the starboard mandible wall top edge, about mid way back. The source of this is confirmed as an AMT Northwest Trucking tractor trailer kit sheet. See below for the detailed images.
Regards, Robert

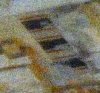
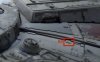
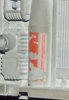
Update: the #90 at this location appears to have another small decal, a rotated light colored square or half a square, overlapping the left hand button, giving the appearance of that corner being "cut". Also, the APSC code has a 'shadow' of white on it from a misalignment of the print screens when the original was made.
 

Attachments

  • no_90_b.jpg
    no_90_b.jpg
    116.1 KB · Views: 117
  • no_91.jpg
    no_91.jpg
    87.2 KB · Views: 127
  • no_91_90_locator.jpg
    no_91_90_locator.jpg
    73.9 KB · Views: 160
  • northwest trucking.JPG
    northwest trucking.JPG
    187.5 KB · Views: 162
EM, I have found that #36 & #41 are both from the AMT Nitro Funny car decal sheet (see post #65), cut and weathered in the same way. I think lighting from different images has made the colors appear to be different, but they should be the same group of progressively sized, slanted blocks with a leading strip, basically mirrored. The gaps are the tip-off, being a bit regular.
R/ Robert
 

Attachments

  • no_41_locator.jpg
    no_41_locator.jpg
    150.8 KB · Views: 131
  • no_41.jpg
    no_41.jpg
    19.3 KB · Views: 117
My contribution. Port side mandible.

The standard red "DANGER" triangle from an aircraft kit and a yellow "KANSAS" decal from the previously posted AMT NorthWest Trucking sheet.

382_SWI_7887 (2).jpg

Port side mandible Wankel transmission. Also from the AMT Northwest Trucking decal sheet
359_SWI_7864 (2).jpg
 
Last edited:
The top of the port side docking ring.

Yellow "KANSAS" No.2
419_SWI_7925 (2).jpg

Car registration number/tag?
424_SWI_7930 (2).jpg


Hmmm it seems all these images have been posted before. Oh well.
 
Last edited:
The top of the port side docking ring.

Yellow "KANSAS" No.2
Car registration number/tag?
Hmmm it seems all these images have been posted before. Oh well.

JP, not a problem, mate. Keep looking, by all means. I still have graphics on RAG's "sheet" that need confirmation as to where they are located (like the 'mickey mouse ears' in a red circle, for example - #35.) If you want a copy of the tracking spreadsheet to see exactly what's what, send me a private message with your email & I'll send you a copy. Detective work is also needed on ID'ing the source of the decals used if possible for the benefit of future/present studio scale builders. The 'KANSAS' tag is a perfect example; it and the 'Penn. State tax' tag are found on many AMT truck & trailer kit sheets (apparently - I'm no automotive modeler by any stretch...) but others are from more esoteric sources, like the yellow 'm' decals that look to be from a german tank kit (20th Division unit markings) I've seen in a couple of places. So, if you spot it, document it. Going though all ~3000 images from Stephen's archive takes a while for one guy.

And one area that hasn't even been addressed is attempting to map the myriad of small black strips all over the hull. It would an enormous undertaking to simply locate & document as many of those as possible on a placement diagram. As I noted earlier, if we had access to an accurate drawing of the 5 footer showing the major details and the hull plates, it would be pretty straightforward (and tedious!) to go through and mark out those little black marks.

One thing I wish we could get a view of is the decals missing from the dish mount base ring. These appear as blocks of yellow discoloration (which is the yellowed decal adhesive residue.) If anyone has access to a hi def copy of the movie (ANH), it may be possible to see *something* in the scene where the TIE fighters are attacking the MF while its fleeing from the Death Star. Given the identical size, and apparently similar adhesion performance (both have fallen off) I think the missing decals must have been the same or from the same source. Since the marks are 90 degrees apart, it may even be that there were 4 of the same arrayed at the compass points on the base. Even if we can get a blurry view showing color and 'density', it will help to make an educated guess. I suspect blocks of red 'warning' text, personally, since the relatively large percentage of clear film area would promote UV degradation of the adhesive.

So far, I have access to three different image archives plus a smattering of 'singles' gleaned from the web. Besides the Fantastic Plastic archive on Modeler's Magic, there are two different archives on OneDrive, one being Stephen's. JPCOdessa seems to have access to yet another collection of images, since he found the (what appears to be) two HAZMAT warning diamonds under the aft engine room area. So, pretty big pool to map out...

Cheers!
Robert
 
EM, I was looking at the below of the 'grill buttons' ('grill' because they look more like a tiny radiator grill) and did some measuring. I found the ratio of the long to short sides is 2.25, while the 'grill' rows are 12 evenly spaced lines (giving 13 spaces) with the two outer being the wide solid border lines and the center spaces being white or various colors with a thin black separation line. In short, the borders are the same width as a 'gap' and one thin line. The long side borders appear to be the same width as the end borders. Since these are used repeatedly in different length arrays (as in 3, 4 and 9), this is ideal for replication in a long string with "trim" marks so users could just cut what is needed.

Spacing between 'buttons' appears to be the same as a button width. How does this compare to your findings?

R/ Robert
 

Attachments

  • no_90_b.jpg
    no_90_b.jpg
    116.1 KB · Views: 194
I love it! Lots of good stuff! post 80 and 81 :D

LOL,, post 85 I'm thinking the same thing. I'm doing just a count as to how many times I meed to dupe them for the decal sheet.

At this point seems an 8.5 X 11 with enough space to trim each one (set) out. LOTS to say the least.

86 not a bad idea. Haden't occurred to me. I was/is:)? just going to dupe it as needed for the decal sheet and add 10 to cover any I missed.

I'm currently playing with the position Flc. sheet and what goes were based on ease of application (cutting them out of the sheet) and economic use of the same.

Seems to be a four sheet (8.5x11) decals set with dupes and extras art this point. not a problem though.
 
Last edited:
EM, I solved the 'grill button' mystery. These are railroad car data plates, produced by Microscale over the years. Below is one such sheet I found on eBay showing EXACTLY those little boogiers.... ye-haW!

In fact, I think the tiny decal I ID'ed as a 'star & bar' is probably instead one of the ones from this sheet that looks sort of like a rear differential from a truck...
R/ Robert
 

Attachments

  • microscale RR sheet.JPG
    microscale RR sheet.JPG
    447.5 KB · Views: 166
I love it! Lots of good stuff! post 80 and 81 :D

LOL,, post 85 I'm thinking the same thing. I'm doing just a count as to how many times I meed to dupe them for the decal sheet.

At this point seems an 8.5 X 11 with enough space to trim each one (set) out. LOTS to say the least.

86 not a bad idea. Haden't occurred to me. I was/is:)? just going to dupe it as needed for the decal sheet and add 10 to cover any I missed.

I'm currently playing with the position Flc. sheet and what goes were based on ease of application (cutting them out of the sheet) and economic use of the same.

Seems to be a four sheet (8.5x11) decals set with dupes and extras art this point. not a problem though.

Seems like a lot of pages since most of the graphics will be relatively tiny. For example, the Microscale sheet imaged in my last is a half sheet (approx. 4x6 inches) and it contains a ton of stuff. In my opinion, the cutting out issue is of minor concern since it can be done using a scalpel (aka 'X-Acto'). If there is a number next to the decal, then that can serve as the 'handling tab' for application purposes. It would be nice if the graphics are grouped according to location, since it is best for the application surface to be 'upright' when applying the decals (keeps the floaters from sliding off easily...) so all the bottom items, topside items, etc. together in 'blocks'. Otherwise, the sequence isn't critical. I can add a tag to the spreadsheet to indicate a 'general' location group just for that purpose.

For these 'buttons', I expect they didn't use any more and certainly less, than what is visible in the example I posted. Microscale being a state of the art printer (especially the railroading products), the spacing and placements exhibited on the sheet above should provide excellent guidance for your own layouts.
Regards, Robert
 
I found one here but not sure what it is.....
missing decal.jpgmissing decal2.jpg missing decal4.jpg

The second and third photos is locate at the rear bottom engine box greeblies...(Lower Left on the next photo)

missing decal3.jpg
 
Last edited:
I found one here but not sure what it is.....
View attachment 443404View attachment 443407 View attachment 443409

The second and third photos is locate at the rear bottom engine box greeblies...(Lower Left on the next photo)

View attachment 443408
"JPCO", good job finding these. The first one has been ID'ed as #36 on the sheet, and is from the AMT Nitro Funny Car kit sheet (is it the striping, cut down for width & length.)

The next one was unconfirmed as #56, but now you have found it! The source is either from a tractor trailer kit sheet (I've seen similar on a couple of different sheets) but more likely from a Microscale railroad locomotive sheet, which we may never be able to specifically ID since the same pattern appears on several I've located. I see from the tracker spreadsheet, I DID find one of there, same location but on the port side (your find is the starboard side...)

It appears in your third image that there is possibly two, two line blocks of text near the #56 location. Also, the red & yellow stripe strip on the engine thrust flap actuator head is part of the multiple #12's that seem to have been applied to every one of those parts, both top and bottom. I've been looking for a source of such strips, and given they are uniform in length, it is probably not something they cut up manually from a longer stripe (they also appear in various random locations like the upper hull to port of the engine deck.)

Are these your personal pictures or an online source? It is different I think than the ones I have; if so, perhaps you have a view of the (near as I can tell) red & white decal that is near the dish mount, inboard and a bit forward. It almost appears like another piece of the red & white decal found on the port side 'sensor box' next to the jaw box... again, appreciate the help!

Regards, Robert
 
WHY I USE "PORT" & "STARBOARD":

I feel I should explain my usage of the nautical terminology 'port' and 'starboard'. To prevent any ambiguity related to viewing angles or directions, I use these terms in place of 'left' or 'right' because these are relative positional terms vice absolute positional terms.

To visualize what these terms mean, use this simple technique. If you are standing on a ship (or boat) facing forward ('the bow'), then port side is to your left and starboard to your right. I remember the associations by saying the word 'port' is shorter than the word 'starboard' - which is the same for the words 'left' & 'right'.

Because the 'port' side (for example) is always the same "left" side due to the included definition of 'facing the bow', there is no ambiguity. Saying 'the left side' lacks precision unless you also say something about which direction you are "facing". So, 'left side' when facing to the rear (aka 'aft') is really the 'starboard side' of the vessel.

I also feel this is especially appropriate terminology in light of the Falcon being a "vessel" (although fictional..)

Kind regards,
Robert
 
Another couple from the lower port side rear engine area.

The first are the same diagonal yellow stripes seen on the starboard side and the second in a red 2/3's triangle with the words "Jet Intake" commonly found in aircraft kits.

Decals 1.jpg Decals 2.jpg
 
JP, we have those tracked as #56 (as you noted, same as the starboard side instance) and as #79, "partial engine intake warning chevron". I expect, given the lightened area above it, that the original application used the entire chevron but it has since flaked off. Oh, the tragedy!

Many of the new markings I have found and added to the tracking spreadsheet, but not noted in the thread as of yet, so your efforts aren't redundant but complimentary! I am now up to 92 separate designs, with multiple instances of many (like the red & yellow stripes.) One that is quite the 'easter egg' is the name 'paul hutton', all lower case characters on a decal that I located as "underside fwd ctrline lndg gear box fwd of deckplate detail, offset to port". I found that in image file [2392_SWI_9908.jpg] from Stephen's OneDrive image archive.

This is the kind of information I have in the tracker spreadsheet and I want to share with all our 'survey team' members - though keeping current presents a challenge, I can do that by dating the spreadsheet filenames (as in 'DecalTracker_20150225'.) So, if you PM me your email address, I can add you to the distro list for the (nearly) daily updates.

Regards, Robert
 
Last edited:
EM, some new items for you:
#92: torn red block design (located on strbd face, aft corner of aft lndg gear box) in image 293_SWI_1323.jpg. I'm thinking this is another of the red block w/ stripe decals.
#93: red rectangle (3.5 to 1 height to width ratio), located at strbd mandible wall, fwd end, aft of #46 seen in images 928_SWI_8437.jpg & 886_SWI_8395.jpg
#94: three block medal ribbon, underside of ramp near hinge seen in image 292_SWI_1322.jpg. It looks like a military award ribbon, but I haven't found one to match as of yet.
#95: small black text block (cut selection from source sheet), this is located outboard of a protruding ribbed 'box' found on the aft, upper starboard hull (about the 4 o'clock position), seen in image 283_SWI_1313.jpg. It was made by cutting an area of data text from the Microscale freightcar data sheet I posted above. Originally, I thought it was a faded decal for some kind of logo, because the 'blank spaces' seem to make letters, but it matches perfectly the text data blocks on the Ms sheet, so... there you go!
Regards, Robert
 

Attachments

  • no_95_locator.jpg
    no_95_locator.jpg
    50.1 KB · Views: 142
  • no_95.jpg
    no_95.jpg
    12.1 KB · Views: 127
  • no_94_locator.jpg
    no_94_locator.jpg
    78.6 KB · Views: 139
  • no_94.jpg
    no_94.jpg
    21.5 KB · Views: 110
  • no_92.jpg
    no_92.jpg
    29.2 KB · Views: 116
  • no_64_92 locator.jpg
    no_64_92 locator.jpg
    51.1 KB · Views: 137
EM, another new one, #96. It is a scrap piece located about the 4 o'clock position on the upper hull, starboard side aft of the docking port tunnel near the core. It appears to be a (from center) red, yellow then black (outlined) circle. Hopefully I can locate better views of it, but for now this is what we have.
R/ Robert
 

Attachments

  • no_96.jpg
    no_96.jpg
    7.2 KB · Views: 119
  • no_96_locator.jpg
    no_96_locator.jpg
    49.3 KB · Views: 117
And yet another: #97, the infamous 'cut Valvoline logo' decal. no_97.jpg Faded and flaked, finally found it on the rear,port engine deck in image 276_SWI_1306.jpg The Valvoline logo appears to be the upper portion, cut just at the inner apex of the two colored lines of the "V".no_97_42_43_51_locator.jpg
 
Damn it. Okay. That's it. I give up. You guys are all over this. :)

JP, we have those tracked as #56 (as you noted, same as the starboard side instance) and as #79, "partial engine intake warning chevron". I expect, given the lightened area above it, that the original application used the entire chevron but it has since flaked off. Oh, the tragedy!
Regards, Robert
 
Hi Guys,

Robert, the photos I have are from the net forgot where it is from but it is possibly from the Onedrive archive. I was looking for the one you mentioned near the disk but so far could not locate any red & white decals there.

missing decal5.jpgmissing decal9.jpg

Here are some more I found...

missing decal11.jpgmissing decal12.jpgmissing decal10.jpgmissing decal13.jpg

The first photo here is from the bottom bow section, very interesting find...there are two(2) Red circles possibly Japanese airplane Red Suns and Twin Black Strips.
Unsure what is the Zoomed out photo though.

The second photo is located in the Bow Port Landing gear box (hehehe...I learn that from Robert), the Black & Redish decal looks like the champion sticker

The last two where taken from the AMT Northwest Trucking tractor sheet Robert posted earlier - (cut from the NW decal).


missing decal6.jpgmissing decal7.jpgmissing decal8.jpg
 
Last edited:
Way to go gentlemen! This just proves you can NEVER have TOO much reference. Timing IS everything it seems.

Later this afternoon I'm doing the "were the heck do ALL these decals go?" layout. LOL this is great stuff!

Thks!
 

Your message may be considered spam for the following reasons:

If you wish to reply despite these issues, check the box below before replying.
Be aware that malicious compliance may result in more severe penalties.
Back
Top