5ft Falcon Build Plans

GhostRider

New Member
I have some questions regarding the building of a 5ft Falcon.

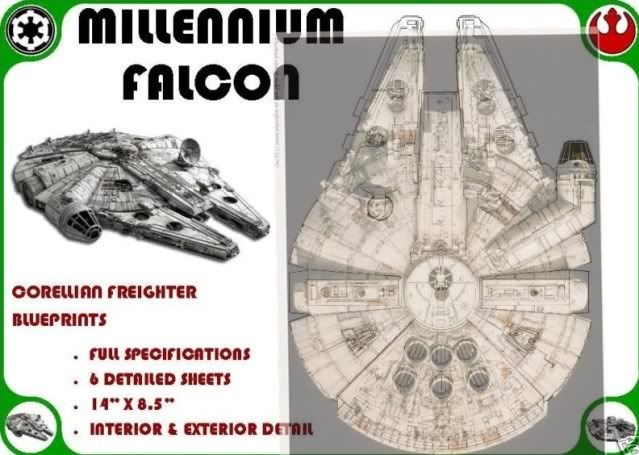
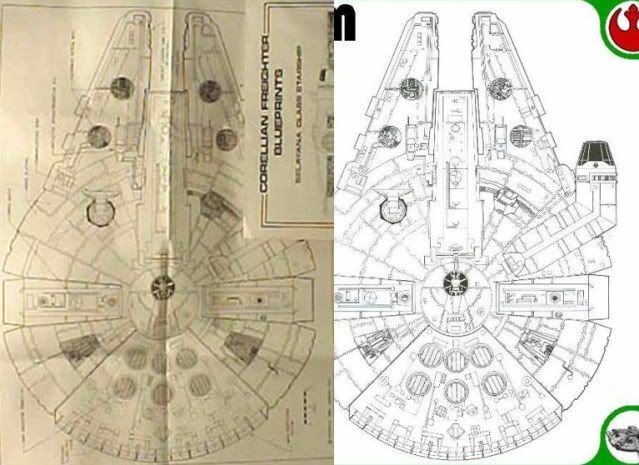
Are the plans from Studioscale correct? On the plan the gap between the mandibles is wider than the width of the cockpit, I believe they are supposed to be the same?

Is 1mm styrene a suitable building material? or is something thicker required? I presume 2 or 3mm acrylic would be a suitable internal frame material?

I'm guessing the kitbashing mentioned here and on Studioscale is for parts suitable for the 32" model? Are there parts suitable for the 5ft build?

I'm researching the 5ft MF build as my next project so I thought the big bad boy would be a worthy challenge.

I understand the 5ft MF is indeed a challenge, especially in the kitbashing dept, but what could be better than a 1.5m Falcon on the dining room table!

If anyone has answers or any tips, tricks or techniques, your input would be greatly appreciated.

Thanks in advance.

Rick
 
Last edited:
First - post pics as you build :D

Second - the kits on the 5 footer are not the same as the ones on the 32. the devil is in the details and overall they are "basically" the same shape... all the detailing is different except for the "big parts". kit subjects are on the 5 footer and 32 bird but in double the scale for example 1/72 tanks become 1/35 tanks, etc. but mostly its a completely different set of kits.

Good luck...

Jedi Dade
 
Hi Ghostrider,
Good luck with your build. It's also a dream project of mine but it will remain just that. A dream.

I personally wouldn't use 1mm styrene, wanting something a little more rigid. If you want to use acrylic for the internal structure you'll need to be able to cut it yourself, assuming acrylic requires specific cutting tools, otherwise it may get very expensive.

Also, get in touch with Faustus100 as he, I believe, is well advanced in his 5ft build.
 
Thanks for the replies.

It is a challenging project, but I've built replica armour, blasters and other movie props before so I know that one has to be dedicated (and nuts) to undertake such a project!

Jedi Dade: It does seem the most difficult part is identifying and aquiring the kits for the detailed parts. As for photos, I'll probably blog the build or at least photobucket the progress.

Junk Pilot: I was considering 1mm styrene just for the cover panels and something stronger for the internal structure as 1mm is flexible and cutable with a knife, but I'll keep researching materials.

I work for a sign and display company so have access to plastics, acrylics and all the cutting, bending, heating and vaccuum forming equipment.

Anyway thanks for the info and I'll keep you all posted.

Rick
 
Hi,

There must be something in the air about building 5' Falcons at the moment. I'm on that kick too :)

Just about to post up a thread with part maps for the big Falcon. As far as getting good plans to build from I would suggest you/we derive dimensions from the key kit parts as we get them. eg the 1/9 Kettengrad part will give a good reference for the height of the waistband. The 1/25 Kenworth chassis parts give a good length ref for the prongs etc etc

Using what we get from the parts then cross referencing proportions from good photo reference we should be able to piece her together.

Good luck with your build. Hope we can help each other out, plus there are others here offering to cast up parts from the hard to find kits which will be a huge help.

Cheers

Nick
 
Hi Ghostrider, there are no available base plans anywhere on the web for the 5-footer. Only for the 32-inch. There are plenty of differences you'll learn as you go along. The biggest difference being the steeper dome of the 5-footer's hull and more narrow sidewalls (at the same scale, of course). The sites I've visited most for reference photos are:

www.studioscale.com (has fantastic photos and kit scans)
www.studioscalemodelers.com (has fabulous photos and kit scans - and parts lists too in one thread I've seen - that long list might make you want to give it up so be warned)

Jedilaw's photos:
MilleniumFalcon

and Forbidden Plastic's:
http://forbiddenplastic.com/ref_star_wars/mos_mf/ref_sw_mos_mf.html

And while you're at it check out this guy's CG build:
http://www.cgfeedback.com/cgfeedback/showthread.php?t=831&page=2

Star Wars Chronicles and Sculpting a Galaxy have been helpful although the photos are few and not really close-ups. I would also recommend that you join the Millennium Falcon Builders Yahoo group. There are some die-hard members there, including Gort, Faustus, Dennis and Edward.

Gort, thank you so much in advance for planning to post some much-needed part-maps.

Good luck with your build, Ghostrider. A 5-footer (or more aptly, 5-ft 8-incher) model may be big, heavy and unwieldy but it's badass. Building it is a long-drawn process that can easily take years to complete as there are LOTS of kits to identify/hunt down so people who have shared their IDs and those who are willing to recast are doing us all a very big favor and I can't thank them enough - it is just pure selflessness.
 
Last edited:
These plans are on Ebay all the time and appear to be based on the 5ft Falcon. Does anyone have these plans and are they any good?


bp894.jpg


!BlZ0wMQCGk~$(KGrHqIOKiIEtkgGeEbBBLbjl7hvq!~~_3.jpg
 
Last edited by a moderator:
Hi Junk Pilot, I don't have these blueprints but took your photo and superimposed the 5-footer top view photo over it and there seem to be differences. The blueprints' mandibles and cockpit seem too long for one thing. I wonder if it includes measurements? Perhaps these came from concept drawings/plans?

I tried doing some calculations once using my 1/5 Entex rotary engine in relation to the ILM top view photo (the Entex engine is visible on the photo) to get the size of the 5-footer and it comes to a whopping 5ft 8in in length - the same length (173cm) given in Chronicles. The cockpit tube comes to about 6inches in diameter, and mandible thickness of 2 inches. The mandibles of course, go all the way into the hull, so this must be the hull sidewall height as well, but will partly be covered by the plating/overhang around the hull.

One person won't be able to move an almost 6-foot long model around easily without help. But to the dedicated builder and die-hard 5-footer fan this will not be a hindrance. It is, after all, the dream model to build and own.

Superimposed.jpg
 
Last edited:
I bought the same plans at a convention in the 80s. They're very neat and well thought-out, but I wouldn't use them for a model build. It's just a fun grey-market thing to hang on your dorm room wall. I'm sure the artist was trying to depict the fictional ship, not represent one specific special effects model.
 
Thanks Crackerjazz.

Are you able to overlay the two plan images together as well. I'd like to know how different the two plans REALLY are from each other. Cheers.
 
That is very surprising. I was thinking about getting both of them and the one on the left has 4 sheets and the right has 6. And if they are the same I wonder where the other two sheets have come from in the one on the right since the 4 sheet Selyana Class Freighter blueprints were out first IIRC.
 
Hi Junk Pilot. From the Ebay post, it includes the following. There are two cutaway views I suppose they're the extras.
  • Sheet 1: Profile Exterior
  • Sheet 2: Profile Cutaway
  • Sheet 3: Fore Exterior
  • Sheet 4: Top Plan Cutaway
  • Sheet 5: Top Exterior
  • Sheet 6: Aft Exterior
I came across this page from Frank V. Bonura. It's the same plan! So I guess the Ebay blueprints are based on his drawings. This is the third figure from the top, which he mentions is based on studying the 5-ft, but, as our overlay shows, is a bit off.

STAR WARS ® Deckplans Alliance - Old_Ship_Gallery

OldDeckplans.jpg


Here she is with 5-ft superimposed.

Overlay.jpg
 
Last edited by a moderator:
Actually, the Selyana Class Freighter blueprints supercedes the internet as I had these plans in the late 80's so I would think Frank's page is based on those plans.

According to this rpf thread the Selyana plans date back to 1982.
 
First rule: Never trust someone else's blueprint!
Second rule: Never trust your own blueprint!

Seriously guys, the only way to get a drawing/blueprint you are happy with is to do it yourself using a lot of the available ref & having alot of the donor kit parts on hand to use as guides in approximating fairly accurate measures & tweaking things as you go along.

I have never seen an accurate 5 footer schematic & probably never will, those blueprint pics are way off, so an accurate looking model won't come from those.

Stu
 
Listen to Stu. Truer words never spoken. There is no substitute for your own research: if you want accuracy don't rely on anyone else's work. You never know how far along the spectrum of "near enough is good enough" that person resided.
 
Stu, you are absolutely right. I made so many Y Wing blueprints, and was never happy with any of them! There was always doubt lurking about. My first ones were absolutely horrible! So far off it's not even funny. It didn't fall into place until I had many of the donor parts and measured them to get approximate measurements of the underlying structure. Then, when all the angles and everything fell into place, and each measurement seemed to support each other... then I knew I was on to something.

Here is a hint that probably applies to the Falcon as well: Use US inches. I was getting measurements for the Y that came out right on the inch marks, and everything came together VERY nicely. But when I was using metric, I had to make assumptions that never quite worked out, I got very odd angles, etc...

It's nice to make a 3D model out of your blueprints as well, and rotate it around to see if it looks true to the physical model's structure.
 
In my experience, one really good way to get accurate measurements of specific sections of the original miniatures is to:

  1. pull a quality, orthogonal reference photo of that section into a good photo editor (I use Photoshop),
  2. find a key model kit part in that photo, the larger the part, the better,
  3. obtain the original kit part, if you don't already have it,
  4. use a high quality set of digital calipers to measure that kit part in each useful dimension, twice,
  5. resize the reference photo on your computer so that the part in the image is exactly the same size as the original kit part,
  6. print that photo at a 1:1 resolution as a full scale "part map" using one ore more pieces of high quality paper,
  7. check to make sure the original part fits perfectly on the part map, and
  8. now you can begin to determine not only the relative placement of other parts in the same plane as that donor part, but the dimensions of the underlying structure as well.
A few notes, again from experience:

  1. depending on the size and complexity of the model, this process can be very, very time consuming,
  2. depending on the size and complexity of the model and the accessibility of the donor kits used to provide parts, assuming you already know what they are, this can be very, very expensive, and
  3. this is all very much trial and error and you will make mistakes, and even when you are sure you're sure that you're absolutely correct, there's a strong likelihood that one or more of your base assumptions are incorrect or incomplete. It takes a high degree of obsessive compulsiveness to stick with this stuff long enough to get it correct, which is why you often see version after version after version of a particular replica miniature here over the years.
Given all of that, it's important to understand when you come to the forum and ask for an accurate set of plans or a complete kit list for the five-foot Falcon, that there are a small number of very talented, patient, obsessive, dedicated guys who've spent countless hours and thousands of dollars working on their own replica builds for many years, a few that I know of have been chiseling away for 10 years or more, and we have yet to see a single one of them completed.

In short, welcome to the Studio Scale Modeling Forum, and keep us posted on your progress! :)
 
This thread is more than 11 years old.

Your message may be considered spam for the following reasons:

  1. This thread hasn't been active in some time. A new post in this thread might not contribute constructively to this discussion after so long.
If you wish to reply despite these issues, check the box below before replying.
Be aware that malicious compliance may result in more severe penalties.
Back
Top