Weta District 9 Arc Generator - my repaint

Nwerke

Master Member
RPF PREMIUM MEMBER
If we could subtitle threads mine would be "Omigod, Martyn actually does something!". :)

Like Zorg, I figure'd I'd start a separate thread - we'll need the main D9 guns thread for discussion of the GP and AR in due course, so here's a thread for my repaint, or mutilation, cos it's going to be a bit of both. :D I'm trying to turn my Arc Gen into a very close replica of the gun which is seen lying on the ground in the "collecting guns" documentary footage, in the rack and fired by Wikus during the MNU testing scenes, and carried by Wikus during the first half of the assault on MNU headquarters.

I'm finishing up the paint basics in a hurry for a big show next weekend and after that it'll go on my wall for a while - at least until the art book is out - because I want to do some more serious surgery, but will need better reference.

Here are a couple of the first pics from the main thread, showing some colour mistakes and over-enthusiastic washes (I started out doing a 'generic' gun and only decided on the "No. 1 Wikus" gun a bit late in the piece). Before I forget, big thanks to Art, Thx and Zorg for leading the way!

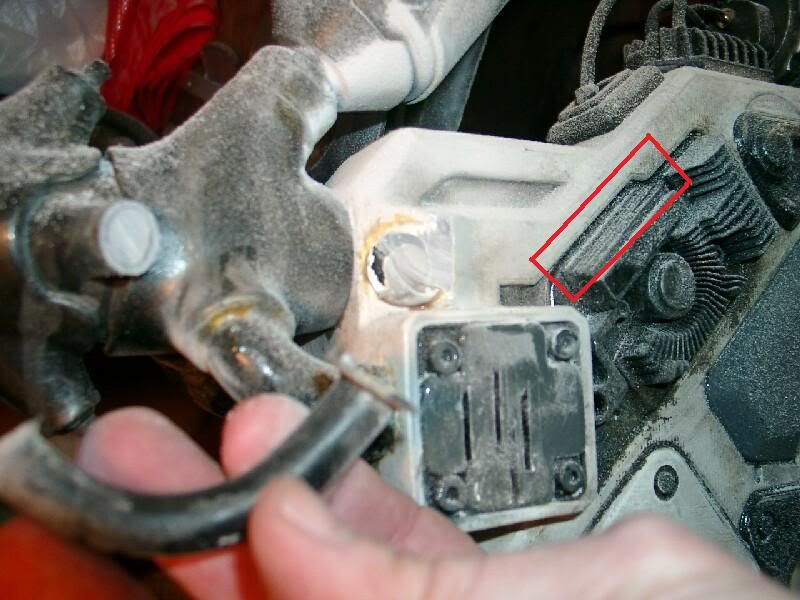
First orange I tried wasn't right:
01010007a.jpg


Fixed. Custom mix was much better:
10300082a.jpg


Note - in both these pics the stripes are all in the factory positions and sizes. They don't represent a specific film gun so that had to change! More pics soon as I've loaded them up and resized.
 
Last edited:
Just backtracking a bit to the prototype, here's a summary of the main differences on the right side vs. the Weta replica:

vlcsnap-2010-09-03-20h15m32s2AA.jpg


On the left side, the heatsink area has much heavier weathering than any of the other guns. Also, note the repairs under the grey panel (the CG animators who did the 'activation sequence' actually animated some of these).

vlcsnap-2010-09-03-20h22m45s17a.jpg


Finally the left side of the gun:

dist3000_a2.jpg


Looking at the factory replica paint job it's obvious that the black stripe on the canister needs work. There is no gap between it and the four "vents", and it meets the semicircular fastener surround too high. The front edge of the stripe also kinks in and out:

10300047a.jpg


The canister decal is about right, but the crude 'paint chipping' spoils it. The 'cross' detail and the large rhomboid panel are black, and the grips are too dark a grey. Also, the orange marker on the knob is in a recess instead of on the upper surface (a moot point for the Wikus gun since it has a different knob anyway):

10300065a.jpg


Many paint lines are off. Here's an example - sorry for the blur, but you get the idea. The masking tape is at 90 degrees, the paint line is visibly wonky.

By the way, for this gun the white stripe begins level with the end of the third "rectangular vent" detail, and ends between the fourth and fifth - so the orange area is quite a bit bigger. The black stripe is much wider than on some other guns and ends almost level with the end of the sixth rectangle detail.

10300090a.jpg


Here's how far back the canister black stripe needs to come...

11010003a.jpg


...and how much muckier the upper electrodey bit needs to be:

11040006a.jpg


Well OK...maybe not THAT mucky...clearcoat killed most of it anyway. :)

Now we're getting closer to what I was after. The rear edge of the canister black stripe also has to be moved rearwards by 5-6mm, BTW (it is done in this next shot, unfortunately you can see the old demarcation line). The main orange stripe is more or less okay. Just need to touch it up to get rid of the bloody awful silver. (Most of that can be sanded off without harming the base paint, but it's hard to get out of low spots.) By the way, as mentioned in the main thread I am using Tamiya X6 orange plus rattlecan Tamiya TS-31 dayglo orange to match the factory colour. Thei ideal mix seems to be close to 50/50 - apart from gloss level the stuff almost just disappears on the base coat.

11050002a.jpg


Basic paint all done - grey areas, canister stripe and front stripes fettled and the gunmetal roundel at the very front painted, um, gunmetal (it is mostly orange, ex-factory). Now for more clearcoat!

11050004a.jpg


Eventually that knob has to go, hopefully the art book might give good ref for the odd knob on this gun. The reason the marker now points backwards can be seen in the screencap above...er, if you squint...and take a bit of a guess!

Next up once the clearcoat cures are more washes and slightly better paint-chipping effects, I hope, though I'm not nearly the master Zorg or Thx are.

Edit: I know my pics totally suck - sorry about that!! I'll take some better ones against a neutral background once I have this thing finished up.
 
Last edited:
Re: Weta Distric 9 Arc Gen - my repaint

nice work man, what paints did you use for the weathering on the electrodey thing and the gunk coming out of the canister etc?

although mine is weathered its looking a bit too clean if you know what i mean :unsure

i will be doing more work on mine for sure.

as for the lines not put on straight, they are the same on mine.

great work and an inspiration

-z
 
Hey thanks zorg, I consider that high praise coming from you. :) I cheated like a cheating cheater with the electrode gunk - it's not really paint or a proper wash at all, it's just dirty spirits from my brush washing cup. :D As a wash it's quite fragile, but it's the right sort of colour, dries fast and is easily adjusted.

FB, not certain, but fairly sure. It has the same grey on grips and crosses, and has the same vertical black glyphs on the crosses - see this screencap.

Addtionally, it has roughly the same amount of grot on each side around the heat exchangers (i.e. more than the other props we've seen so far), and the stripe locations also match - esp. the front stripes, I haven't yet found another gun which has the black and white stripes in the same relationship to the rectangular details.

Then there's the fact that the other two guns in the rack are the ones that are held up to the lab camera. None of this is conclusive, but that's my working theory.
 
Last edited:
Re: Weta Distric 9 Arc Gen - my repaint

Here's another pic of the test gun. I wonder what that rounded triangular piece with the 3 screws is on the grips.

d944.jpg


FB
 
Re: Weta Distric 9 Arc Gen - my repaint

That's an awesome pic, FB. I didn't have it. Thanks! Not least for the excellent space helmet closeup, still love that thing. Swoon!

I don't know, but I'd just got back to my PC with some sheet styrene and the prop draped across my knees to sketch it onto my grip, ha ha! Forgot to print out my reference pics on Friday. Anyway, good timing. :thumbsup

I imagine that like the strip with the four screws, it's probably holding a hatch in place. Did you notice the two cuts in the grip between the strip and the triangle? The triangle lies over the bottom end of those.
 
Re: Weta Distric 9 Arc Gen - my repaint

Here's the only shot we see of the test Arc Gun's Right side. I included the rack gun pic for reference.

It looks like the black logo on the back is a different size but it's hard to tell.

arcr.jpg


FB
 
Re: Weta Distric 9 Arc Gen - my repaint

It does, but it's so blurry that it may be just that the outer parts of the logo are just too out of focus to register. And there's no guarantee that that WAS the same gun, of course. As we know, they chopped and changed a lot. (Why did they change hero props halfway through the attack on MNU? Did the first gun just completely disintegrate or something?) :D
 
Re: Weta Distric 9 Arc Gen - my repaint

This is a fantastic write up and walk through. :thumbsup Your AG is looking awesome. I still don't know if I have the confidence to tackle mine just yet. But I am going to start trying a few mods on other projects before I hit my favourite piece. I will hunt around and make sure I can find all the colours I need before I do start work on the AG.

But, after seeing all the mods shown by everyone, it's no longer a question of if, just when. It might be a stupid question, but why did you follow the White stripe all the way to the bottom of the front stock on one side but not the other? I know it may be just a work in progress shot, but what screen one has the white stripe running all the way through?

I see on the screen grabs that you and FB show only the very front colour, the Orange or the Grey seem to run right around. I actually prefer the look of the White running all the way down, and the way Zorg did his with the black bottom section completely painted out. I know there are several models being reproduced. I am just trying to remember which is which.

On another note I can't believe how much detail you guys pick up. I have watched this movie loads, and when I saw my AG, I was more than happy with it representing the screen accurate version. It's only after you blokes point out the differences I see how off it is. Is this why I can't find my car keys when they are on the kitchen bench too??

Lastly..whats that thing that looks like a ducks head near your Dremel in the pic of your AG's right side? it's driving me nuts trying to figure it out.

Once again mate, fantastic job and thanks for going to the trouble of doing the write up, as well as the incredibly detailed tutorials on weathering you answered my PM's with.
 
Re: Weta Distric 9 Arc Gen - my repaint

I found the full white version..duh!

What are your thoughts on the knob on the right side above the heat sink, do you think that is molded into the piece or added separate? I am now looking at my mods as doing the electrical work first, and would like to make that knob the switch for turning the LEDs on and off. I think the heat sink part is a glued on piece so that is where..if I go ahead, I will try to gain access for wiring and batteries etc.

Any thoughts?
 
Re: Weta Distric 9 Arc Gen - my repaint

Glenn, the knob is hard to say - I've tried to prise it off, but to no avail. If it's glued on, it is glued on strongly! The heat sink is certainly a separate piece, moulded resin or plastic I think. It's fragile, be careful. In fact my guess is that it's glued onto a flat recessed fibreglass surface - with a large contact area and the piece being thin, I do not think you will remove it successfully. If you do decide to try then I would advise taking a mould off it beforehand as insurance!

Thanks for your compliments. I'm embarrassed by the crappy quality of the pics so far so I'll try and take some better before/during/after pics when I do the next lot of washes. Hopefully that will justify your 'tutorial' remark a little better! :)
 
Re: Weta Distric 9 Arc Gen - my repaint

Thanks Martyn, yeah I'd planned on making a mold of the heat sink, and maybe even the knob. If I go ahead with this, I will also make a mold of the Arc generator piece at the very front and cast it in clear with an LED inside it, and paint over where I don't want light to escape.

The Tutorial comment wasn't a dig at you mate. I learn a lot from threads like these, especially when they show a bit more of the behind the scenes work. I just went through the Weta guns thread again, and Art, Thx, Zorg and you have all done amazing work and have truly inspired me.

Again..whats the duck?
 
Re: Weta Distric 9 Arc Gen - my repaint

Oh, sorry, I wasn't being defensive - it's just that I'd been looking again at Zorg's pics and they're just so good. I feel all inadequate. :)

Sorry again - missed that question - it's what is left of a Mil-24 Hind forward fuselage with the cockpit puttied over. It's intended to form the cockpit section of a Kow Yokoyama spacecraft, someday.
 
Re: Weta Distric 9 Arc Gen - my repaint

Ahh!! I knew it looked familiar, was driving me insane.

I know what you mean about Zorgs, I am secretly trying to get him banned just so I don't have to keep seeing updates. Thx is next, then you, and Art. You seen his Pulse rifle work?

it kinda makes you frightened to post doesn't it
 
Re: Weta Distric 9 Arc Gen - my repaint

Heh!!

Not much work tonight, had a club meeting. Here's what I got. First off, the electrode was looking a bit clean again following an overdose of gloss clear:

11060001.JPG


Soon had that fixed. Now this actually needs a bit more colour, so I'll pick up some more oils during the week. I have umber in hand but just that gets a bit monotone too. This is about five minute's work, by the way. (You may say as many unkind things along the lines of 'looks it too!' as you wish...sticks and stones!) But the spirit makes things very fast and controllable, also very reversible if needed.

11060021.JPG


Wetting up the upper canister and letting it flow where it wants:

11060017.JPG


When it flows where you don't want, it's easily touched up:

11060019.JPG


What the heck are these? Submit your entries on postcards please...

11060015.JPG


Here's a hint:

11060024.JPG


Something's not right here. Something's off, somehow. I think this needs some minor, subtle adjustment - I'll get my Dremel out:

11060025.JPG


OH ****, MY DREMEL SLIPPED!!!!

11060031.JPG


...I meant to do that. It'll be fine.

11060034.JPG


Actually that glyph needs work doesn't it? The lines are too widely spaced, I'll have to take it off again. Bugger.

In case you're wondering about the surgery, check the ref pics...Oh hey, Franz, this was the thing I forgot to mention re your question. It's still not a clincher, but the only other Arc Gen I know of that has this piece missing is Griefboy's. So I guess we might as well pretty much be positive that the testing gun is the one in the rack.
 
Last edited:
Re: Weta Distric 9 Arc Gen - my repaint

i also think there is a white block detail part here in the movie gun

gun.jpg
 
Re: Weta Distric 9 Arc Gen - my repaint

Ah my good Jean-Baptiste, you have an excellent eye! :D Also, I LOL'd, big time.

As for your :eek :eek :eek - I have worse things in store for this gun, trust me! :love

Actually I'm in two minds about adding that white block part. It's CG - it never existed in reality but was added by the animators to jazz things up for the activation sequence. I'll leave it off for now but when I get into "Phase II" (i.e. a lighting and effects setup) I'm going to have to really think about it...the other activation stuff never existed either, but at least the lights and motions happen in plausible spots using actual parts. (Although seeing the white rivet repair strip also sliding back and forth is kinda odd!)

Edit: cannot believe it took me a full day to notice I made a typo in the thread title. D'oh. Hope to god Colin Droidmilk never sees this, lol.
 
Last edited:
This thread is more than 13 years old.

Your message may be considered spam for the following reasons:

  1. This thread hasn't been active in some time. A new post in this thread might not contribute constructively to this discussion after so long.
If you wish to reply despite these issues, check the box below before replying.
Be aware that malicious compliance may result in more severe penalties.
Back
Top