Howdy folks, I figure I ought to start a thread on my next saber.
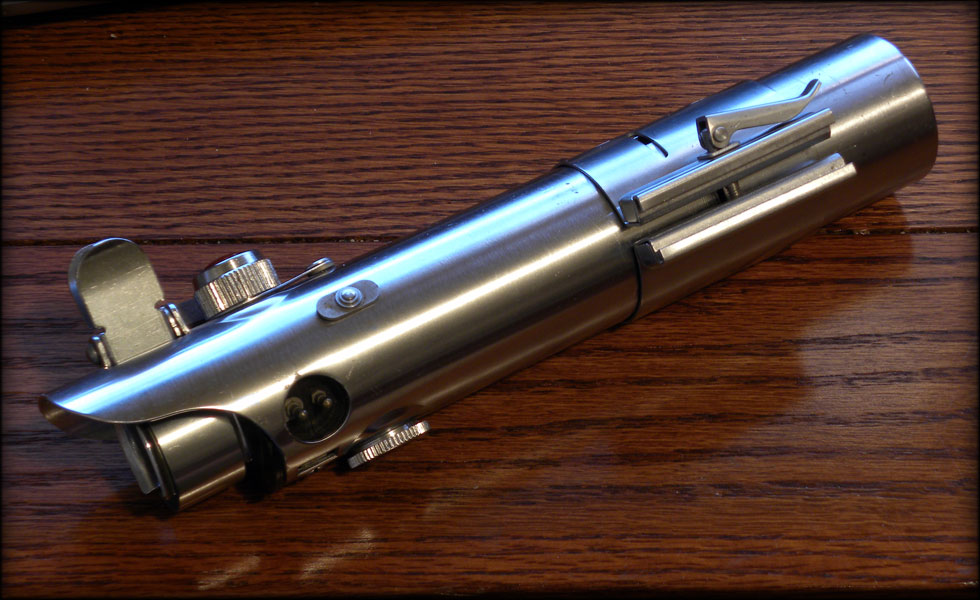
I wanted to go back to the roots again, this time with a Graflex ANH Luke saber. This is my interpretation of the internal lightsaber workings.
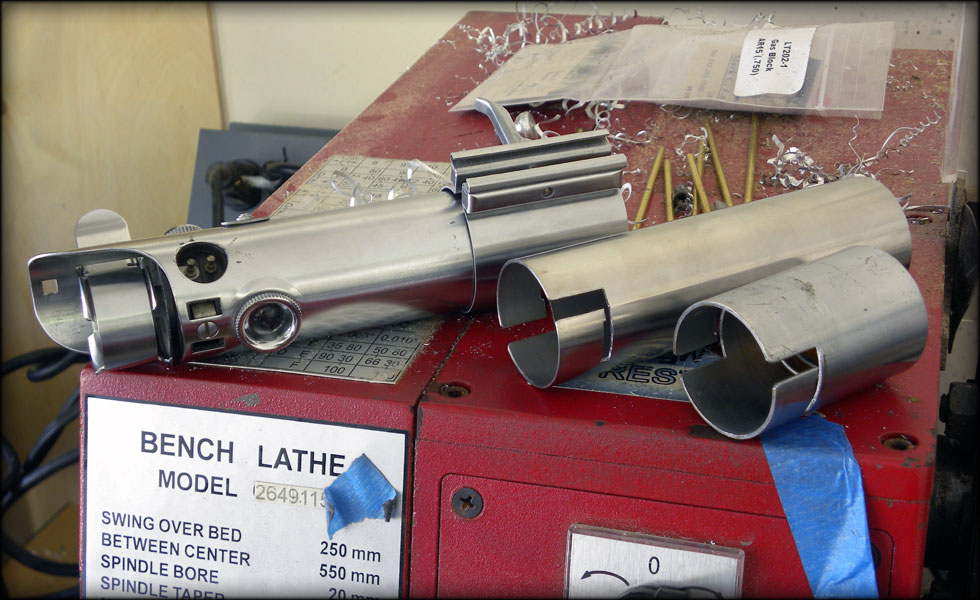
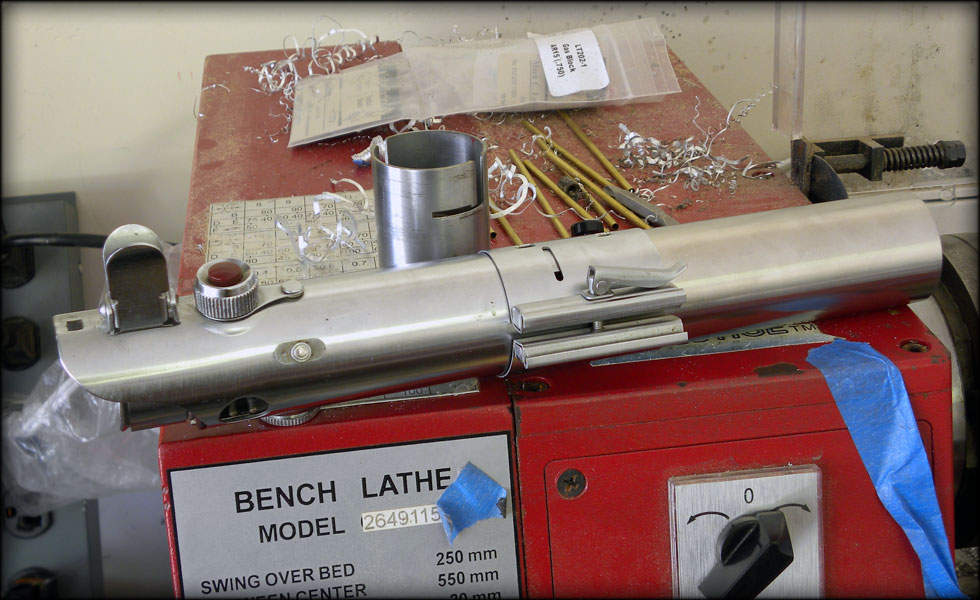
I picked up a cheaply priced Graflex 2 cell on ebay, and proceeded to make it into a 3 cell.
Unfortunately, I couldn't find anywhere that offered 3 cell back ends, so I decided to make my own out of some scrap capped 1.5 inch stock I had in the bin.
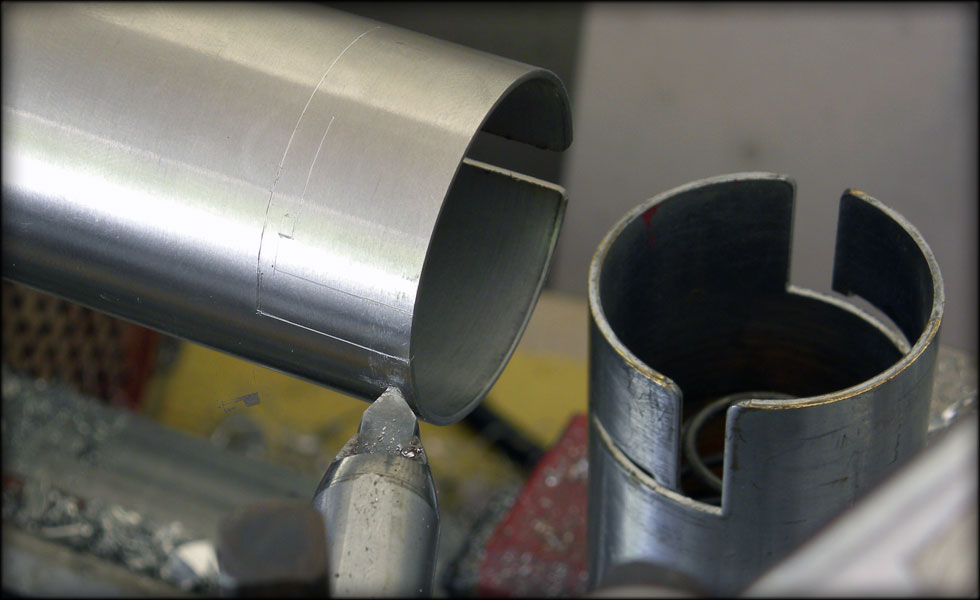
I used my lathe to etch the pattern for the tab slots so I could get them even and straight.
After removing the material with my dremel, it fits just as snug as the original two cell back.
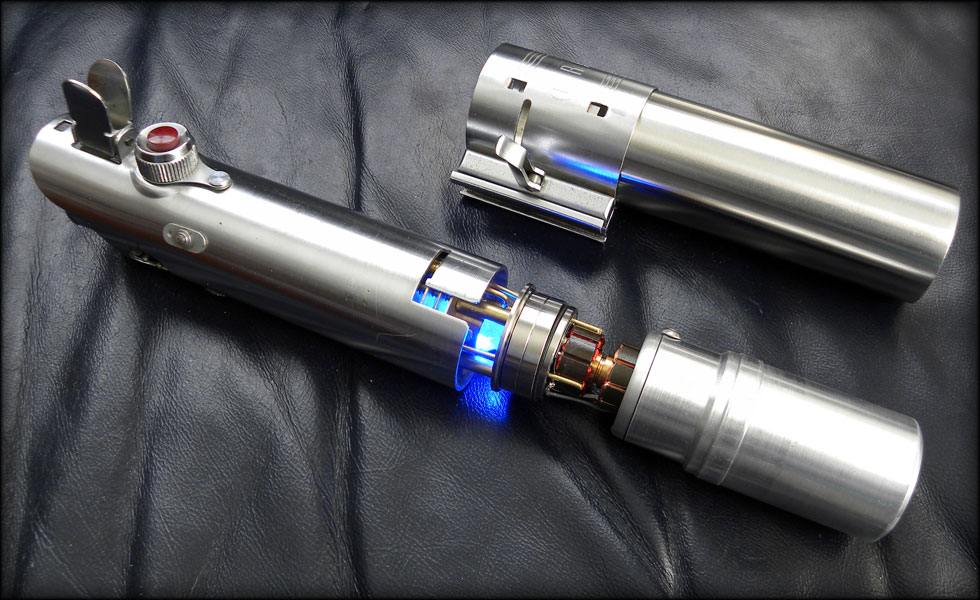
Next I thought about a crystal chamber. With much inspiration from those who have gone before me, I set off on my own direction, harvesting many parts from harddrives, old clocks, etc.
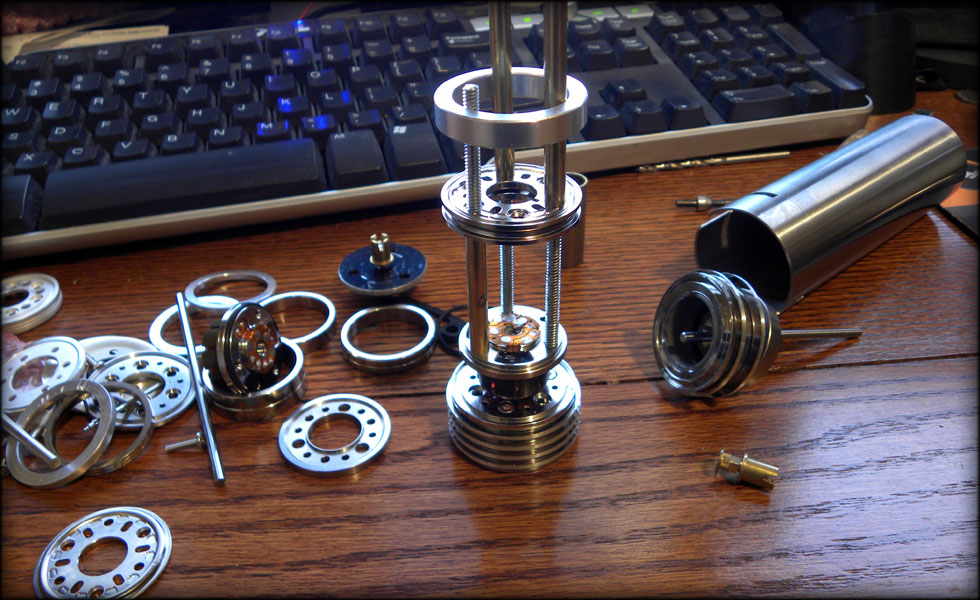
I took one entire array of harddrive platters and lathed them down to fit inside the graflex rear. At this point, I have the ... middle decided on more or less, and I will be constructing from there out to either end. I want to make sure I leave enough room in the design for soundboard, speaker, batteries, etc.
The crystal chamber is made of various parts, the most intricate so far is the crystal holder, made of brass tubing, guitar string beads, some brass stock from an old clock, etc.
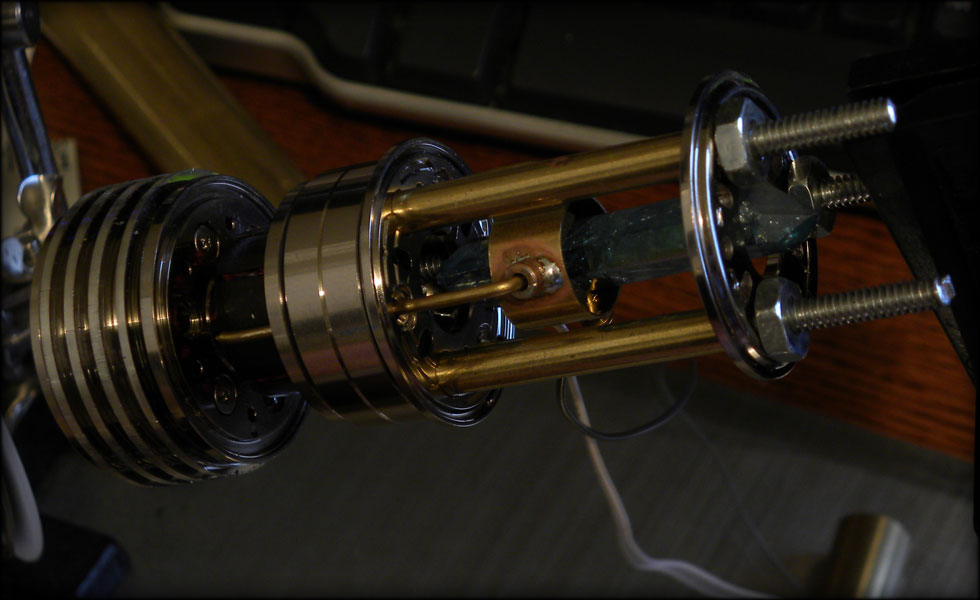
Here is my Aqua Aura double terminated crystal, a very nice blue without lighting, but with...
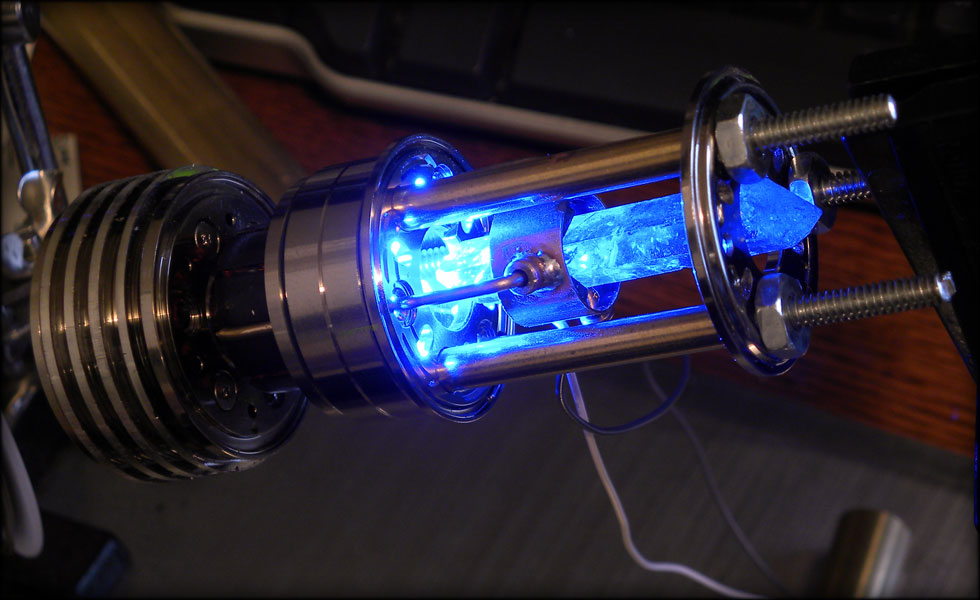
...it really shines..
And here's an update. I present to you my radiator section!
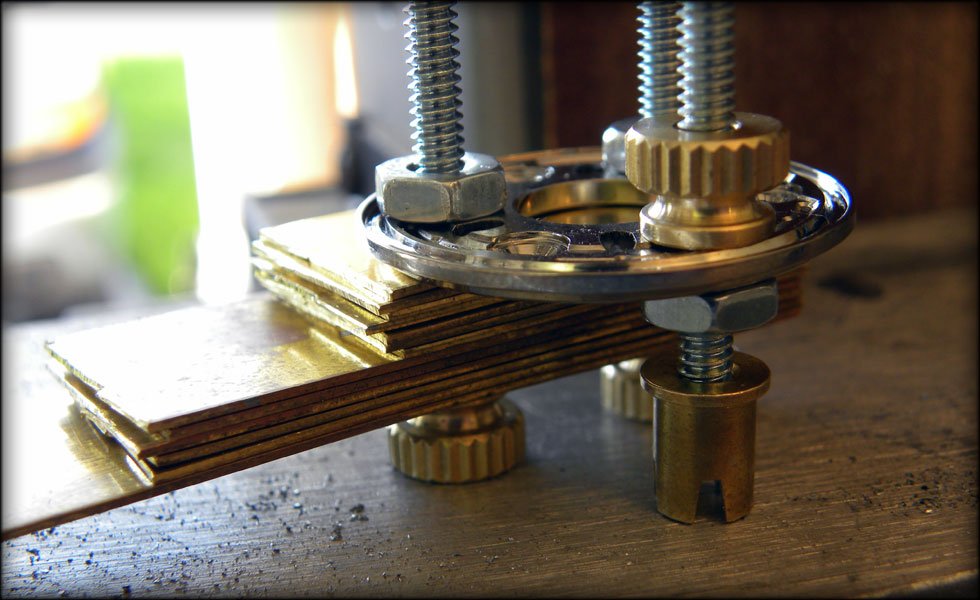
Some of you may know I was looking for some brass sheet, and I found 3/4 by 1 foot sections at my local hobby shop. I cut two of these down to sort of 2 inch sections, and drilled through a stack of them in a pattern that fit my three main frame posts. Here is my first rig, that didn't work too well on the belt sander, as it wasn't quite easy to hold, and therefore dangerous.
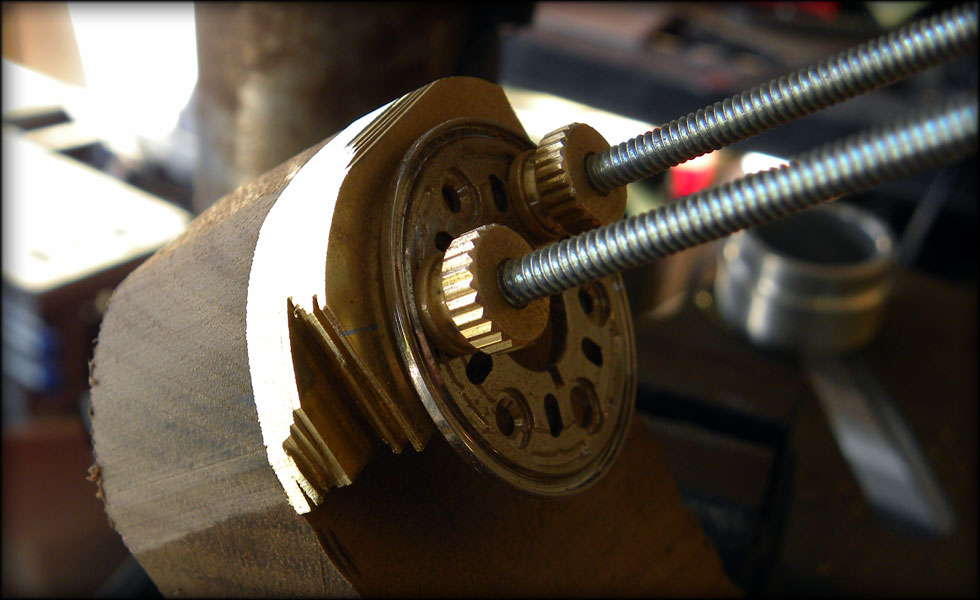
Here you see my better rig, bolted to a piece of scrap walnut, this lets me shave the brass down on the belt sander without bending anything near the bottom of the stack.
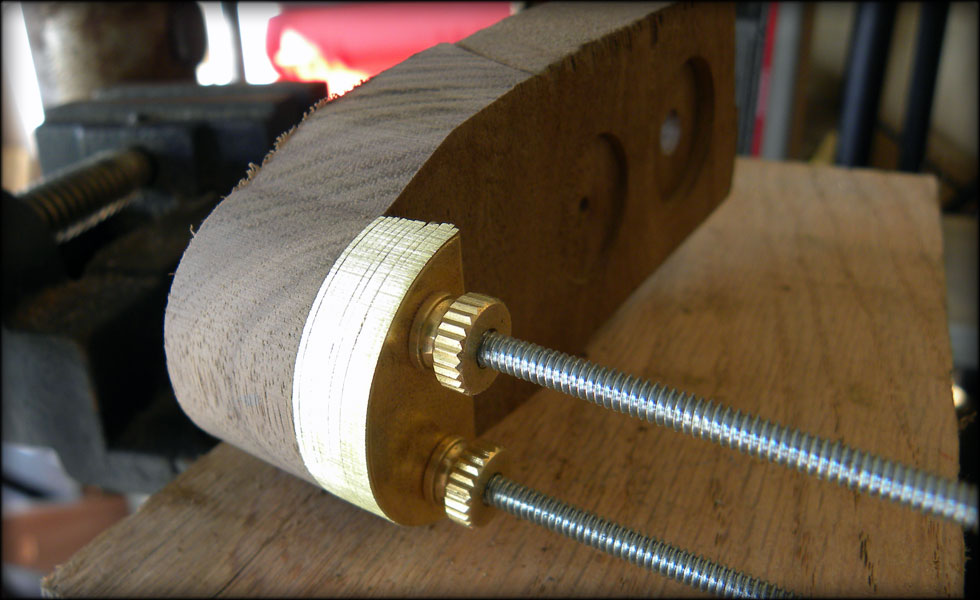
Here I have the stack pretty much shaped, I removed the harddrive platter retainer as I got closer to the shape I wanted, so as not to scuff it up.
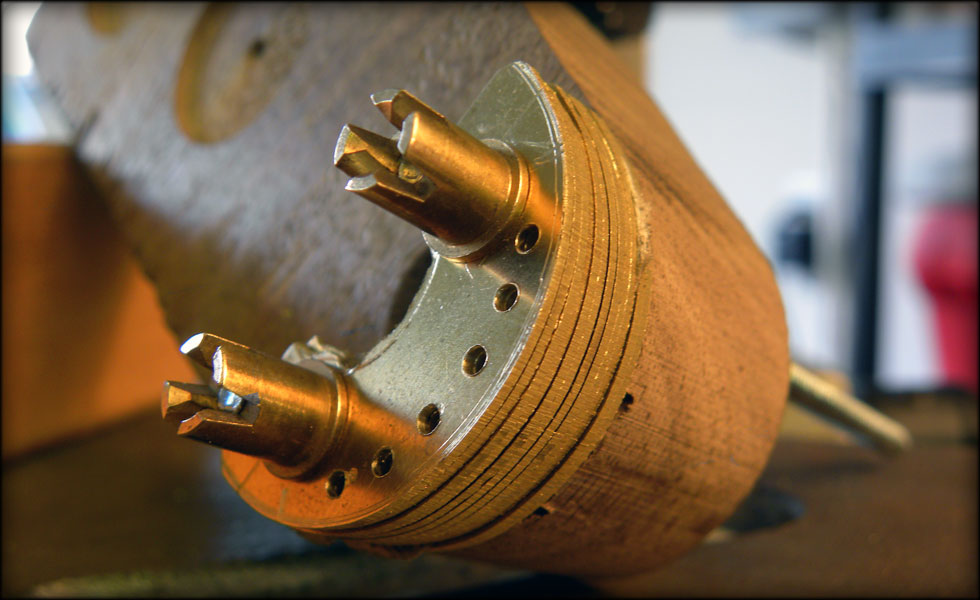
Now for the radiator line holes. This, again was drilled out on the drill press.
I had a devil of a time hollowing them out on the inside, to make a C.. I will probably revisit that inside contour, as I am not quite satisfied with it. Also, after drilling, I sandpapered each section to remove any flash or sharp edges from drilling.

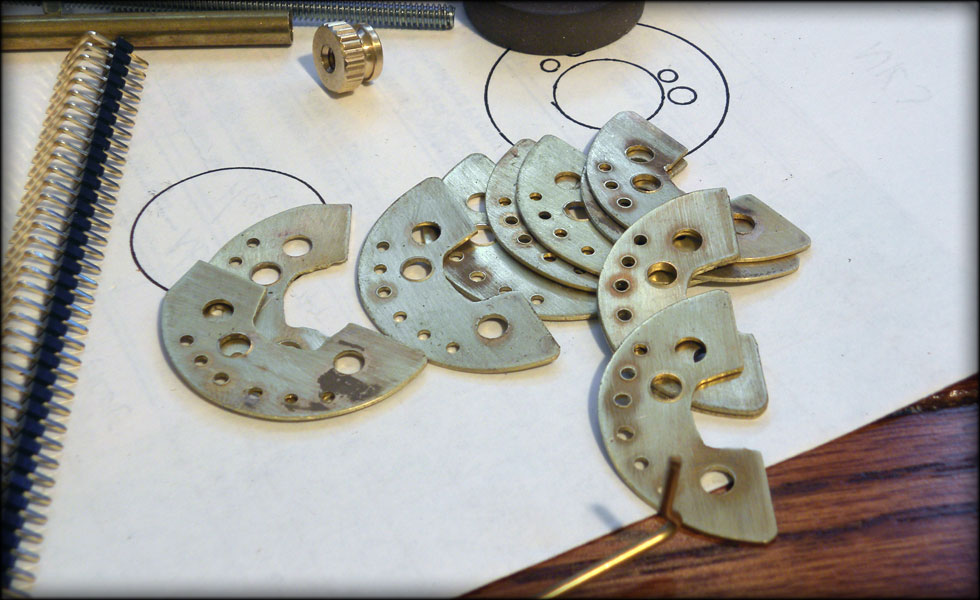
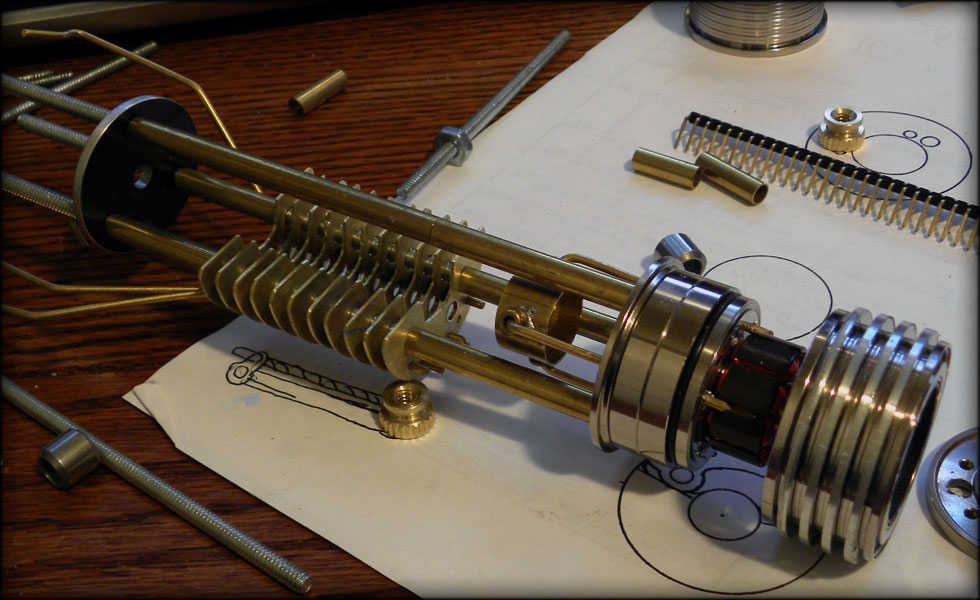
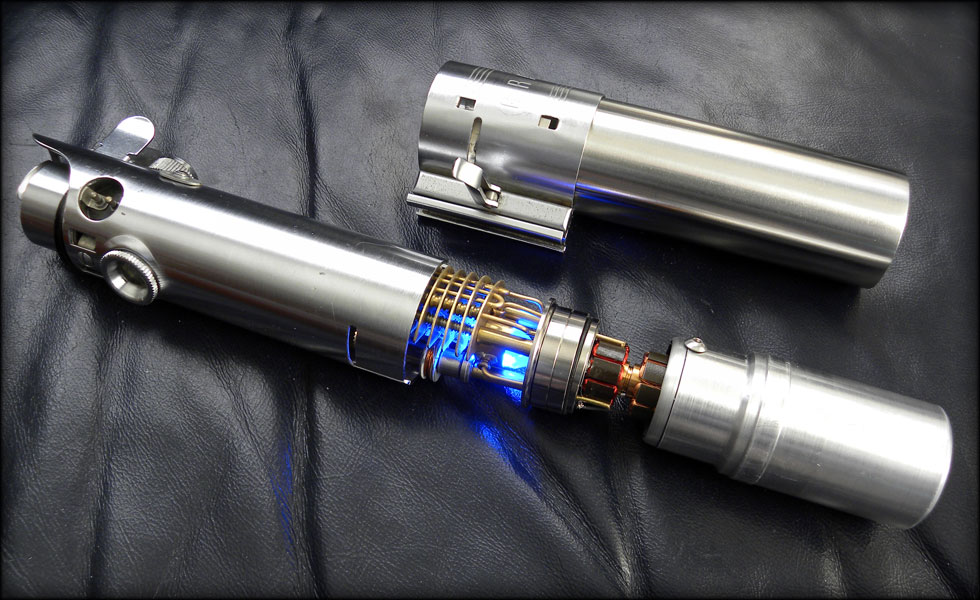
Here we are assembled and test fit. I am again using brass guitar string ends for spacing, and scrap brass rod from a broken clock to run through the sections.
Here's where I need to work on the inside contour... I am not quite happy with that yet, I will hollow it out a bit, and add some interesting details in there.
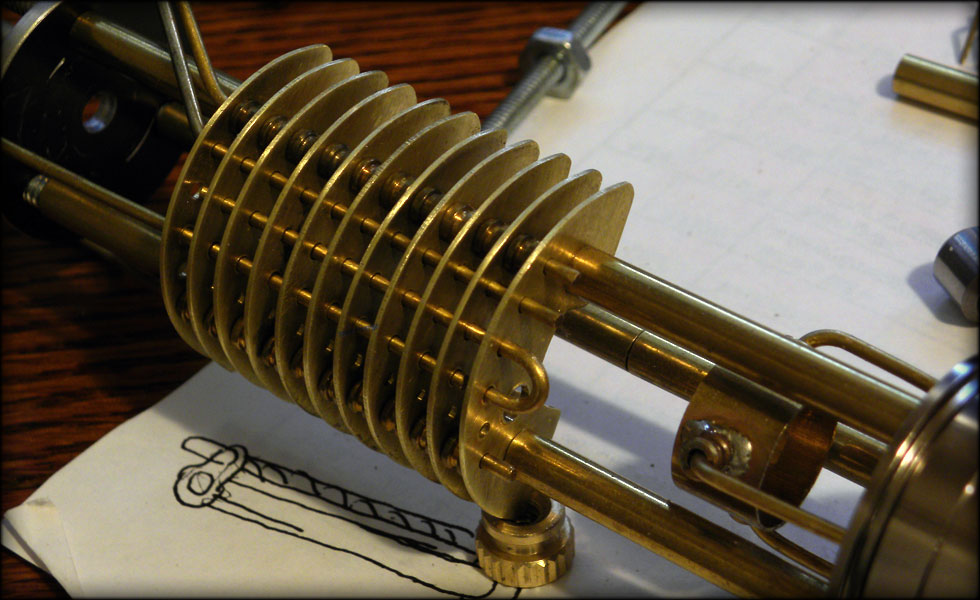
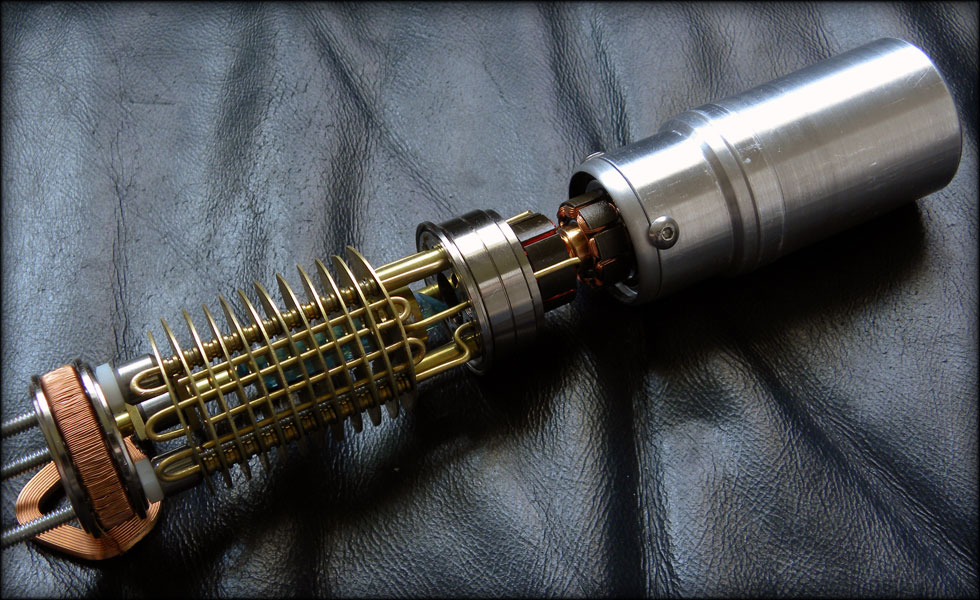
A closeup of the radiator section, shows my first bend. I will bend the rest of the rod around like that to make it look like tubing that needs to be cooled,,, or heated, or whatever.
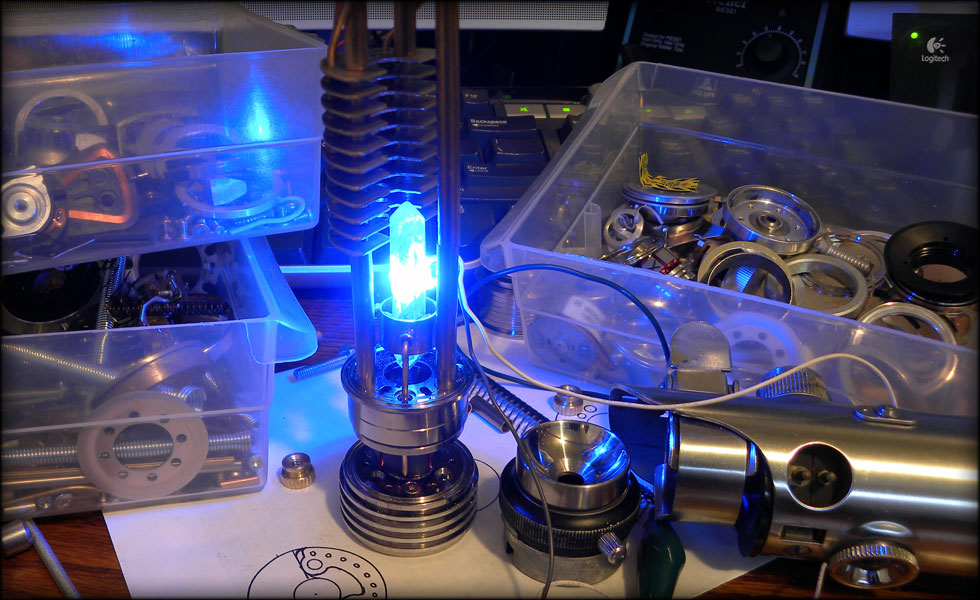
And another shot of the crystal. After assembling this, I think I will lower the placement of the radiator a bit to overlap with the crystal some. The radiator ended up being a bit longer than what I had in my original sketches, but I think it's fine.
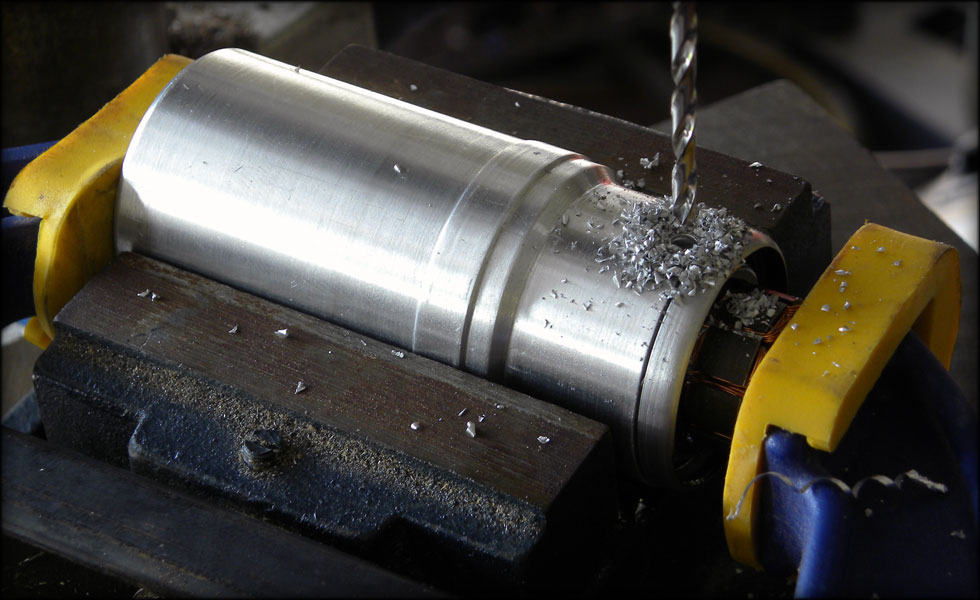
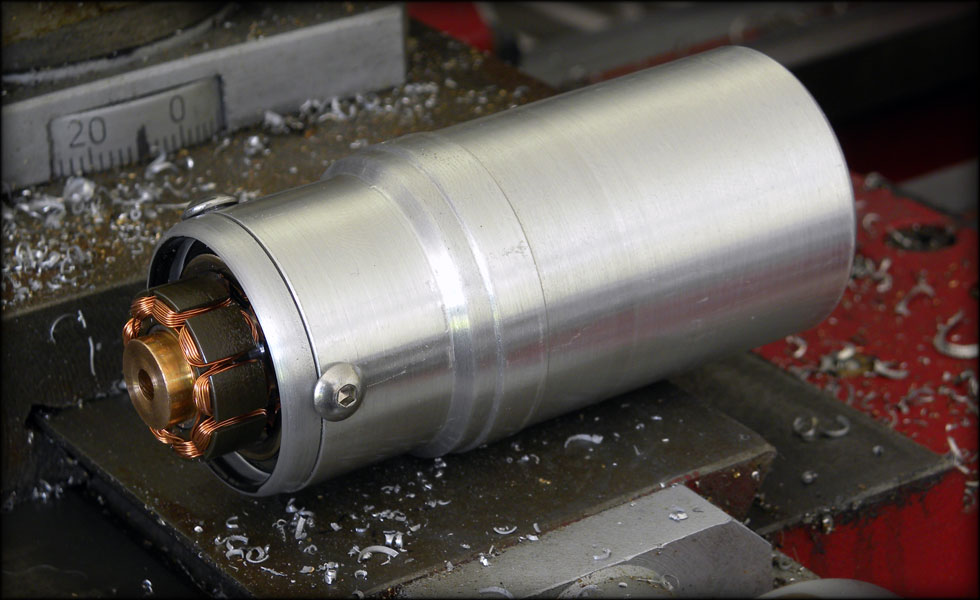
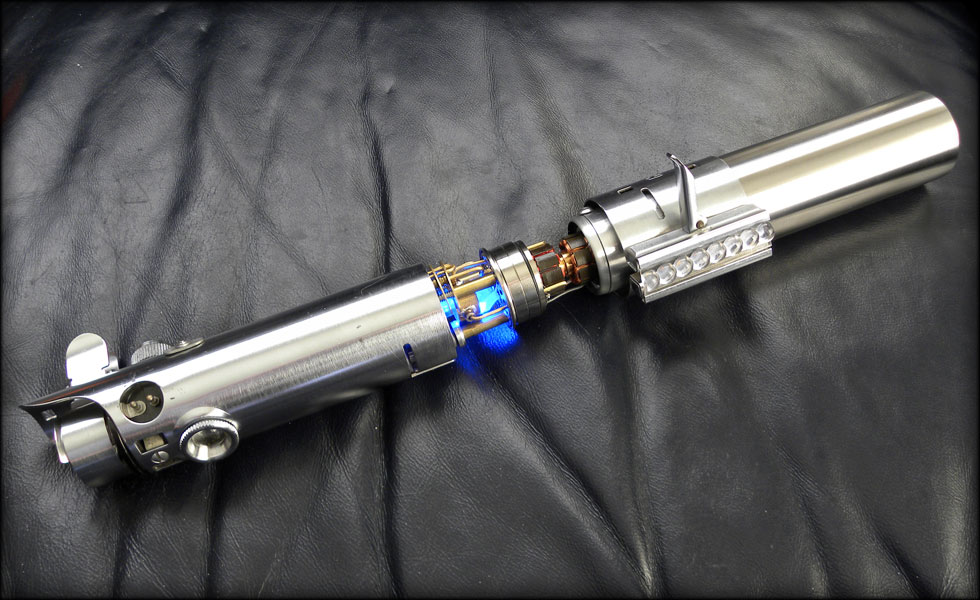
I machined a canister for my batteries and soundboard. Then I needed a fore end cap, so I turned down one of the harddrive motor mounts on my lathe, and set it so I could drill and tap for screws to seal it off.
I like the inset motor coils against the black paint of the motor mount cap. Here, I have threaded for 6-32 stainless cap screws, to hold it together.
I also took one of the hard drive platter spacers, and meticulously and tediously wrapped it in copper, for my front lens. I figured, a magnetic lens would work as well as an optical one. And I like the contrast of the copper vs the brass and chrome look.
It fits just fine in the graflex, I left the main support rods long so I can cut them down once my blade adapter arrives, but I have tape about where I estimate the adapter stops. I will fidget with the spacing a bit once I get the adapter, but I think it's really coming together.
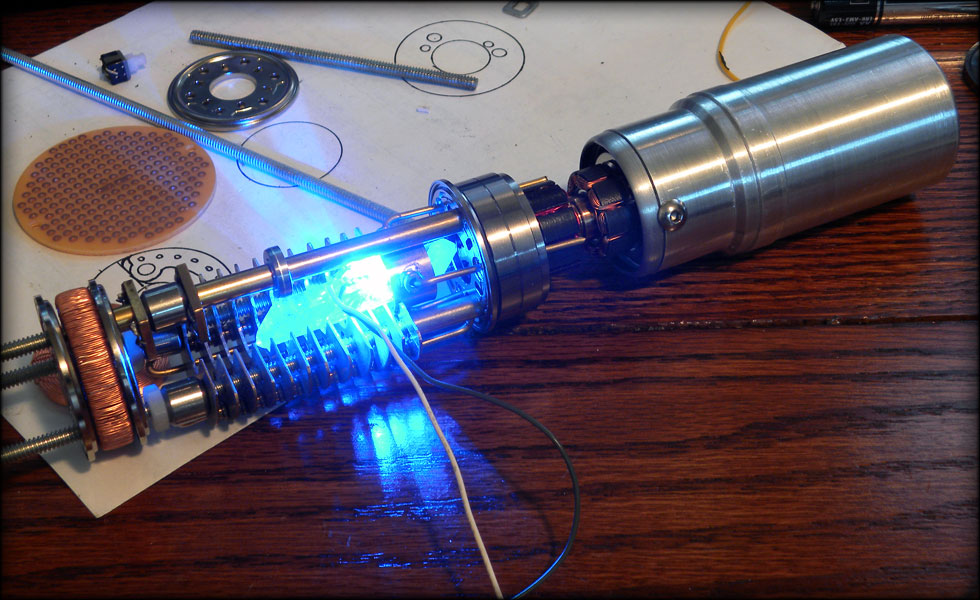
This evening, I shortened up my end screws, wired a preliminary LED into the crystal, and set my batteries and a temp switch in the battery canister.
Another shot, I love the color contrast between the blue of the light and the gold/yellow of the brass.
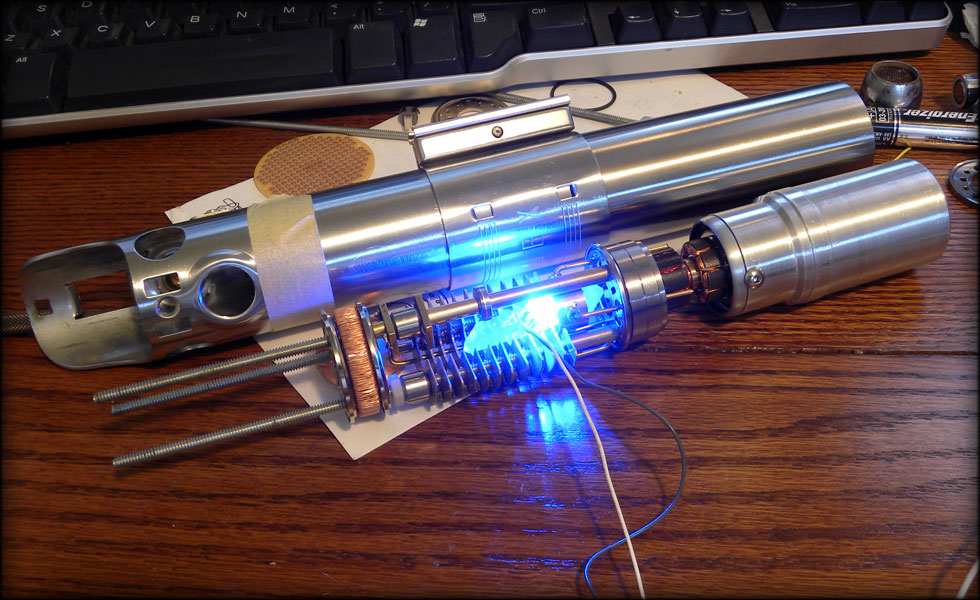
All spread out, I may mount it this way. I'll have to build a mount.
I wanted to go back to the roots again, this time with a Graflex ANH Luke saber. This is my interpretation of the internal lightsaber workings.
I picked up a cheaply priced Graflex 2 cell on ebay, and proceeded to make it into a 3 cell.
Unfortunately, I couldn't find anywhere that offered 3 cell back ends, so I decided to make my own out of some scrap capped 1.5 inch stock I had in the bin.
I used my lathe to etch the pattern for the tab slots so I could get them even and straight.
After removing the material with my dremel, it fits just as snug as the original two cell back.
Next I thought about a crystal chamber. With much inspiration from those who have gone before me, I set off on my own direction, harvesting many parts from harddrives, old clocks, etc.
I took one entire array of harddrive platters and lathed them down to fit inside the graflex rear. At this point, I have the ... middle decided on more or less, and I will be constructing from there out to either end. I want to make sure I leave enough room in the design for soundboard, speaker, batteries, etc.
The crystal chamber is made of various parts, the most intricate so far is the crystal holder, made of brass tubing, guitar string beads, some brass stock from an old clock, etc.
Here is my Aqua Aura double terminated crystal, a very nice blue without lighting, but with...
...it really shines..
And here's an update. I present to you my radiator section!
Some of you may know I was looking for some brass sheet, and I found 3/4 by 1 foot sections at my local hobby shop. I cut two of these down to sort of 2 inch sections, and drilled through a stack of them in a pattern that fit my three main frame posts. Here is my first rig, that didn't work too well on the belt sander, as it wasn't quite easy to hold, and therefore dangerous.
Here you see my better rig, bolted to a piece of scrap walnut, this lets me shave the brass down on the belt sander without bending anything near the bottom of the stack.
Here I have the stack pretty much shaped, I removed the harddrive platter retainer as I got closer to the shape I wanted, so as not to scuff it up.
Now for the radiator line holes. This, again was drilled out on the drill press.
I had a devil of a time hollowing them out on the inside, to make a C.. I will probably revisit that inside contour, as I am not quite satisfied with it. Also, after drilling, I sandpapered each section to remove any flash or sharp edges from drilling.
Here we are assembled and test fit. I am again using brass guitar string ends for spacing, and scrap brass rod from a broken clock to run through the sections.
Here's where I need to work on the inside contour... I am not quite happy with that yet, I will hollow it out a bit, and add some interesting details in there.
A closeup of the radiator section, shows my first bend. I will bend the rest of the rod around like that to make it look like tubing that needs to be cooled,,, or heated, or whatever.
And another shot of the crystal. After assembling this, I think I will lower the placement of the radiator a bit to overlap with the crystal some. The radiator ended up being a bit longer than what I had in my original sketches, but I think it's fine.
I machined a canister for my batteries and soundboard. Then I needed a fore end cap, so I turned down one of the harddrive motor mounts on my lathe, and set it so I could drill and tap for screws to seal it off.
I like the inset motor coils against the black paint of the motor mount cap. Here, I have threaded for 6-32 stainless cap screws, to hold it together.
I also took one of the hard drive platter spacers, and meticulously and tediously wrapped it in copper, for my front lens. I figured, a magnetic lens would work as well as an optical one. And I like the contrast of the copper vs the brass and chrome look.
It fits just fine in the graflex, I left the main support rods long so I can cut them down once my blade adapter arrives, but I have tape about where I estimate the adapter stops. I will fidget with the spacing a bit once I get the adapter, but I think it's really coming together.
This evening, I shortened up my end screws, wired a preliminary LED into the crystal, and set my batteries and a temp switch in the battery canister.
Another shot, I love the color contrast between the blue of the light and the gold/yellow of the brass.
All spread out, I may mount it this way. I'll have to build a mount.
 thumbsup!!!