The PEPAKURA question thread - PLEASE READ RULES IN FIRST POST!

You can also turn on 2d menu>Check overlapping parts before you start reorienting; I orient a lot of my parts EXTREMELY close together, it keeps me from stacking any pieces.

Thanks for that. I just turned it on and didn't see any marked difference then when I scroll along the 2D pages I saw the red pieces and realised they were overlapping. A useful hint for sure.

Cheers
 
Hello how are you? I'm a little new with this whole replicas of weapons / accessories for cosplays, but I would like to help me with something. I work with Foami (Goma eva) all replicas I do, but I wonder: what materials you add to the piece so the blade is rigid and is completely smooth?. I once talked a liquid polyurethane.
 
Hello how are you? I'm a little new with this whole replicas of weapons / accessories for cosplays, but I would like to help me with something. I work with Foami (Goma eva) all replicas I do, but I wonder: what materials you add to the piece so the blade is rigid and is completely smooth?. I once talked a liquid polyurethane.

Might want to look at what xrobots does:

XRobots.co.uk - Plastic coating your Plastazote / EVA / Polystyrene foam / cardboard props and costumes
 
Pepakura is a paper modeling/unfolding program from Tamasoft. They are totally legit. The free programs work great.

Pepakura Designer

The program can read various 3D image files and help you "unfold" them into flat 2D representations, much like a puzzle to be cut out and built.

LOTS of folks out ther have the paid designer program, and develop "unfolded" versions of different designs into PDO files.

A google search on your favorite subject, followed by "pepakura" or "PDO" will probably give you a GREAT starting point.

"So you have the Pepakura reader/designer and some PDO files, what next?"
Look at the file in the designer and play with some settings to get to know it. When you are ready, use the Pep software to print your design onto cardstock.

Some folks use regular paper, but cardstock will be easier to work with. You can then cut out your design and match the edges of your cutouts to other parts in the design.

You can turn edge numbering on and off in the program and there are a few things to know that will help. The design features solid lines, dashes and dot-dashes. The solid lines are for cutting. The dashed and dot-dash lines are for folding. Looking down on your design a "------" or regularly spaced dash line will be folded like a mountain peak. or at least will follow a curve/bend toward the ceiling. The dot-dash lines "._._._" will be the valley folds and fold like a "V" or a bowl shape.

I like to use flat, thin (they have thick foam ones, you dont want those) photograph mounting strips found itn he scrap-booking section of a craft store to match the flaps to their corresponding "face" on various peices.

Anything that will help you cut paper and stick paper to itself is welcome here.

After you finish your paper model, you then decide what to do with it. That particular part of the discussion is a longer post yet, but this should suffice to get you started.

Thanks for the lesson, I'm just getting started and still have a lot of questions.
 
I've noticed a number of PDOs originating from the collection of Dung0beetle who I believe, correct me if I am wrong, had a site called the Printable Armory? I used the URL I had for that place but notice it is no longer in use. Would anyone know if this was just closed or moved to greener pastures?

Cheers

He's still around, but to my knowledge the printable armory is gone. He's still a member here, you can PM him.
 
231769552.jpg


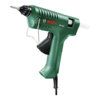
Hey guys not really a noob as such I've done a few peps to accustom myself to the ideas of building helmets and armor. I'm working on a really HD Iron man file and am struggling to do the really small groves on the helmet and chest for that matter!!! The glue gun in the pic is what I'm using but am kinda struggling to achieve a neat look all round really and getting a bit frustrated haha!

Any help would be awesome guys cheers =]

Shaun
 
View attachment 228067


Hey guys not really a noob as such I've done a few peps to accustom myself to the ideas of building helmets and armor. I'm working on a really HD Iron man file and am struggling to do the really small groves on the helmet and chest for that matter!!! The glue gun in the pic is what I'm using but am kinda struggling to achieve a neat look all round really and getting a bit frustrated haha!

Any help would be awesome guys cheers =]

Shaun

You're going to find yourself trying to pep things thin and difficult. Don't hold your breath, you'll do fine :)
 
View attachment 228067


Hey guys not really a noob as such I've done a few peps to accustom myself to the ideas of building helmets and armor. I'm working on a really HD Iron man file and am struggling to do the really small groves on the helmet and chest for that matter!!! The glue gun in the pic is what I'm using but am kinda struggling to achieve a neat look all round really and getting a bit frustrated haha!

Any help would be awesome guys cheers =]

Shaun

I've been looking for such a rather precise glue gun. The one I have I feel is a generic hobby brand so would you be able to drop the name of that one.
Cheers
 
Hey guys im new to making pepakura files and i cant find a certain file that i wanted to cosplay as at Armageddon expo and since you guys no alot i thought you could help me the armor that Im hoping to make is from Fallout NV (new vegas) its in the DLC called lonesome road this armor is called the elite riot gear or just plain riot gear if you cant find (or make) the elite riot gear .pdo file (which hopefully you can) any way i will attach a file that is just a basic over view of the Elite riot gear Thx for helping :p Riot Gear.png
 
Yea sure its a Bosch PKP 18E. I paid £20 for it at Homebase in the UK. I had a general hobby one to and it wasn't that good really.

Had a look at some retailers online that sell that particular model down under and dang if it isn't up around AU$50. Might do some more shopping around as that was just a prelim search. Thanks for getting back to me.

Cheers
 
Does anyone use plastic sheets for papercraft? I contacted the makers of Pepakura to see about a feature of displaying the angles of edges so that you could cut the edges at the angle for projects using thicker plastics. I saw a video on youtube where someone was making a gem, but it was their first time and they messed it up pretty badly. I thought more precision would help solve that problem, but do prop makers really bother with that amount of detail?
Anyway, does anyone think this would be a useful feature? I suggested he display the angles on both halves of the divided edges, because I figured people would be breaking up ALL the edges of the model on projects where you're actually precision cutting the angles of edges. Also to have the number divided in 2, because you're probably cutting both sides by half. I should suggest that he match the angles relative to whatever most hardware measures at. Do they start at 0 degrees for a cut that's 90 degrees perpendicular, or is it actually 90? It's funny because Pepakura shows that angle as 180. Well, divided by two, that's 90. but then it always goes down, and differentiates by valley fold or mountain fold. which is all relative.

I don't know where to post this. (searching for things like acrylic and plastic give me unrelated search results. maybe styrene? but what if people aren't calling it styrene?) I'm new to papercraft and don't have much experience, so this was all theoretical for me.
For myself, I was thinking of a 6 foot tall hammer with a crystal head on it (a big one, like a foot long and half a foot thick), which would be necessary to do in clear or translucent plastic. I don't know how thick to make it though. or how to texture it. whatever.

I looked into this a while ago too for foam building. My solution was to export the .obj into Blender opened next to the Pepakura part. Blender has a feature that will measure the angles between two selected faces; I write down the angles then on my pep templates. It's a bit of extra legwork, but it gets you your precise angles. I do split my angles between the two sides to reduce the individual angles. You could use acrylic, then you'll need to cut all your miters and avoid chipping the material. That's a big project I think.
 
This thread is more than 3 years old.

Your message may be considered spam for the following reasons:

  1. This thread hasn't been active in some time. A new post in this thread might not contribute constructively to this discussion after so long.
If you wish to reply despite these issues, check the box below before replying.
Be aware that malicious compliance may result in more severe penalties.
Back
Top