First Ever Official RPF Group Build - IT HAS BEGUN...

:thumbsup

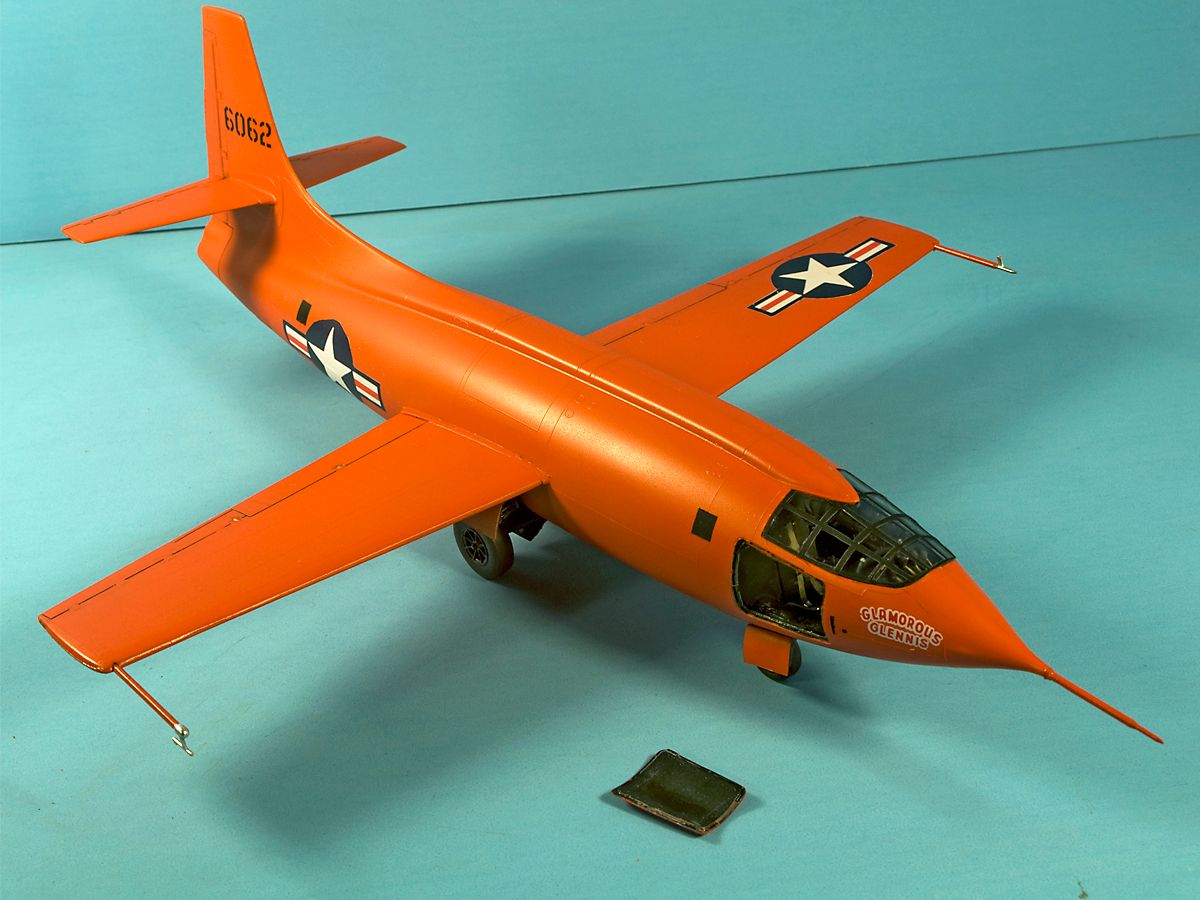
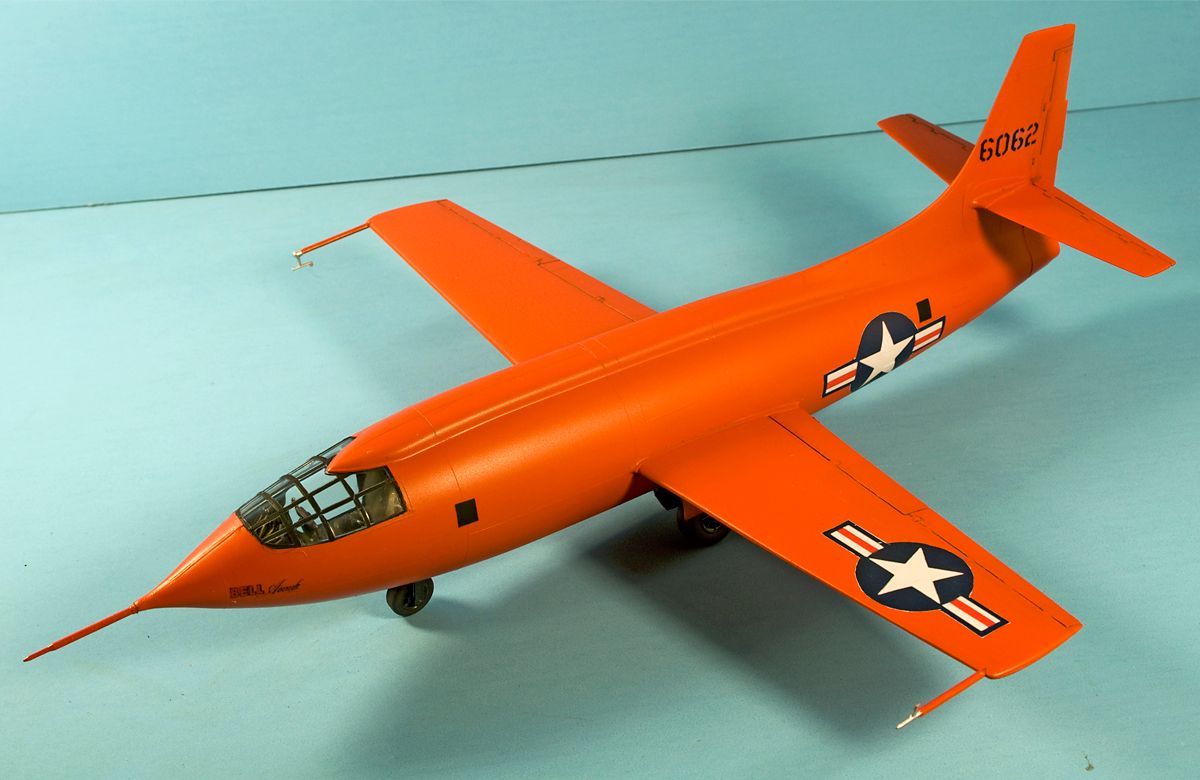
The new decals are working out quite well. Having to trim so close on the white background decals is a little nerve-wracking as there's no margin for error.

But, Testors' decal paper takes very well to the raised detail of the Revell kit and reacts very well to decal set and solution. If I didn't know any better, I'd think the decals were an aftermarket set from an established company.

The only two problems I've come across are the decals that go by the main nose gear and my version of "Glamorous Glennis". The gear decals, even on the stock sheet, are fuzzy and lack definition. Since they aren't on the 1/18th scale sheet, I couldn't properly replicate them. The GG decal is just too small to properly trim from the backing paper (could probably be done with a set of precision micro-scissors). I had to spray the original sheet with the bonding agent and was able to use the stock decal (though it still started to deteriorate once I tried to move it into position).

I just have two more national insignia and one tail number to go. After they've dried, I'll tone down the sheen with some clear semi-gloss and it should be done :cool.

-Fred
 
And she's done

Finished1.jpg


Finished2.jpg


Now I just need to finish building my Ikea Deltof and it's time to start on the shuttle stack.

-Fred
 
Thanks, Rob :cool

Cracked open the shuttle kit tonight - this one might not get finished by the end of the build :eek.

So, we've got about 10 weeks left, so I hope to start seeing some more builds. I hope there's more to the group than just me ;) :lol

-Fred
 
Looking forward to some pics, Jock :cool.

Tick-tock, boys and girls. Time to get a-buildin', lest we run out of time :)

Got the base color on the shuttle, 2 nights ago and giving it plenty of time to cure so I can mask the whackadoo scheme. Have to say, the shuttle has a lot of fit issues. Seems like anything that was done in two pieces, one half is always larger than the other, leaving a huge step that needs to be sanded down. And on a kit with raised detail, that's a real pain in the patootie.

Hopefully, I'll get a few hours in this weekend and at least get the black and grey sprayed down.

-Fred
 
Jeezaloo, has it been a long time. As much fun as new relationships are, they sure do get in the way of model building ;) :lol.

I've built the launch pad, the SRBs and the tank (mostly). The fit of this kit is so dang terrible. Every seam is a huge step, which requires mondo sanding.

This one might just make it in under the wire, but it'll be close.

Anyone else making any progress?

-Fred
 
Fred, my Mom passed away last week so I was with her the last few weeks. Getting back to in this week if I can, but I have not really felt like it so far.
 
My condolences, jockdeboer.

And my apologies to you guys - for dropping the ball on my Flying Bedstead build. I had to turn my attentions to other model obligations & opportunities. I hope this is a 'better late than never' group build.
While I haven't had a chance to touch my build in over 2 months, I've planned my approach & should be able to build her rather quickly when I finally get the chance.
I see Great work all around from you gentlemen. That X-15 kit has really got my attention.
As a boy I had a chance to sit in the cockpit of one of the early X-15 variants while it was being assembled. My father was a good friend of one of the chief engineers.
 
Sorry to hear of your loss, Jock :(


For the others, I have no problem extending the time line, if we feel it's needed. I have no problem extending it to the end of the year.

While the assemblies are 95% constructed, paint and decaling may take a while. There are a lot of decals and complex masking on the shuttle and I'd prefer to not rush it.

-Fred
 
Well, I think the painting is finished (except for the crawler). I'll try to get pictures up, over the weekend. I'm just waiting for the paint to cure, before I start decaling.

Anyone else?

-Fred
 
As promised, here's a pic of where the build stands

paintedstack.jpg


The ET is base-coated in red primer, then misted with variations of a yellow-brown mix. The SRBs are painted with DupliColor gloss white while the shuttle is Tamiya flat white with a few drops of grey added in, to bring down the color, a bit.

After staring at it for a week, I decided the cargo doors needed a complete rebuild. There was a 1/16" gap all around; the doors didn't make contact anywhere on the body except at the hinge points. So, I broke out the strip and sheet styrene and went to work. An hour or so of scratchbuilding and the doors finally close. I know they're not 100% perfect, but they're 1000% better than they were. Since it's part of a larger display and part of an even larger "diorama", I'm not going to really worry about it all that much.

Next up - decaling :cry :lol

-Fred
 
Well, I'm calling her done. I've decided not to paint the crawler as it's far too inaccurate, to even bother wasting paint on. Instead, I'm going to order this papercraft version and use it, instead EDU-Craft Diversions - Hands On To History . I've seen build-ups of his Saturn rocket tower and the results are absolutely amazing.

Anyway, on to the pics

finished1.jpg


finished2.jpg


Enjoy!

-Fred
 
Very nice work. I am glad Revell of Germany gave this kit decals that were much superior to the original ones. That means almost anyone now can do a decent replica, even with an out of the box build.
 
Thanks, guys :cool

I have to say, the decals go down, almost flawlessly. A little bit of decal set and solution and they snuggled down good and tight, over the raised detail. Didn't even need to glosscoat, first.

Though, the tail decals were a real pain. Because they come in one piece and they're so thin, they tend to twist and break while you're trying to put them on. It took me 45 minutes to do one side of the tail. Between untwisting and repositioning the broken pieces, it was a real nightmare. For the second side, I cut the decal into 4 sections, first. It minimized the twisting - but not completely :cry.


I wonder if anyone else is going to add anything, or should I just have Art un-sticky the thread? Granted, there's still 6 weeks left, but it's been almost 6 months and this has pretty much been a one-man show :unsure.

-Fred
 
Well I finally worked some more on mine... finally.

I put the fuse together, so it actually looks like a plane now!

Then I remember that I hate sanding/filling. I used the Bondo spot filler, I think next time I'll try thinning it - it wasn't thick enough to get the really big cracks, but It was too thick and getting all over the place.

Unfortunately my sanding on the back-bottom part is pretty bad. Oh well. Lesson learned.

I also know that there are some spots where the paint didn't reach, and you can still see some pink or grey. Should I just try and spray this again? (I'm using a rattle can) or just try and brush touch up (I'm scared thats going to leave a blobby mess)

I also need to figure out what to use for the clear parts (the canopy window, and the camera window on the bottom). I messed both of the pieces up in such a way that they are unusable now.

IMG_0212.jpg

IMG_0225.jpg

IMG_0227.jpg

IMG_0228.jpg
 
Looking forward to seeing your work, Jock :cool


Liz, the easiest way to fix it, would just be to re-spray the area. Unless you go a bit heavy-handed, the new paint should blend just fine with the old. If you're worried about overspray, you can make a soft mask. Take a piece of masking tape and loop it back on itself, making a sticky ring. Then put a piece of paper over the area you want to protect, using the tape ring to attach it to the plane. The raised edge of the paper will keep you from getting a hard edge, like with a traditional mask, but also protect the rest of the build.

As for replacment glass, in that scale, I like the plastic from the bubble that they use on carded action figures. It's thin, clear and takes glue and paints, just fine.

-Fred
 
I have finished my LM, it looks more crappy then the real thing lol. It's not any one module, a bit of a combo from looking at a few pics. If i pluck up the guts to get some pics taken i will post em.
 
This thread is more than 7 years old.

Your message may be considered spam for the following reasons:

  1. This thread hasn't been active in some time. A new post in this thread might not contribute constructively to this discussion after so long.
If you wish to reply despite these issues, check the box below before replying.
Be aware that malicious compliance may result in more severe penalties.
Back
Top