Scratchbuilt mixed-media Patoroch Land Raider

g0rb

Active Member
Hi all,
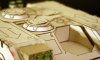
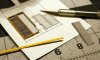
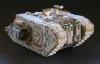
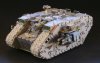
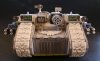
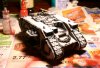
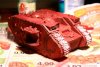
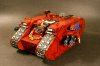
I started working on a scratchbuilt mixed-media Land Raider a couple of months ago, using Eli Patoroch's "Land_Raider II 2009" template.
It is built using paper, cardboard, plastic tubes (from popsicles and cotton swabs), perfect cast, sculpy, apoxie sculpt and a couple of other things.

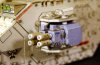
I've taken some liberties with the build: for example, the sponson-mounted meltas and thunderfire cannon designs are my own.
The build is complete; at this stage I am painting it. The original forum build log is over at papermodelers.com [0],
but I want to post a slightly cleaned up and condensed log on this and other sites.

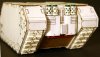
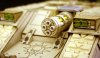
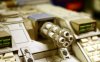
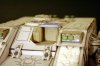
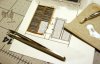
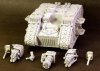
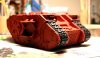
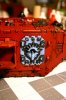
In the attached photos you can see the internal construction of the track housings, the plating on the sides, and the main body.

[0] http://www.papermodelers.com/forum/alternate-dimensions/41645-mixed-media-patoroch-land-raider.html

- - - Updated - - -

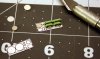
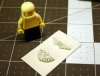
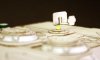
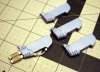
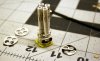
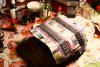
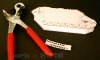
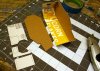
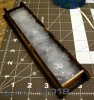
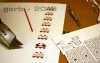
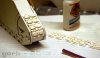
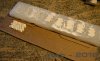
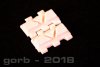
To make the tacks, I decided to build a couple of track masters out of card and plastic rod.

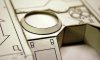
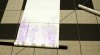
I then made a mold of these with caulking silicone.

- - - Updated - - -

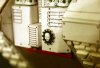
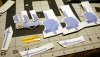
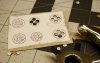
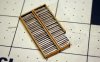
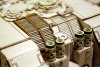
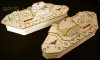
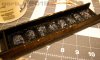
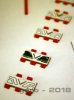
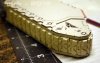
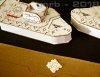
Next I cast a bunch of tracks using Skullduggery Perfect Cast, and attached them to the track housings.
 

Attachments

  • IMG_2329.JPG
    IMG_2329.JPG
    221.8 KB · Views: 489
  • IMG_2332.JPG
    IMG_2332.JPG
    248.2 KB · Views: 458
  • IMG_2333.JPG
    IMG_2333.JPG
    423 KB · Views: 471
  • IMG_2334.JPG
    IMG_2334.JPG
    395.8 KB · Views: 551
  • IMG_2340.JPG
    IMG_2340.JPG
    474.6 KB · Views: 480
  • IMG_2339.JPG
    IMG_2339.JPG
    330.5 KB · Views: 432
  • IMG_2338.JPG
    IMG_2338.JPG
    361.8 KB · Views: 454
  • IMG_2315.JPG
    IMG_2315.JPG
    160.3 KB · Views: 293
  • IMG_2314.JPG
    IMG_2314.JPG
    400.9 KB · Views: 418
  • IMG_2313.JPG
    IMG_2313.JPG
    357.1 KB · Views: 464
  • IMG_2347.JPG
    IMG_2347.JPG
    453.3 KB · Views: 478
  • IMG_2345.JPG
    IMG_2345.JPG
    379.9 KB · Views: 436
  • IMG_2341.JPG
    IMG_2341.JPG
    316.7 KB · Views: 470
  • IMG_2337.JPG
    IMG_2337.JPG
    123.6 KB · Views: 442
  • IMG_2335.JPG
    IMG_2335.JPG
    282.8 KB · Views: 461
Engines & Headlights

I built some iconography using Apoxie Sculpt, added the engine, cowling and smoke stacks, and added the headlights.
The cages around the headlights were made with some thin-gauge electric wire.
 

Attachments

  • IMG_2357.JPG
    IMG_2357.JPG
    424.4 KB · Views: 513
  • IMG_2355.JPG
    IMG_2355.JPG
    220.4 KB · Views: 406
  • IMG_2354.JPG
    IMG_2354.JPG
    451.2 KB · Views: 380
  • IMG_2352.JPG
    IMG_2352.JPG
    344.8 KB · Views: 609
Hatches etc.

Built the hatches (a slight deviation from the Patoroch design) and added the Mechanicus symbol on the engine cowling.
Added the radar dish.
 

Attachments

  • IMG_2361.jpg
    IMG_2361.jpg
    398.7 KB · Views: 388
  • IMG_2366.jpg
    IMG_2366.jpg
    304.5 KB · Views: 472
  • IMG_2369.jpg
    IMG_2369.jpg
    241.4 KB · Views: 390
  • IMG_2373.jpg
    IMG_2373.jpg
    312.7 KB · Views: 468
Sponson multi-meltas

I decided to forgo the original design's lascannons, in favour of multi-meltas, but I had to build these from scratch.

So I designed the body in OpenSCAD and unfolded it with Pepakura. The barrels are from popsicle sticks, I added some
vinyl tubing, and the skulls are Apoxie Sculpt, made from a press mold I constructed from a master.

The plating armour covering over the meltas were also designed in OpenSCAD and Pepakura.
 

Attachments

  • IMG_2390.jpg
    IMG_2390.jpg
    391.3 KB · Views: 402
  • IMG_2385.jpg
    IMG_2385.jpg
    434.2 KB · Views: 363
  • IMG_2384.jpg
    IMG_2384.jpg
    446.9 KB · Views: 380
Main gun

The Thunderfire cannon is next; I made a housing for it, built the barrels from rolled up paper and added the barrel spacers.
There are some auxillary tubing around the barrels, I added cotton swab tubes for these.

All the rivets on the model are made from either cardboard punchouts or Sculpey, which I press fit into a piece of board with punched out holes and then bake.
 

Attachments

  • IMG_2400.jpg
    IMG_2400.jpg
    553.1 KB · Views: 415
  • IMG_2399.jpg
    IMG_2399.jpg
    399.8 KB · Views: 408
  • IMG_2398.jpg
    IMG_2398.jpg
    397.5 KB · Views: 380
  • IMG_2397.jpg
    IMG_2397.jpg
    353.9 KB · Views: 400
  • IMG_2396.jpg
    IMG_2396.jpg
    304.5 KB · Views: 406
  • IMG_2391.jpg
    IMG_2391.jpg
    569.7 KB · Views: 397
Rear engine vents

The rear engine vents are made from pieces of index card and cardboard, which I glued to a printout of the pattern, and then cut the construction out and glued that to the top of the rear body.

- - - Updated - - -

Next I applied some wood hardener to the entire model. This adds some strength to the softer pieces of the model, and smooths the surfaces a bit. It goes all shiny, but this will be covered by the primer and paint job.
 

Attachments

  • IMG_2414.jpg
    IMG_2414.jpg
    321.7 KB · Views: 399
  • IMG_2415.jpg
    IMG_2415.jpg
    439 KB · Views: 416
  • IMG_2416.jpg
    IMG_2416.jpg
    475.9 KB · Views: 421
  • IMG_2417.jpg
    IMG_2417.jpg
    438.1 KB · Views: 388
  • IMG_2462.jpg
    IMG_2462.jpg
    269.4 KB · Views: 449
  • IMG_2460.jpg
    IMG_2460.jpg
    273.8 KB · Views: 456
  • IMG_2451.jpg
    IMG_2451.jpg
    296 KB · Views: 466
Primer and basecoat

I primed the model with gray spray paint, then pre-shaded it with airbrushed black, followed by a basecoat of layered reds.
The tracks got a brushed-on coating of black.
 

Attachments

  • IMG_2475.jpg
    IMG_2475.jpg
    411.2 KB · Views: 509
  • IMG_2495.jpg
    IMG_2495.jpg
    327.3 KB · Views: 392
  • IMG_2496.jpg
    IMG_2496.jpg
    334 KB · Views: 387
  • IMG_2498.jpg
    IMG_2498.jpg
    288.2 KB · Views: 441
Painting time

I realized that the paper was visible in the crevasses between the tracks and the body, so I masked the tracks off
and airbrushed them black (making sure to hit the crevasses), then brushed on gunmetal, and washed it with several coats
of dark and strong tone wash.

I then went and painted a bunch of detail, and gave it all a clear coat of varnish.
This is where I am at now, the next steps will be to paint all the doors (masking, airbrushing, etc), and the smaller details.
Then some weathering, and finally a dull coat.

Stay tuned!
 

Attachments

  • IMG_2503.jpg
    IMG_2503.jpg
    397.6 KB · Views: 391
  • IMG_2501.jpg
    IMG_2501.jpg
    387.1 KB · Views: 389
I'm always amazed at what people can achieve with just paper.

When I think of the time involved in making this, compared to just buying a plastic one, I can only gasp in wonder. It must all be about the journey and not the destination I reckon.

The result is nothing short of spectacular, from what I can see in the pictures; hats off to you, sir... :)
 
shokk & Daeothar

!Thanks guys!

> When I think of the time involved in making this, compared to just buying a plastic one, I can only gasp in wonder.
> It must all be about the journey and not the destination I reckon.

I figure I've spent around 300 hours on this, so yes considering the time and energy, it is definitely "cheaper" to just fork out $100 and start slapping paint at it.
But the journey is so much better than that. And when I get comments like these it makes it all worth it.

We tend to build in isolation, but having someone tell you that you've done a good job is awesome.
 
Last edited by a moderator:
Painting update

Slowly getting somewhere on the painting. I want to post this update otherwise it feels like I'm stagnating :)

Some of the fine details (the aquilla/twin-headed eagle, sensors and windows) are done, as well as the burnt-metal on the side guns,
and the blood gem on the main gun's raven. I've started on (a beginner's attempt at) OSL on the front headlights, these will have a bluish tint to them.
I still need to do a bunch of highlighting on the main body, and a bit of weathering. And of course the whole thing is still shiny from the
gloss coat I put on before this step - it'll get a good matte varnish coat after.

The main sore-thumb however is the two doors on the side. I got sick of the bleached bone / orangey color, so I re-based them
dark blue, and then added a brushed-on pre-shade. I'm layering this with lighter coats of grey-white now, Then I have to
do the details...
 

Attachments

  • IMG_2515.jpg
    IMG_2515.jpg
    474.8 KB · Views: 409
  • IMG_2518.jpg
    IMG_2518.jpg
    370.4 KB · Views: 378
Finished paint job

Here's the finished model. I have to call it finished, otherwise I'd just go in and "redo" things a million times.
 

Attachments

  • collage.jpg
    collage.jpg
    567.1 KB · Views: 478
This thread is more than 5 years old.

Your message may be considered spam for the following reasons:

  1. This thread hasn't been active in some time. A new post in this thread might not contribute constructively to this discussion after so long.
If you wish to reply despite these issues, check the box below before replying.
Be aware that malicious compliance may result in more severe penalties.
Back
Top