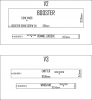
To begin, we have to thank trooper trent for taking the time out of his day and converting my hand made templates into downloadable, printable version. that version can be downloaded in this post, attached below. please follow his instructions here to scale them correctly!
Instructions for sizing:
Print at full size and it should fit. But just to be sure, the image should be printed at 593 x 644 pixels
This should give the entire thing a size of about 170.392mm x 156.889mm.
Either way, just print at 100% rather then shrinking it to fit
Let the tutorial begin!
Now that you have templates printed out, cut out the booster and pommel section. making sure to cut exactly on the lines.
Next we are going to take our 1" angle iron and cut it to roughly 6 inchs. Now place the angle iron flat on the booster, centering it on the 4mm grub screw. With our pencil, now mark a line on the booster, using the 1" angle iron as a guide. BE SURE to have the pencil at a 90* angle with the angle iron so the line is perfect.
Don't forgot to continue the mark into the pommel recess, that line we are going to use later!
we must make sure the pommel is in the correct orientation. You want the pommel cube right of the D ring, to be centered with the 4mm grub screw in the booster. like below.
Now this is going to look familiar, we are going to cut small pieces of tape and tape the patterns we cut out on the booster and pommel recess. Now pay attention and make sure the Booster Template is on the pencil line we made. making sure the pencil is in 1/2" through the grub screw
Another very important thing is, we have to make sure the printer printed these templates out to the correct scale. if its the right scale, the template should wrap completely around the booster, JUST like trents stencils! if there is a large gap between the template this is a problem and its not to scale.. try printing them out a little larger and try again. if you decide to go with it and use the smaller template, the Cone knob will be in the wrong location...
Now that our template is on correctly, we are going to use a center punch to create a little dent for our drill bit to start in. if you have never used a center punch before it is very easy and works amazingly!
if you dont want to break down and buy a center punch... which i highly recommend purchasing if you plan on doing more lightsabers.. you can always use a nail and hammer.. this isn't 100% right way of doing it, but can be pulled off right.. again i highly recommend the center punch
now we are going to put on the mystery chunk template. double check and make sure the pommel is still clocked in the right orientation, then stick the mystery chunk template on the pencil line you made! are you excited yet?!
The dot for the mystery chunk so be located here on the pommel cube, this will make the mystery chunk sit half and half in line with the cube
use the center punch once more and punch that sucker!
Now we need to pay attention... we are going to drill and tap for the cone knob. The Cone knob Dan made for us is beautiful. it has a 6mm x 1.00 thread pitch. so we will need a 6mm x 1.00 tap, and a 5mm drill bit to drill for the tap. these can be purchased from mcmastercarr. just go to post #1 here in the thread and click the links to go right to the website with the correct part numbers.
you may also have some luck purchasing on eBay and amazon
With the booster flat on the table, you may want to put some cardboard under the ring section to let the saber sit perfectly flat. Carefully, try and hold the drill at a 90* angle and drill all the way through with the 5mm drill bit.
in my video at the end i show how to use a drill like a drill press but using the wall as a guide, check it out
Now comes time for the tapping. You want to use a cutting oil to help the tap cut through the threads. I am not a machinist, nor is my father but we have built some pretty crazy sh%t. and he always told me to tap until its tight, turn 1/4 turn, then back all the way out, clean the threads and do it again, wait for tight, turn 1/4 of a turn, back all the way out. SLOW is the key part here!! DO NOT RUSH!!
Now comes time for the famous Mystery Chunk..
The under side of the leather tool is thin, but then it slowly progresses wider for a more comfortable grip in the hand. we will have to sand this down to make it all one size, and then shove that in the hole we drill. so the thinnest part of the leather tool is 4.13 or so.
I personally threw my leather tool on the lathe, and turned it down to 4.10, because I have a 4.20mm drill bit i will use on the V3 this should slip right in.
BUT not everyone has a lathe... So i have done this in the past with bolts. I put the leather tool in a power drill, and used sand paper to turn it down. this takes time, but works! you can even use a file, to speed up the process, we only have to shave off 1mm or so..
Again, i turned mine on my lathe so i cheated... you can easily cut it with pliers
then sanded the edges on my bench sander to remove the sharp edges
Now i am not one to do comparisons, but since these are both from Dan. I figured theres no harm and i'd throw this up there, i also like this picture a lot with the 2 chunks
with the hole being 4.20 if it still is tight, just keep running the leather tool in the drill chuck with the sand paper until it goes in. if you take your time, you can do it so its a tolerance tight fit, and no glue would be required. if the hole is too big, you can easily dab a little e6000 on it and let it sit over night.
And thats all to it on installing the Cone knob and mystery chunk.
The last thing we need to do is add the milling circle in the pommel cube.
This circle can be seen on the 2nd pommel recess from the left of the D ring cube.
Dan Starkiller came up with this clever trick! And I love it!
Your best bet is to put the pommel in a vise, this will ensure it staying straight and allow you to heat it up.
First you will need a 3/8 x 16 hex bolt. Preferably nothing smaller then 2-1/2” this way you have a good grip on it.
The bottom of this bolt should measure around 6.40-6.50mm
Next, use a pair of micrometers and measure down 11.20 mm from the edge of the pommel recess.
Use a sharpie and mark a center Mark
Next, heat up the pommel with some heat. You don’t need much, 45seconds is plenty of time
Now carefully because the pommel is hot, center the 3/8 x 16 bolt on the mark we made with the sharpie
WE ARE HITTING STEEL ON STEEL USE EYE PROTECTION!!!!
I use a 16oz finish hammer and gave it one good pop!
And the end result is a beautiful circle!!
I hope this tutorial was helpful! so chemical aging, physical damage locations, painting, and weathering please see our master Anakin Starkiller FX thread. where I cover all the finishing work.
Anakin Starkiller FX thread
If you have not yet grabbed one of these, i highly encourage you to check out Anakin Starkillers Run thread, see if he has any left!
Anakin Starkiller V2 + V3 Builders Kit Run
No V2 is complete with out a accurate paint job, TrooperTrent still has his legendary stencils in stock, don't hesitate and grab a set today! also check out his Gaffers tape adapter kit!!
Trooper Trent Stencil Set
To complete the V2 we need the correct clamp card, thankfully sloth furnace came to our rescue and has a beautiful vintage finish option
www.slothfurnace.com
For the correct clamps you can grab a satin finish from Roman Props
Roman Props Satin Clamp
To complete the clamp you will be a lever from our boy Roy!
Wannawanga.com lever
(9/27/18 as of right now they are out of stock, but roy is quickly working to restocking them! CHECK DAILY!!)
Here is a little video of myself explaining how to apply the templates
Next up I will be doing the V3 version, stay on the look out!!


")