You are using an out of date browser. It may not display this or other websites correctly.
You should upgrade or use an alternative browser.
You should upgrade or use an alternative browser.
JPG Productions 1/350 Medical Frigate Build
- Thread starter JeffBond
- Start date
JeffBond
Well-Known Member
Re: Cosmos Models 1/350 Medical Frigate Build
It definitely has its challenges and you might want three powerful arms for final assembly. It's a mammoth, impressive object when finished though, and they provide some great extras like a nice replica of the medical bay and window featured so prominently at the end of ESB. To light it I strung a bunch of fairy string blue LEDs through the structure after opening up windows in some of the lower bow pods and the rear engine section, and then lit the engines, the med bay window and a few other areas with separate LEDs on a 9v battery.
It definitely has its challenges and you might want three powerful arms for final assembly. It's a mammoth, impressive object when finished though, and they provide some great extras like a nice replica of the medical bay and window featured so prominently at the end of ESB. To light it I strung a bunch of fairy string blue LEDs through the structure after opening up windows in some of the lower bow pods and the rear engine section, and then lit the engines, the med bay window and a few other areas with separate LEDs on a 9v battery.
darthsideous
Well-Known Member
Re: Cosmos Models 1/350 Medical Frigate Build
I’ve never heard of this kit until now. What a stunning build up you did. Just a question on the stand, do you have any plans to make the base out of a single piece of wood? I would hate trying to move that model the way it is.
Anyways, beautiful work!
I’ve never heard of this kit until now. What a stunning build up you did. Just a question on the stand, do you have any plans to make the base out of a single piece of wood? I would hate trying to move that model the way it is.
Anyways, beautiful work!
JeffBond
Well-Known Member
Yes, I'll get it on a single piece at some point--I was limited by what they had at Michaels. ") It has a brass tube in the forward section that just slides down over the brass tube on the stand and the engine section just sits on the rear mount. Moving it isn't quite as horrifying as I'd thought it would be because there's a pretty heavy metal pipe that goes through the center spine and all the way to the back of the engine section so all of that is quite strong and you can easily lift it up by the spine.
It has a brass tube in the forward section that just slides down over the brass tube on the stand and the engine section just sits on the rear mount. Moving it isn't quite as horrifying as I'd thought it would be because there's a pretty heavy metal pipe that goes through the center spine and all the way to the back of the engine section so all of that is quite strong and you can easily lift it up by the spine.
It has a brass tube in the forward section that just slides down over the brass tube on the stand and the engine section just sits on the rear mount. Moving it isn't quite as horrifying as I'd thought it would be because there's a pretty heavy metal pipe that goes through the center spine and all the way to the back of the engine section so all of that is quite strong and you can easily lift it up by the spine.Richard Baker
Sr Member
I love this ship- one of my favorite designs from the franchise.
That is a great build up- the weathering looks to scale and the lighting adds a punch to it.
I hope to get one of these one day- not this big, but I do want one of his on my shelf...
That is a great build up- the weathering looks to scale and the lighting adds a punch to it.
I hope to get one of these one day- not this big, but I do want one of his on my shelf...
Hunk a Junk
Sr Member
Great build! I see you retconned how the Falcon attaches to the support. Sort of a Medical Frigate Special Edition? :devil In my head canon, the on-screen attachment point at the engines was for refueling after Lando and Chewie boarded the ship somewhere else -- Home One? But really, she's a beauty.
Richard Baker
Sr Member
Sad thing is that they missed a golden opportunity to have the Falcon dock using those side ports- a little different engineering on that vertical tube and it would have looked great!
Alan Cross
Sr Member
If Jeff is reading this thread I was hoping he could give everyone a status update. Curious where he is with orders and when he plans to take the next ten? I completely understand it taking a long time to fill these orders because the ship has so many small and intricate parts. I am SO impressed at the job he’s doing! But I’m also worried I’ll miss the next announcement for new Medical Frigate kits. Thanks!Great build for sure...love the whole thing
dockbay94
Well-Known Member
Hey Jeff, I must say you have done an outstanding job with your Medical Frigate! your paint job is dead on - looks like the Empire Studio Model used!I A passion build in the best way! I know it wasn't easy. but you seem have built yours rather quick. which is good! because you have time to devote to the craft of modelling. I, myself, not so much... wish I could have at least half the time you have! me, family man.
I have a slew of questions to ask you about your build process and some of the tweaks I know you had endure on this kit.
I got my Medical Frigate kit from Nicholas about 6 weeks ago, as I play and dry fit pieces some dead on and some need a little trimming/sanding but a VERY NICE kit to behold, Large, Detailed and probably the most accurate kit available I would say. glad I waited the almost 2 years of agony wanting this kit. the pay off is very rewarding wouldn't you say?
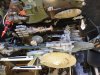
as you know there were a few changes made in the casting process and a couple of parts were re-designed for a better casting and pull. it was this piece in particular as it was original a 2 piece part but ended up a solid cast one in the end, see pic

what did you do or how did you mount you model, there were to be a 2 piece part that was for square tubing in the middle of but now since it was cast solid what was your solution to this?and the ship boat hull parts that were to go on this pre-molded plate are gone as well. I did a dry fit of these parts and when added/stacked they tend to stick out over the bottom a little further where the that long ribbed (original printer cartridge part?) is attached.

hope you know what I am trying to say. lol.. anyways, how did you mount the darn thing on a stand? you seem to have done it well while hold the structure integrity at bay.
the other question is how did you hollow out the ship boat hulls for the lighting? these parts see below

you did a few more as well.
the windows are fairly simple to cut out so thats an easy mod. but these are solid castings? drilled a hole from the back?
and for the lighting I have that covered, in fact I think I might have the same blue lights you used.
Your medical bay window with luke/leia is really cool. what did you use for the figures?
anyway, keep up the great work and once again great job on you frigate I'm jealous! cant wait to get mine started but I am deep in the middle of my korbanth SD bridge and I have to get that done first. I hate it when you get a kit in the mail you wanted for a long time and ends up that your in the middle of another one. thats why I have so many kits on the bench right now! I must show restraint and discipline!!! anyway thanks for showing your work and hope to do the same when i get to mine.
I will have a few more questions later if you don't mind.
Aloha
dockbay94
... wish I could have at least half the time you have! me, family man.I have a slew of questions to ask you about your build process and some of the tweaks I know you had endure on this kit.
I got my Medical Frigate kit from Nicholas about 6 weeks ago, as I play and dry fit pieces some dead on and some need a little trimming/sanding but a VERY NICE kit to behold, Large, Detailed and probably the most accurate kit available I would say. glad I waited the almost 2 years of agony wanting this kit. the pay off is very rewarding wouldn't you say?
as you know there were a few changes made in the casting process and a couple of parts were re-designed for a better casting and pull. it was this piece in particular as it was original a 2 piece part but ended up a solid cast one in the end, see pic
what did you do or how did you mount you model, there were to be a 2 piece part that was for square tubing in the middle of but now since it was cast solid what was your solution to this?and the ship boat hull parts that were to go on this pre-molded plate are gone as well. I did a dry fit of these parts and when added/stacked they tend to stick out over the bottom a little further where the that long ribbed (original printer cartridge part?) is attached.
hope you know what I am trying to say. lol.. anyways, how did you mount the darn thing on a stand? you seem to have done it well while hold the structure integrity at bay.
the other question is how did you hollow out the ship boat hulls for the lighting? these parts see below
you did a few more as well.
the windows are fairly simple to cut out so thats an easy mod. but these are solid castings? drilled a hole from the back?
and for the lighting I have that covered, in fact I think I might have the same blue lights you used.
Your medical bay window with luke/leia is really cool. what did you use for the figures?
anyway, keep up the great work and once again great job on you frigate I'm jealous! cant wait to get mine started but I am deep in the middle of my korbanth SD bridge and I have to get that done first. I hate it when you get a kit in the mail you wanted for a long time and ends up that your in the middle of another one. thats why I have so many kits on the bench right now! I must show restraint and discipline!!! anyway thanks for showing your work and hope to do the same when i get to mine.
I will have a few more questions later if you don't mind.
Aloha
dockbay94
JeffBond
Well-Known Member
Thanks for the comments! For big kits that have a lot of internal lighting like the Black Hole Cygnus and the Medical Frigate I've gotten good results with LED string "fairy" lights. You can get these on amazon either with battery packs or AC plugs (which is what I use for larger kits because you get more reliable, brighter light) and also remotes that let you do pulsating/dimming effects if you want. One of the main advantages of these lights is that they are all connected with very thin and very strong copper wire which is great when you have to laboriously pull the lights through tubes, bulkhead openings etc. to spread them through a large kit--they will take some real tension without breaking or ruining connections, and the copper wire also bends into whatever shape you need and holds it. So I used blue LED string lights for all the interior "windows." The kit has just two windows opened for you: the familiar medical bay and a couple located behind it. All the other windows had to be opened up which meant a lot of laborious drilling and filing to get square openings. I put clear sheet plastic behind those which I frosted with glass frosting spray. The other lights--the engines, the med bay ceiling lighting, the antenna light and a couple of forward lights on the bow are LEDs from Evan Designs (modeltrainsoftware.com), which come pre-wired for a 9V battery. The kit comes with circular plugs for the rear engine nozzles which I just left off--I was going to try blue flickering LEDs for the engines but they look too blue, and bright white LEDs actually look the correct blueish tinge when photographed and light up the engines perfectly.
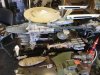
I built the main components of the kit--the forward section, the connecting tube and the engine section, and connected the engine section to the central tube but left the top off the engine section. For the forward section, I drilled a 1/4" hole as far up through that central mounting piece as I could (mine is one-piece and featureless, with no mounting faces for the airplane fuselages and ship hulls like the one in your photograph) and inserted a 1/4" brass tube up there. For the stand I then mounted another brass tube one size smaller so that the tube on the medical frigate forward section just slides down over that. Supposedly with the thick steel tube that runs through the connector tube, the model is supposed to be able to support itself just from that central forward piece, but I don't plan on testing that theory. The stand I built also supports the engine section from underneath--there's a little circular detail that fits perfectly over the right-sized metal tube and you can either drill into that or glue it or just leave it fit there.
For the airplane fuselages etc. with windows and interior lights, I picked four or five of those and drilled out the inside with a large, 1/2" drill bit. This is much faster and less messy than gouging them out with a dremel or other tool--after you drill the initial pit you can widen it with other tools, and this makes drilling and filing out the windows easier. I made window frames out of sheet plastic for the large bank of windows that are most visible on that boat-shaped middle fuselage, but for the others I just filed them out and inserted frosted sheet plastic on the inside--note that once you put on the jagged flat shield pieces on the sides of the front section, a lot of the details of the fuselages will be hidden and you won't get a very clear look at the windows, but you can still see the light and it's a nice effect to have--but this is why I chose just a few of these to light.
I started threading the LED string lights through the forward section with that central mount and the fuselages as I assembled that area--I determined which fuselages would be lit, marked where they connected with the center support on the support in pencil and drilled holes through the support at the appropriate points so I could snake the LED string up through the structure and push as many LEDs as needed into each fuselage to light them. So the end of the LED string where it plugs into power leads out of the bottom of the medical frigate where it connects to the stand.
I finished the front end of the ship minus the big, flat shield pieces--this actually leaves huge open areas on the forward hull which makes it easy to work with any LEDs you want to have in there like the med bay light for example--I just made a clear, frosted plastic ceiling for the med bay (the figures of Luke and Leia are actually 1/350 brass photo etch pieces from the 1/350 Enterprise Refit photo etch accessory kit) and then glued a white LED over that. I built the engine section but left the top of it off, added frosted clear plastic behind the windows I'd hollowed out, and added a piece of white plastic bulkhead behind that to better scatter and reflect the light from the blue LEDs. After I attached the central tube to the engine section (and you should note that there is a piece there that requires some MAJOR cutting for the connection point to fit) I then did the laborious work of threading the blue LEDs AND all the wiring for the engine lights etc through the central tube. This is a little tricky because the blue LED string had to be pulled from the front to the back into the engine section and the engine wiring had to be pulled FORWARD through the same tube, so I did the engine etc. wires first. Then I was able to connect the forward section through the completed rear section and cram all the remaining blue lights into the engine section where they could light the forward facing windows and a couple of windows I opened in the big connecting section. I will not kid you, connecting the forward and rear section for final assembly was pretty terrifying because the two assembled sections are quite heavy, BUT the connecting tube is EXTREMELY strong and you can actually lift the entire model from that area, which helps a lot in building.
I don't know if it's possible to tell in the attached photo, but I added two metal tubes extending sideways out from the wooden stand, which was made by screwing two pieces of 36" oak together. Since we're in earthquake country and this model is VERY top-heavy, I wanted to give it a little extra lateral support so it could survive at least a minor shaking out here. Definitely getting it on a secure stand is a critical part of the build, and I"m sure others can do a better job of this than I did, but what I built will suffice for now. I love the kit--you can really go wild painting and weathering it and I'm sure I will be adding some more touches of that in the future.
Attachments
Last edited:
Similar threads
- Replies
- 11
- Views
- 1,437
- Replies
- 1
- Views
- 989
- Replies
- 67
- Views
- 8,702