V2 builders kit: Shared Stunt V3

thd9791

Master Member
RPF PREMIUM MEMBER
Since it's still raw, I decided to add the holes I wanted. A hole for "wires" ... and a tapped 8/32 set screw to hold a steel rod in there. I also sculpted something into the body.... recognize the detail?
 

Attachments

  • 20180921_231225.jpg
    20180921_231225.jpg
    665.7 KB · Views: 127
  • 20180921_231156.jpg
    20180921_231156.jpg
    991.3 KB · Views: 162
  • 20180921_231124.jpg
    20180921_231124.jpg
    768.3 KB · Views: 167
  • 20180921_232316.jpg
    20180921_232316.jpg
    650 KB · Views: 156
  • 20180921_232454.jpg
    20180921_232454.jpg
    1.2 MB · Views: 144
thanks guys! I only remember seeing one obvious seam line, so i thought that side of the mold collapsed a bit or something. is it on both sides?!

I decided to go pure ugly on this one :)
 
Sooooo. I somehow spasmed my hip and in trying to stay avtive, I went down to the shop and re cut the seam lines. Including the second one. That was so simple I decided to go and start painting the darned thing. The grill paint cured so quickly that I was able to scrape off the grip rings almost immediately. I then moved on to dressing the saber with real aluminum tape. That stuff is unforgiving, easily crinkled and rigid. Took me a few tries but I got it! An X Acto knife helped me get clean edges with the tape, so i didnt bother with the edges until after i got the main part smoothly stuck on. Also, the adhesive is ridiculous! I used ipg intertape. Painted the emitter before the tape unlike the ugly redecoration they did. I feel like the copper on the neck is missing something. I even did a brass wash first!
 

Attachments

  • 20180924_221856.jpg
    20180924_221856.jpg
    1.1 MB · Views: 113
  • 20180924_221955.jpg
    20180924_221955.jpg
    1.3 MB · Views: 141
  • 20180924_222036.jpg
    20180924_222036.jpg
    1.7 MB · Views: 114
  • 20180924_222131.jpg
    20180924_222131.jpg
    1.4 MB · Views: 139
  • 20180924_222214.jpg
    20180924_222214.jpg
    1.2 MB · Views: 126
  • 20180924_222316.jpg
    20180924_222316.jpg
    1.1 MB · Views: 99
  • 20180924_222346.jpg
    20180924_222346.jpg
    737.2 KB · Views: 103
  • 20180924_222443.jpg
    20180924_222443.jpg
    915.5 KB · Views: 110
  • 20180924_222607.jpg
    20180924_222607.jpg
    732.1 KB · Views: 106
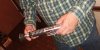
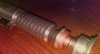
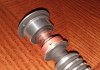
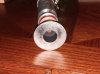
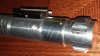
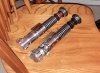
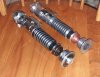
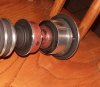
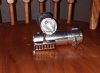
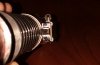
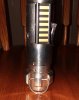
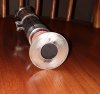
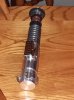
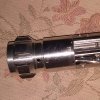
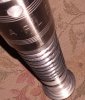
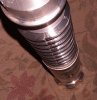
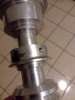
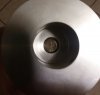
Soooo... I sliced Anakin Starkillers nipple in two. It was too short to fill the space and get screwed in, so I eyeballed the depth we can see on the real prop, which turned out to be the height after the diameter changes on the nipple! Now it's screwed to a steel rod, which is set screwed in the windvane. Also, got a slothfirnace card with the accurate mismatched brass (copper neck) and installed it the way I always do, with wires and packing tape. I also cleaned up the seam line a little, too much paint got caught up in there. Should I clear coat this? The grill paint is pretty hard, so is the copper rustoleum.
 

Attachments

  • 20181005_001253.jpg
    20181005_001253.jpg
    897.2 KB · Views: 108
  • 20181005_001218.jpg
    20181005_001218.jpg
    841.7 KB · Views: 120
  • 20181005_001149.jpg
    20181005_001149.jpg
    649.5 KB · Views: 104
  • 20181005_001119.jpg
    20181005_001119.jpg
    752.9 KB · Views: 91
  • 20181005_001048.jpg
    20181005_001048.jpg
    496.3 KB · Views: 92
  • 20181005_001025.jpg
    20181005_001025.jpg
    1 MB · Views: 90
  • 20181005_000949.jpg
    20181005_000949.jpg
    828.2 KB · Views: 96
  • 20181005_000922.jpg
    20181005_000922.jpg
    1.1 MB · Views: 101
  • 20181005_000859.jpg
    20181005_000859.jpg
    468 KB · Views: 77
This thread is more than 5 years old.

Your message may be considered spam for the following reasons:

  1. This thread hasn't been active in some time. A new post in this thread might not contribute constructively to this discussion after so long.
If you wish to reply despite these issues, check the box below before replying.
Be aware that malicious compliance may result in more severe penalties.
Back
Top