My Ghost from Destiny

Justphred

New Member
So this project of mine is one that has really pushed my abilities, and I am so grateful for it.

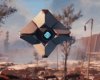
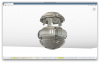
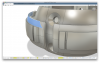
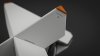
one of my favorite thing to do is to time to time look on Thingiverse for different models I would love to print off, and When I came across the the ghost model from BoldPrintShop I really got inspired. To me their model was so good that I had to make it. So I had the files for ever and didn't do much with it, and once I started to think about it is when the rabbit hole really swallowed me up.

View attachment 842683

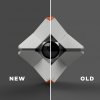
In the game the character is much more active, that just having a static model didn't feel right. There was so much movement and positioning that made the character come to life that I wanted to be able to have in my model. At first I told myself that I was just going to make the wings rotate. Which seemed like a huge feat on its own because at the time I had done little to no design work. However once I decided I was going to add that feature. everything else felt like It needed an upgrade. the biggest thing being that of the eye in the middle. Using just a simple LED to light it up, wasn't going to do. So I planned on giving it a brain. OLED screen, Speaker, Battery powered. Browsing Adafruit was not helping.

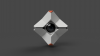
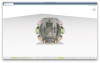
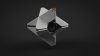
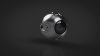
I decided that I was going to make the rotation of the wings work like a Rubik's Cube (or at least how I thought one worked.) so I devised a mental plan to use post running in groves, essentially T-tracks designed into the Center sphere.

View attachment 842688

I thought that designing a sphere would be easy enough and was well within my abilities... I was wrong. I was just using 123D Design at the time and had a mess of a project. it sat on the shelf for a while and then I picked it back up. got my own 3D printer so a new found drive on the project had been started. thats when I learned about bringing SVG drawings in from Illustrator, a program I was more that comfortable with. That and starting to use Fusion 360 made it all more real.

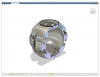
I got to a spot where I had things printed off and I was even going to sand and paint the Wings. Then however a cascade of issues happened. I used the wrong clear coat. A metal part I had printed off from Shapeways broke, and I was biting off more than I could chew with regards to the the brain of the thing.

Time passed and I had shelved the project again. It was a slow week at work a few weeks back, and I spent the time getting the printer up and running again. The hot end needed to be replaced and just some general touching up. once I got it going, the files for the wings were still on the card so I set one to print. Having printed several off before, I figured I could use that a test print to check that it was working properly.

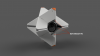
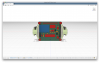
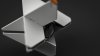
That flipped a switch for me and the project was back on. I printed a whole set off and was starting to get the desire to make silicone molds and cast them in resin. But in that down time where the project was on the shelf I had found some resource images that showed more detail that I needed to have in my model. The plan was to always use the wings that I downloaded from Thingiverse. They were just SO good, and I didn't even know where to start with modeling them. But not having that extra detail was killing me. Also I didn't want to spend the time and money on making molds of parts that I was just going to improve upon later...

View attachment 842690

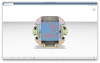
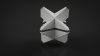
Specifically it was the detail on where the wings attached to the center eye. there were a few other parts on the models I downloaded that were different, but I figured I would have to live with. I spent a few days trying to take the STL files I had into something I could edit, but giving up on that pushed me into figuring out how to make my own.

a45ea98b-461b-4e2b-8ce5-668c643d3154.PNG32efaab1-0664-421c-ad3e-9acc746c309d.PNG

Once I figured the shape out it was this snow ball effect of making everything just how I wanted it. It's just been within the last day, that I feel like the models are almost there. And it has been really exciting to see it come together.

So whats next, well like I said the models for the wings aren't done. Ironically the part I wanted to add detail to in the first place I haven't touched yet.

IMG_1309.JPG

I'm just not sure how to go about designing it. I want some relief but don't have much room to go in on that bottom edge. Any advice would be greatly appreciated.

Then next phase after modeling will be working on the Brain, And for this I could REALLY use help. I have a parts list and even a plan for animations of the eye. but getting them all to work, program them and all that, is something I have never ever done. I have been planing for them while designing the center eye keeping board sizes in mind and making sure they will fit. but again making sure they will all work together is something else.

Screen Shot 2018-09-13 at 3.09.59 PM.pngScreen Shot 2018-09-13 at 3.06.02 PM.png

Long post, If you are still reading, Thank you. and if you can help me with any of the parts I have to work on moving forward I would greatly appreciate it!
 

Attachments

  • 3b25342a-0403-4529-8a50-f43956a10607.JPG
    3b25342a-0403-4529-8a50-f43956a10607.JPG
    1.4 MB · Views: 155
  • assemble_2018-Sep-13_12-58-11AM-000_CustomizedView15257165329.JPG
    assemble_2018-Sep-13_12-58-11AM-000_CustomizedView15257165329.JPG
    96.1 KB · Views: 155
  • 7e5dde86-15ad-40e4-872e-c729be09f85a.JPG
    7e5dde86-15ad-40e4-872e-c729be09f85a.JPG
    1.4 MB · Views: 175
  • 3288a75b-0193-49c1-8656-60c0185b73e1.JPG
    3288a75b-0193-49c1-8656-60c0185b73e1.JPG
    1.4 MB · Views: 199
  • 42f0bbb1-601b-4c00-8388-357d3740354e.JPG
    42f0bbb1-601b-4c00-8388-357d3740354e.JPG
    1.4 MB · Views: 161
  • e1bede22-dae0-4ae9-bdc6-178005e84a2a.JPG
    e1bede22-dae0-4ae9-bdc6-178005e84a2a.JPG
    1.4 MB · Views: 183
  • in-game_ghost.jpg
    in-game_ghost.jpg
    38 KB · Views: 172
  • Screen Shot 2018-09-13 at 2.05.17 PM.png
    Screen Shot 2018-09-13 at 2.05.17 PM.png
    887.9 KB · Views: 195
What a difference a day makes...

So I mostly had been ok with where it was at... until I looked closer at the reference images I had... and I saw angles that couldn't be unseen.

View attachment 842962View attachment 842963

So I spent the day redesigning the Wing and horns from scratch. Mostly because it seemed easier. I liked the files I had and going back in Fusion 360 I still don't fully understand.

View attachment 842964
View attachment 842965
Side-old-new.jpg

it's really subtle, but it also gave me a reason to change little accents on the Wings and Horns that i could have done better last time. But I was to lave to change, because I thought they were "good enough".
 

Attachments

  • compoldnew.jpg
    compoldnew.jpg
    337.6 KB · Views: 147
  • cecc5282-7737-45d7-bb9b-5f956a48566d.PNG
    cecc5282-7737-45d7-bb9b-5f956a48566d.PNG
    827.9 KB · Views: 149
  • whats wrong 01.png
    whats wrong 01.png
    1.8 MB · Views: 125
  • whats wrong 02.png
    whats wrong 02.png
    1.2 MB · Views: 153
Great minds, and all that. I've got a couple of the vinyl Ghosts one can get at GameStop ThinkGeek, Target... The internet... *shrug* Fifteen bucks a pop for some pretty decent starting fodder. Measured the center sphere, measured the horizontal "sandwich" layers' thickness, noted the positions of the detailing on the sphere, measured the eye, cut things up to have a clean, separate piece of each wing and wingtip, using the sandwich layer to create templates...

I got a twleve-pack of blank plastic Christmas-ornament spheres off Amazon of the right size for the core. One's the main body, with the large and small cutouts being carefully positioned, a couple are sacrificed to cutting all the heels and caps for the sphere, the rest are backups in case I screw up. I've sourced the right size round screen for the eye, and am hunting for a good lens. I have a friend who's going to assist with the programming and such. I'm looking into a levitating globe to cannibalize for the hover bits. Still sorting out wing articulation and such.

It's a fun project, and I'm looking forward to seeing how yours turns out. :D
 
I saw one of those figures at BestBuy last week, before I started doing all my remodeling of the wings and horns. And honestly it knocked the wind out of my sails for a second. I had spent a lot of mental energy on this thing, and there it was sitting in a box for 15$.

But a few minutes went by and I told myself that my ghost had already been such a fun project to work on that I could give up on it (many other projects have I put in cold storage)

Mine isn’t the exact size of the official ghosts that you can buy though; I think it’s a little smaller. I would be interested in getting your measurements.
Also where did you source a round screen? I doubt I’ll be able to find one that fits the space I have inside my center eye, but maybe.

I also thought about using clear ornament spheres for the glass in front of the eye. But I knew that you can buy a kinda of watch parts on eBay so I’m going to use a domed round sapphire glass, meant for watches. You can get them in so many different parameters.

I’d love to see your progress as well!
 
I'm flying back home tomorrow. I'll dig up my numbers and sources this weekend. :)

And definitely don't let the official beastie knock you off stride. If nothing else, the time youve spent delving into how the thing goes together, the angles and details and movement points...? That's essential information, there, whatever materials you end up working with. You'll be bringing that eye for obsessive detail to it. Trust me, that official Ghost is good, but could use some superdetailing, even if one *wasn't* going to butcher it to go all Six Million Dollar Man on it. For what you and I have planned, it's a very good starting point, and could potentially save you some 3D modeling and printing time and effort. But what you've already done certainly isn't wasted.
 
So glad I found this thread. I am gearing up to make mine soon as well.

My plan was to have it on thin, possibly posable, tube on a base to look like it's floating.

The front horns would be the core frame, and off this would be the rear horns that would rotate and inside the eye would look around on a universal joint.

My stretch goal is to find a way to make the front horns move in and out like it does for its "facial expressions".

These would all be controlled by servos in the base with fishing line up to the ghost.

Sent from my Moto G (5S) using Tapatalk
 
Last edited:
thats exactly what mine do.

e1bede22-dae0-4ae9-bdc6-178005e84a2a.PNG
Screen Shot 2018-09-13 at 2.05.17 PM.png

I designed grooves around the center sphere that will allow for me to movie them around, and furrow its brow.

also I finally got around to detailing the inside of the of the horns. they print out ok but I have some cleanup to do on them to be sure.

IMG_1415.JPGIMG_1417.JPG
Screen Shot 2018-10-04 at 4.08.50 PM.png

- - - Updated - - -

I take it back Confused85, Mine will just move freely, not controlled by servos.
 
Last edited:
Interesting! The more I look at it, the more I think I will just have the eye look around and the back horns spin back and forth.

What screen have you found for the eye? I have done an oled screen with Arduino for my dredd lawgiver so think I could do it.

Sent from my Moto G (5S) using Tapatalk
 
Interesting! The more I look at it, the more I think I will just have the eye look around and the back horns spin back and forth.

What screen have you found for the eye? I have done an oled screen with Arduino for my dredd lawgiver so think I could do it.

Sent from my Moto G (5S) using Tapatalk

I was looking at some parts over on Adafruit.

https://www.adafruit.com/product/1673

It's going to take some work to get it to fit into the space I have inside the eye but I have been trying to map it all out, and I think it will fit.

This is my rough plan
the brain.png

Getting it all to run on the other hand is something I have never done before, and would gladly accept any pointers or tips you might have.

Here are links to all the various parts that I think I need so far.

Audio Board and Amp
https://www.adafruit.com/product/2341
https://www.adafruit.com/product/2130

Adafruit Trinket
https://www.adafruit.com/product/2000

Battery Backpack
https://www.adafruit.com/product/2124

Things I am unsure on is power requirements... getting this to run on a battery would be Ideal but I have not clue how to figure all that out. nor do I know how to wire all this up. I have a rough concept in my head, but have no clue if it is based in reality at all.
 
I was looking at some parts over on Adafruit.

https://www.adafruit.com/product/1673

It's going to take some work to get it to fit into the space I have inside the eye but I have been trying to map it all out, and I think it will fit.

This is my rough plan
View attachment 846879

Getting it all to run on the other hand is something I have never done before, and would gladly accept any pointers or tips you might have.

Here are links to all the various parts that I think I need so far.

Audio Board and Amp
https://www.adafruit.com/product/2341
https://www.adafruit.com/product/2130

Adafruit Trinket
https://www.adafruit.com/product/2000

Battery Backpack
https://www.adafruit.com/product/2124

Things I am unsure on is power requirements... getting this to run on a battery would be Ideal but I have not clue how to figure all that out. nor do I know how to wire all this up. I have a rough concept in my head, but have no clue if it is based in reality at all.
Adafruit do have a lot of good tutorials.
I am using their GFX graphics library. Between the tutorial, example code and forum I have managed to get pretty far along.
I've not used anything other than that yet myself.

As for the battery, you can have it removable to save space for having a charger board inside the eye. If you try to pick a screen etc that all use the same voltage as your battery it will be easier

Sent from my Moto G (5S) using Tapatalk

I have looked at their tutorials before, and they always seem very narrow to the project they are working on. Where as I just have general concepts that I want to make happen.

Power for me has been a big confusion point. How to make everything power off one battery, and how to just make all the different systems interact is just a mystery that I wish I knew how to solve.

When I see projects that other people put together, I am left in awe wondering how they knew what needed to be done.


I guess I just need practice
 
So I am getting closer. I am happy with all the designing at this point. I have one more of the Horns to print out. Then I'm going to clean them up with some bondo in a few spots, really get the finish down, and then the plan is to attempt to make two part silicone molds then cast them...

the parts for the center eye have a little more work. I have to make some crew mounting points on the inside which shouldn't be to hard. I just need to figure out what screws I'm going to use. then I plan on getting those printed from somewhere like Shapeways. The detail on the parts for the eye is just something I can't get out of my printer. At least not that I have been able too.

26AA9325-A744-45E8-8638-CCE90DD6A666.JPG
 
I'm afraid I can't help with your questions; I just don't have the knowledge. Also, while I, sort of, know about Destiny, I'm not particularly familiar with the game either.

But this project does intrigue me; there's so much engineering and designing going on, it's just too interesting to pass by.

Please keep it up; I'll be following this, even if it were just to learn something... :)
 
Im excited to be sharing it. Im hoping that in doing so, I'll keep the the progress moving forward.

most of the engineering has been done by eye, really. I have no clue If the grooves along the eye are going to work. I might have made my tolerances to tight. I also do understand that this is a learning experience.
 
Update.

So I finally got the tabs for screwing the various parts of the Eye together. At first I designed them to small, and shaped them in a way that would have made it impossible to assemble.

but I eventually settled on a robust, and potentially over-engineered...

View attachment 850090View attachment 850091

once I had those done I wanted to make sure I still had the clearance on the inside of the eye for all the various electronics I think I'm going to need in there. It was then that I discovered that Adafruit has made Eaglecad files available for most of there products. and it was then that I discovered that Eagle can export those drawings to a step file. so I went ahead and exported files for all the different components and brought them into my file.

as I knew already the board for the OLED screen that I want to use won't fit unless I modify it.

View attachment 850092View attachment 850093

I had planned on cutting off the four screw post anyway. However the new tabs for screwing everything together made it all too tight. I thought about it, and at this point I think I am going to rotate all the boards 45º

View attachment 850094

I'm not sure If I'll even be able to do this. Using the screen I am planning on using, all ready has a stipulation to it. I'm hoping that I'll be able to remove the screen from the board. from what reviews say, it is just held to the board with double sided tape.. so I'm hoping I can lift that off. and also hoping that I can now extend the ribbon cable connecting it to the board. (also Im hoping that the physical size of the actual screen is small enough to fit into the cut out I have made for it.... :lol:wacko)

Once I had all that done I started double checking everything. making sure all my work was correct. Which lead me to COMPLETELY remodeling the middle right of the eye...

The way I had originally modeled these parts was by drawing a profile in Illustrator. Exporting SVG files that I would then bring into Fusion. and then revolve those drawings around a center axis. this would lead to different drawings being slightly off from one another. and things, over all working, but not pretty.

View attachment 850095

The reason I chose to redo the whole thing is because I was starting to think about painting this thing. And I started to worry that my tolerances were to tight. In the process of trying to push everything back so I would have enough room, I kept running into areas like in the picture above. It wouldn't let me push one area back because of how it was modeled. so I said screw it. and started from scratch. This time doing all the work in Fusion. In the end, it is now a much cleaner model, and Im happier for it.
 

Attachments

  • Screen Shot 2018-10-21 at 8.08.07 PM.png
    Screen Shot 2018-10-21 at 8.08.07 PM.png
    2.2 MB · Views: 132
  • Screen Shot 2018-10-21 at 8.07.03 PM.png
    Screen Shot 2018-10-21 at 8.07.03 PM.png
    2.3 MB · Views: 122
  • Screen Shot 2018-10-21 at 8.17.26 PM.png
    Screen Shot 2018-10-21 at 8.17.26 PM.png
    1 MB · Views: 137
  • Screen Shot 2018-10-21 at 8.19.17 PM.png
    Screen Shot 2018-10-21 at 8.19.17 PM.png
    1.2 MB · Views: 161
  • Screen Shot 2018-10-21 at 8.24.35 PM.png
    Screen Shot 2018-10-21 at 8.24.35 PM.png
    1 MB · Views: 130
  • Screen Shot 2018-10-21 at 8.34.45 PM.png
    Screen Shot 2018-10-21 at 8.34.45 PM.png
    2.2 MB · Views: 124
Ok so... I am dusting off the cobwebs of this project, is there anyone out there that can help guide me on the electronics of this project?
 
UPDATE: It's coming together!

So sheltering in place, has meant that I've had to see this project sitting on the shelf everyday. So I finally did something about it.

I did a little more research into the electronics I would need for the inside of the Ghost. Foremost was the screen. If I didn't/couldn't find a screen that fit or worked It would be all for not. and what do you know, I took a chance and I think I hit the nail right on the head.

IMG_3994.JPG


All the electronics, without having them in person, were some what of an unknown as far as dimensions. I have bought mostly everything from Adafruit, and they do a great job of giving a lot of general information about the products. but I wanted to know things like, exactly how wide and tall is the screen and not just the overall PCB footprint. I really lucked out cause the screen fit like a glove in to the groves I had already designed into the body. So from there I was off, and a new determination to actually complete this project had been set in my mind.

I went on to map out all the electronics and create and internal frame for them. With the screen on hand I was able to take all the dimensions I needed from it, and luckily everything else was easy enough to account for. So I ordered the electronics and then designed and ordered what I have lovingly called the "Brain Frame"

IMG_6801.JPG


Again I was amazed at how well everything fit and came together. Things like the battery, which the dimensions I was given for it were rough ones, fits in so well to the the design, it's almost interlocking. You would have thought I planned it.

With all of this new stuff I had on hand I went ahead and assessed/played with how things were going to fit together and work. I also took the time to rework things I had been kicking down the road. Things like, redesigning the back cap so it could act as the main button, yet also come off so you could have access to the USB port to do things like charge the battery.

Screen Shot 2020-08-17 at 4.21.19 PM.png


I made it so it was held in place by two sets of the tiniest magnets I have ever seen. (2mm x 1mm). In order to make the button work this way I had to do some redesigning on the Brain Frame (which is currently on its way to me) and I think it will work out better, because with the new layout I will have more room inside this tiny space for wiring and additional circuits that I am planning for, that will allow me to only have the one button to do everything.

With the hardware all in place I turned my focus to the software side of things. Honestly this is where I have the least amount of knowledge. I am really learning a new skill here. Programing and code I have always thought of as a language. Which is a bummer because I have never been great at language. I'm a visual person, and I can't picture words or numbers in my head. Shapes, lines, dimensions, I'm your guy. But ask me how to spell a word and I'll spell out G O O G L E back to you. So I was really learning how to swim by jumping out of a plane over the Pacific on this task.

IMG_9074.JPG


That being said, I have been chipping away at it. Part of the process has been learning what I need to learn. As I read an article and I see a term I don't understand that will be my next term I look up. At this point in the process I feel a little like Mickey Rourke from Iron Man 2 "Can make salute, no demonstration" 'cause at this point all I can do, is make an image appear on the screen. Which, hey, that is FAAAARRR better looking than just having a single LED lighting up, which is what originally was going to be the case. However this has been the project of going way too far.

As I worked at learning how to write Arduino code I placed an order for the watch glass, as well as the parts that were going to be holding it in place, that I was going to use for the Eye. When they came in, it was another moment where things really just reinforced the fact that it was all going to work out.

APC_0387.JPG


I have two layers of glass, a domed exterior that is 28mm in diameter, and a flat interior piece that is 1.5mm thick and 33mm in diameter. I wanted to have multiple layers of glass because I wanted to give some depth to the screen. I figured with all the reflections and putting the screen just that much further in set into the model it would feel like you were looking into it and not just looking at a screen. And from what I can tell so far it has worked!


At this point I have committed to doing a few things design wise. The way the back door attached to the body was in two parts. There was the back cap itself, and a little ring that I would glue into the inside of the main body. I though by having it be a separate piece the body parts could be ubiquitous. but this part was just to small and was too frustrating to deal with on its own and to not have it be a part of the body itself. So I glued it in place. And then in Fusion 360, made the change and integrated it into the body.

IMG_8880.JPG


By gluing it in place I made the decision that all the parts on had were not going to be the final parts (which I had been assuming they would be) but rather part of what I am calling Ghost In White. Essentially this is to become my prototype, and when it comes time that it is all finalized I will order parts printed with a finer detail and a smother finish so I won't have to do as much prep work to make the molds, cause it's still my hope to make several of these.

Anyway. that's the update. If anyone has any tips for making molds of really small parts, Please let me hear them. I am gearing up for that and again, am learning something new here.

Thanks!
 

Your message may be considered spam for the following reasons:

If you wish to reply despite these issues, check the box below before replying.
Be aware that malicious compliance may result in more severe penalties.
Back
Top