surf
Active Member
Dear fellow RfP Members,
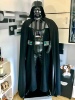
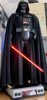
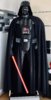
finally my ROTJ Vader Statue is complete now (though some upgrades planned for the future) and I want to share with you my looooong way getting there ...
*Edit* Final Upgrade to a new Capeset and a new and more accurate Chestbox. This is it !


My passion for Star Wars started in 1985 with the release of the VHS Video Cassettes. Especially Darth Vader was always my favorite character and I loved his look in ROTJ the most. As a 7 year old kid, without having Internet at this time, I tried everything to build myself a Darth Vader Statue, but failed in the end due to the lack of my craftman skills. It took another 11 years, when I got access to the Internet for the first time and openend the door to a complete new world with all it's opportunities ...
This is were I found an offer for an "Ultimate Darth Vader" Costume on eBay. As I was doing a apprenticeship at this time, my funds were very limited. I started begging my father to lend me the money and as he was always a great supporter of my passion he agreed on giving me the money finally to pull the trigger.
It took about four month to receive the Soft- and Hardparts finally.

As I learned later on essentially the "Ulitmate Darth Vader" offering on eBay consisted of the parts of various vendors that are still in the business. The Softparts (Leather, Cape+Robe, Cod and Gloves) were done by Fenixprops and the Hardpards by Portumac (Helmet, Belt, Armor and Shins).
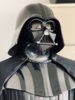
Having the ROTJ the Reveal Helmet, I wanted to have the possibility to show Vaders pale and scared head, when taking off the dome. Meant for me that I needed to sculpt the scars on the mannequins head. Point was the head of the standard mannequinn was simply too small for the helmet so I used foam and some tape to make it bigger.

For the sculpting I used some window putty that I've bought at my local property market

Finally it all got painted as best as possible to match the on screen appereance of Vaders head in ESB/ROTJ.

Next thing, which I didn't had on my Screen, was that the mannequin simply doesnt had the body proportions of a Dave Prowse. It was simply too skinny to look anywhere near Darth Vader should look like. This meant that I needed to get some foam and make also the shoulders wider. For the shoulders I ended up by pulling two iron rods through the torso, hanging the arms on them.

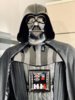
Finally I was able to put my Vader together having him standing in my Star Wars Room.

However, I was never completely sold by the result. Guess you can imagine why... His Cape and Robe were too short, the Gloves and Cod Piece were too big, the Chestbox broke after some while ... etc.
Over the years it really started bugging me more and more that the Vader that I always wanted hasn't become what I was aiming for. Years went by and last year I jumped the fence by starting customizing my vader more and more. All started on the day I was jumping off the sofa starting to cut off his legs, cause they were simply too short. After I did this, I had no clue how to extend or connect them back again. So I was checking my local Home Depot and ended up with some plumping pipes which were exactly what I needed.

Seeing that my Vader finally got more and more the proportions that were needed was some of an oasis for my soul after all these years, but I wasn't still there where I wanted to be. This was the time when I registered for the 501stsithlords Forum starting inverstigating about the best Vader parts that money can buy.
At the end of my little project I replaced the batteries and hooked everything up to a power socket. All can be remotely controlled (Chest Box, Belt, Saber and a Bluetooth Speaker that sits under the helmet)
Finally I'm completely happy now about my Vaderand beside of some minor updated and tweaks, after more than 15 years 17 years I'm really proud having him standing in my living room. I want to thank all the guys that of the 501th Forum that were contributing and helping me to investigate on the best Vader parts on the market !!!
Thanks !
Sebastian
finally my ROTJ Vader Statue is complete now (
*Edit* Final Upgrade to a new Capeset and a new and more accurate Chestbox. This is it !
My passion for Star Wars started in 1985 with the release of the VHS Video Cassettes. Especially Darth Vader was always my favorite character and I loved his look in ROTJ the most. As a 7 year old kid, without having Internet at this time, I tried everything to build myself a Darth Vader Statue, but failed in the end due to the lack of my craftman skills. It took another 11 years, when I got access to the Internet for the first time and openend the door to a complete new world with all it's opportunities ...
This is were I found an offer for an "Ultimate Darth Vader" Costume on eBay. As I was doing a apprenticeship at this time, my funds were very limited. I started begging my father to lend me the money and as he was always a great supporter of my passion he agreed on giving me the money finally to pull the trigger.
It took about four month to receive the Soft- and Hardparts finally.
As I learned later on essentially the "Ulitmate Darth Vader" offering on eBay consisted of the parts of various vendors that are still in the business. The Softparts (Leather, Cape+Robe, Cod and Gloves) were done by Fenixprops and the Hardpards by Portumac (Helmet, Belt, Armor and Shins).
Having the ROTJ the Reveal Helmet, I wanted to have the possibility to show Vaders pale and scared head, when taking off the dome. Meant for me that I needed to sculpt the scars on the mannequins head. Point was the head of the standard mannequinn was simply too small for the helmet so I used foam and some tape to make it bigger.
For the sculpting I used some window putty that I've bought at my local property market
Finally it all got painted as best as possible to match the on screen appereance of Vaders head in ESB/ROTJ.
Next thing, which I didn't had on my Screen, was that the mannequin simply doesnt had the body proportions of a Dave Prowse. It was simply too skinny to look anywhere near Darth Vader should look like. This meant that I needed to get some foam and make also the shoulders wider. For the shoulders I ended up by pulling two iron rods through the torso, hanging the arms on them.
Finally I was able to put my Vader together having him standing in my Star Wars Room.
However, I was never completely sold by the result. Guess you can imagine why... His Cape and Robe were too short, the Gloves and Cod Piece were too big, the Chestbox broke after some while ... etc.
Over the years it really started bugging me more and more that the Vader that I always wanted hasn't become what I was aiming for. Years went by and last year I jumped the fence by starting customizing my vader more and more. All started on the day I was jumping off the sofa starting to cut off his legs, cause they were simply too short. After I did this, I had no clue how to extend or connect them back again. So I was checking my local Home Depot and ended up with some plumping pipes which were exactly what I needed.
Seeing that my Vader finally got more and more the proportions that were needed was some of an oasis for my soul after all these years, but I wasn't still there where I wanted to be. This was the time when I registered for the 501stsithlords Forum starting inverstigating about the best Vader parts that money can buy.
At the end of my little project I replaced the batteries and hooked everything up to a power socket. All can be remotely controlled (Chest Box, Belt, Saber and a Bluetooth Speaker that sits under the helmet)
Finally I'm completely happy now about my Vader
Thanks !
Sebastian
Attachments
-
 124wpli.jpg95.7 KB · Views: 549
 -
 IMG_3284.JPG973.9 KB · Views: 608
 -
 829F3CFA-E8BF-4E26-B9F6-D25062DA347B.jpeg3 MB · Views: 748
 -
 5ABDB526-B8F3-4A90-85B1-09686512CFD9.jpeg1.6 MB · Views: 644
 -
 B0354F54-F5AC-4EFD-9200-F62D78DCCB9C.jpeg900.9 KB · Views: 767
 -
 29B51E1E-EC6E-42EF-8993-1958CE4DFB25.jpeg670.5 KB · Views: 452
 -
 C03A8BDA-98BA-461A-8368-0E1E260EDF41.jpeg694.7 KB · Views: 694
 -
 C8E474EE-16F9-4D0D-92E2-A80DDD20A910.jpeg812.4 KB · Views: 323
 -
 8499F851-7CE7-425C-A93B-1AAD33DEB8B0.jpeg951.8 KB · Views: 365
Last edited:
")