Star Destroyer Bridge Section ( Korbanth ) Build

dockbay94

Well-Known Member
I am not new to the site but new to posting. I fact this is my first post here in alt least 8 years. I have been Modeling for around 20+ years now and I am not one to show, post and or document any of my work, I honestly don't feel my work is up to par these days with the advent of the internet and instant access to peoples work but I try. I do take pics of my finished commission's and personal models. I mainly do star wars kit of all make's, scale, from resin to injected mold, etc.
I also build resin, denix, mgc, star wars blaster's, but that's another Hobby and story...

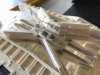
Now, on to the ISD kit Iv' been working off and on for a better month or so, Mainly weekends as work, wife, kids take up most of time. I have not seen much material or builds on this kit? mainly more kit part pictures i.e. here, korbanth site, MMM (modeler magic). and that's about it. so I thought I would finally start to take pics and document my build
IMG_1914.JPGIMG_1919.JPGIMG_1918.JPGIMG_1917.JPG


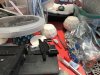
as you can see here some of the part laid out. I washed and let soak overnight in tub and dried with air compressor, then the sanding, lots of sanding and sanding, and more sanding! the parts are crisp and clean! very little bubbles and pit holes, but some panel's have been over poured with resin and results in different sizes and weight + even more sanding.
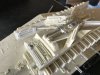
Now, these are not all the parts to the kit. I did neglect to take pics of all the parts. but will try to find them. so what I did with these panels was to marry the left/right side together with the details facing out and used my sander to even out all 4 corners with a level to make sure each one was perfect to the next. so when I glue/epoxy them bridge will go together seamlessly as they will be the same measurement all around. hard to explain. but I think you get the Idea? maybe.


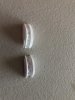
next was the neck of this beast! sanding, leveling, then gluing together. was a challenge to get straight .
IMG_1915.JPGIMG_1987.JPG

then I glued in supports inside the neck to even out the sides as they weren't straight. I have a ton of pics but post of where I am at but I mu go and will more later.

I thank you for tunin in and looking at what I have done so far! not much in your eye's but mine are full. if you have any questions about this kit? please let me know. I look forward to sharing this venture with all.


Paul.

thanks
 
Wow this thing is going to be an absolute unit! Great work so far! Don't be worried about posting your work here, modelers of all skill levels (and I think you've got quite a bit of experience under your belt) are a treat to follow.
 
Thanks for the support guys, I will try to post pics and details as much as I can. any thoughts or better ideas would be great! as I am a self taught model maker before the internet, I find help and constructive criticism very helpful. as I learn I share and as I read I learn. I find that here at the RPF people are very friendly and supportive of anyone's hobby.

Sooo, here was one I my favorite parts to do. the face of the bridge, I glued the left/right panels together nice and flush. then I went to town on adding more greebls on the whole front. staggering them in places ( see pic of my grebble stash) I also added styrene rod, etc. as well. I thought it would look good and add more dimension to the face of it.
this kit is not meant to be accurate in anyway, but it's a great start. I think I did just enough to make it pop out, and I did not want to go overboard either. which you could easily do! I know, I've done it.
be back later. and continue this conversation. gotta leave work and go home. more tonite.

Thanks Again / Paul
 
here are some more pics of the neck section i did not post earlier, I would say I am half way done now. I am just cleaning up the deflector shield (balls) now. but we'll get there later.
like i said earlier, this went together pretty good, just a few minor issues i had to be fix. the top as you see here had beams going across from left to right or right to left. similar to what you see on the back slope on the rear, well mine had some warps on those beams and indentations like is was pushed on when the piece was pulled from the mold ( sorry,took no pics of it) no big deal, I used styrene L shaped beams and square rod to cover the issue and then just did the whole top as it would have looked odd if I just did that area only,no one would notice after painting.
I am putting 0.35 mm fiber optic in it along with strips of RGBW led lighting powered by 12 volt and a remote w/dimmer to achieve that right level of lighting.


IMG_1984.JPGIMG_1985.JPGIMG_1986.JPGIMG_1988.JPGIMG_1990.JPG


now for the primer, black for the whole thing. haven't done the interior yet as I am still pondering how to mount the power unit inside and where to put the IR receiver for the remote. I think i know where, just haven't done it yet.

IMG_2006.JPG

i will take some pics of all the pieces I have of the kit as of where I am now, but still go in more detail how i got there with building it up to now. and I will document with more detailed shots as I progress.

in the mean time, I will share some of my work and projects I am working on. like I said before I don't normally show off my stuff. but if you can't share it, why build it!


IMG_1455.JPGIMG_1401.JPGIMG_1384.JPGIMG_1424.JPG
 

Attachments

  • IMG_1436.MOV
    3.9 MB · Views: 278
first is the tiny Bandai x-wing, second id the 1/72 ? y-wing bandai, the zvezda SD, I bought 3 of these to build. one to see how well it goes together, one for a special project and the othe for a full light up build with FO, the whole works, this was the test subject came out OK i guess, sold it to a collector and the Bandai a-wing I lit up. not finished with this one either.

IMG_1450.JPGIMG_1452.JPGIMG_1436.JPGIMG_1437.JPGIMG_1439.JPGIMG_1759.JPG

this also the bandai AT-AT, great kit! I have 2 more to build, and I cant find many pics of the 1/48 alfred wong at-at I am also doing. got this kit last year big of course. but not finished either. I have 5 kits going on at the same time. and to make it worse Nicholas from JPG Productions sent me a pic of my 1/350 medical frigate that he shipping out here in a few day! MMMMM!! can't wait for that one!! almost a year and half. but well worth it.


anyway gotta go. more later of course.and thanks for tuning in. Aloha

Paul
 
Very Nice Work!!! i can relate on almost every level and the longer i am here on the forum the more i too discover how great this community is!! waiting with great anticipation for updates!
Subscribed!
 
Thanks tdb68, I will do my best to document as much as possible! this site has a plethora of knowledge and a pleasure to read. I have learned so much and have advanced my skills 10 fold. and after all the snooping around here. I thought I would pay it forward with first real post on my build. thanks again

Now, on to this beast. this will be short as I am my office.
next was to drill all the damn holes in the face of the ISD. my intent was to light up the FO with a bunch of illuminators, 4 or 5 for the warm white and 2 for red. and I was going to go with this loo of the promo shot bridge section from Empire, then I though I want more of a studio look with out any colored lights. don't why I changed my mind? easy enough to do but when I did a test after all My FO was installed I really liked the look of the mild cool blue daylight color gleaming through all the FO. So I ordered a LED RGBW kit and will use that. and instead of binding the fibers together, build an led board fo rth inside face of thSD and then cut my FO less than a 1/4 inch. and have an inch between the inside led plate and the cut FO.
I just cut them 2 days ago after my final decision to do it. call it a lighting short-cut. LED strip kits are a wonderful thing! and cheap! so here a few pic before I cut the fibers. I think it was around 250 holes give or take. I just stop counting after 100!!!t9irY.jpg

IMG_1973.JPGIMG_1975.JPGIMG_1976.JPGIMG_1977.JPG

I forgot to mention I did paint a black primer as well on the front.


IMG_1944.JPGIMG_1945.JPG

this was the stat of the hell!!

now on the front of what it looks like, a mess I know! but will clean up nice when done.

IMG_1962.JPGIMG_1960.JPGIMG_1963.JPG

and more...

IMG_1979.JPGIMG_1978.JPGIMG_1981.JPG

thanks for looking! I will share more trials and tribulations of the build later as. got to go for now


ALOHA...
 
I must apologize for my bad grammar and spelling, I am used to my laptop keys being so smooth and flat! at work I use a crappy over sized keyboard form the 80's and when I think I have typed the word in it's only half or partial, Damn! these keys are just soooo - UGH, pause,pause,pause, BIG and CLUNKY. I promise to proof read before I post next time. so I don't look like an inept mad man.
 
Hello all, Been busy this weekend had no time for Modeling. so I thought I would post a few more pics of the bridge section of the SD. I custom built a SD Bridge out styrene strips, rod, etc. it is small and was a pain to do but it's done. the first one I did was pretty good and as I test fitted and tacked it on the face of the bridge to see how it looked. I used it as a template to drill the small holes for the bridge windows and FO, worked great but the chuck of the drill smeared/melted the styrene and lost detail of the bridge face. so I built another one. the second one came out cleaner and crisper as I had already done one and learned from my first mistakes.
this kit does not come with any bridge section on the casting and or piece to add, hence why I built one. at this scale ( ? ) it was necessary for effect and makes it look cooler. I am not sure but I believe he said it would be 8 or 9 feet long if he finished the whole SD. that was korbanth's intention to build an ISD kit in sections. and if so? I would be huge and pricey. plus to have a place to put it? would be SWEET if he did finish the rest of it.
I like making models my own and try not be so accurate as most resin kits are not anyway. but as I add greebles, styrene and kit bash parts I give them more of personal touch trying to emulate the essence of the ship. and to be honest the casual fan will not know the difference and or care how much work you put in it or scrutinize the accuracy of the build. which to me is fine. but us hardcore builders who put time and passion in them, sometime blood from that damn knife! ( I have many scars on both hands from blade slices ) enjoy seeing what can be done in so many levels and experience. I believe modeling is a true piece of art of the builders . anyway enough rambling! back to this beast.


here are some pics of my progress so far. in particular order. as of now the bridge is on the Face of the SD and holes drilled
.IMG_1969.JPGIMG_1970.JPG

the one on top is bad, one with the red is the good new one.

IMG_1982.JPG

new bridge glued in place and holes not drilled in yet for the FO.

IMG_2008.jpgIMG_1983.JPG
and more, looks pretty good to scale, especially when lit up.


IMG_1965.JPG
IMG_1967.JPG

bad left - then - right good.

IMG_1968.JPG

final, second one I did.

and some more progress pics some seen and some not seen from different angles.


IMG_2005.JPGIMG_2004.JPGIMG_2007.JPG
 

Attachments

  • IMG_1966.JPG
    IMG_1966.JPG
    897.1 KB · Views: 248
Well I just figured out how to respond to a reply with a reply! sorry I'm late! Yeah, the people here on the site are very helpful! it's a joy to read . this has been a fun project when I get the time. this last weekend has been been giving attention to my jeep as I have neglected her for a while. did a full detail/wax job on her. but I can't forget my SD either.
 
very nice piece! i did notice on the kit there was no bridge piece. different ones were used on different filming models but the one you made nice, and its all yours! Art :)
i feel your pain too, gotta a shingle my house, landscaping at my moms, windows to put in my sisters house, vehicles, blah blah blah...i just want to build!!!


Yup, It seem every SD on screen has a different bridge, hard to keep track. as this SD kit is more of a Empire version I tried to get that look. but by no means is it accurate at all, but close. I have done allot more work and taken pics I just have not posted them yet as I am trying to go in a build order. I have been working on the Deflector shields ( the 2 big balls ) I had to get 2 more from him. when he poured them he under-poured and when the dried up they shrank so when I finally got to them for clean up and more detailing I found when I put the bottom and top together they did not look right. I'll post pics later for you and all to show you how they look. the new ones are allot better but detail got lost in the mold and he used a different resin than the first pour I got with the kit. I sanded all of the detail off all four sections with my hand sander and will add sharper crisper detail on them and custom antenna's so, for anyone wanting this kit to build make sure that he over pours the ( balls ) top/bottom pieces. cause you can always sand them down to the perfect level..


IMG_2054.JPG IMG_2053.JPG
the one on the left ( lighter color) is the new one, and right ( darker color) is the older


IMG_2045.JPG

this is what it looks like together, I am debating if I should cut small triangle (5 different sizes for each level of the sphere) and put them on to sharpen the detail? allot of work but might be beneficial. thoughts anyone?
once I put all the antennae's all around the upper dome ( by the way, those aren't included anymore, you have to scratch build your own) and the rest of the detail on them including the struts on the lower part and inner ladders (which I bought a 3D printed version) that go around the inside of the support beams. see blow pic

star_destroyer_esb_bridge_shield_generators-e1337783607341.jpg

gotta stop myself, I am atwork. OOOPS. more later.
and thanks for tunin in.

Aloha
 

Attachments

  • IMG_2055.JPG
    IMG_2055.JPG
    3.2 MB · Views: 205
OK I'm back, went on a small holiday and haven't had much modeling time lately. but I did do some work in between. I spent time sanding and gluing on the left/right sides of the bridge. and pre-drilled around 10 holes on each side for FO. didn't want too many but just enough to add balance for the face/front. not sure if I will add any red LED's? just might keep it all white.
The LED kit I got off amazon is a RGBW w/IR remote and a plethora of colors, but the only color I will be using will be the cool white, warm white, and daylight. and I can dim them to the right level. I will show pic of LED KIT later. but on to my progress I didn't take any pics of the sides put on, but I added the 2 back panels so everything but the bottom is put together. everything but the top is painted in black primer.
As I glued in the side, back, top, front panels together I ran into some gap problems and rectified it with styrene square rod, strips, and old model greebles. I'm not totally finished with all of it need some more clean up and details added but I think you get the Idea. The white duct tape is to hold it together as I glued it. the reason for the gaps is because as I dry fitted the parts the bottom piece was going to overlap all four edge's, so with some measuring and some scientific crap in my head I figured out what I needed to make it work. any-hoo thanks for looking.

(SORRY THIS IS PIC HEAVY!, BUT THAT WHAT PEOPLE LIKE TO SEE) ENJOY.

IMG_2088.JPGIMG_2089.JPGIMG_2090.JPGIMG_2091.JPG

MORE.

IMG_2092.JPGIMG_2098.JPGIMG_2099.JPGIMG_2100.JPG

AND MORE..

IMG_2102.JPGIMG_2101.JPGIMG_2103.JPGIMG_2104.JPG

GUESS WHAT ? MORE...

IMG_2107.JPGIMG_2106.JPGIMG_2105.JPGIMG_2108.JPG

YUP!

IMG_2109.JPGIMG_2110.JPGIMG_2111.JPGIMG_2112.JPG


THINK I'M DONE

IMG_2118.JPGIMG_2120.JPGIMG_2121.JPG

NOW I'M DONE FOR NOW.

Tonight I will upload pics and explain in more detail the antenna array and the deflector domes I'm working on.


Aloha
Paul
 
well, it was a crap shoot over the weekend! I chose to play with my new acquisition - My new 1/350 Nebulon B medical frigate kit from JPG Productions (show pics of the kit later). just looking at all the parts and dry fitting sections, playing, inspecting. (I love new kits) But, I must finish this Bridge first
.
So, before I got the Bridge section glued up I did a lot of work on the deflector shields - sanding and trying to get the top/bottom halves to meet up evenly/flush.
IMG_2043.JPGIMG_2042.JPG
this is the dome put together (dry fit) - there are 2 of course, one was cast better than the other but both need a substantial amount of clean up. I sanded off all the detail on both as of now. and will be adding more of my own detail to it for a sharp crisper detail. I will have to add some thin styrene in between the 2 halves to make them symmetrically balanced and will not be really noticeable when greeble detail is added.

these pics show a little detail left on as I was taking pics for a designer (308 BITS) on shapeways to see if he could 3D print these for me in this scale ( ? ) Tony, Very nice guy and very helpful in my quest to get these for me. so he just up-scaled his original Domes for the Zvezda kit and came up with a scale I needed. see pic with caliber so, after all said and done I was willing to spend around 50 - 100 bucks on a set. but, it was 3 times more just for one Dome!! Tony was nice enough to get it up-scaled and a price/cost from shapeways! but it's not his fault they made them so expensive. even he said that's outrageous. My wife says I have DEEP pockets when it comes to Models/resin kits! but even I can't justify that much for new domes. call me crazy! but when the cost of two of these is more than what I paid for the kit itself! I have to re-evaluate... Onward


the 2 dome stands/mounts are in great shape. just a little clean up on these but otherwise very nicely cast. black primer of course on these as well.
IMG_2044.JPGIMG_2045.JPGIMG_2046.JPG


Next I worked on the Radar Tower (center part). this was cast cleanly as well aside for a few minor pit/bubble holes. I think at this scale ( still don't know? ) the detail lacked so I took it upon myself to add my OWN flare on the this. first it was subtle, then I went nuts adding ship gun parts, styrene, etc. to give it more detail. as I said "detail lacked" not in a bad way, just looked a little to plain for me. this will make it pop when painted since the top and front is what most people will see. It's not really accurate but withe many, many, many reference pics I have seen almost every one is done differently. sooooo, this is just an additive to the mix of SD towers.


what are your thought? criticism? changes? anyone.

IMG_2010.JPGIMG_2009.JPG

IMG_2011.JPGIMG_2012.JPG

IMG_2013.JPGIMG_2014.JPG

then to the front/back long solar? arrays, don't know what they are called. here you can see the work in progress.

IMG_2049.JPGIMG_2048.JPG

IMG_2051.JPGIMG_2050.JPGIMG_2052.JPG


thanks for looking and again, please comment on any thoughts

Aloha -
Paul
 
Here is a link of the domes I was referring to from Tony 308BITS on shapeways. I would be very curious to see how they would come out? but I guess I will never find out. unless I win the lottery! but it was nice of him to help! thanks Tony! hope someone will take that leap.


https://www.shapeways.com/product/Q...ld-generator?optionId=67651724&li=marketplace


one piece I forgot to mention was the front/center part of the SD bridge.kind of U shaped. just a little sanding, black primer, adding a little extra detail. not too much to say here as this will bee one of the last pieces to go on. but a few pics to entertain the eyes

.
View attachment 842245View attachment 842246

View attachment 842244


Now I have done a Dry fit of the parts to give you a sense of what it will look like when built. still a lot of detail work to be done!! plus the light kit for the FO to add and more primer then painting. still a big road ahead. time is a luxury I don't have. - but i'm in no hurry anyway.

I took pics of the antenna array up (new hope/rouge one) version and down (empire/jedi) version. I think I like the down version better IMO. looks a little awkward being upright.
 
This thread is more than 5 years old.

Your message may be considered spam for the following reasons:

  1. This thread hasn't been active in some time. A new post in this thread might not contribute constructively to this discussion after so long.
If you wish to reply despite these issues, check the box below before replying.
Be aware that malicious compliance may result in more severe penalties.
Back
Top