AMT Slave 1

jake88

Sr Member
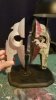
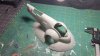
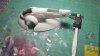
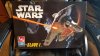
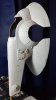
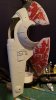
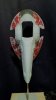
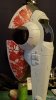
Going to try and make this as detailed as possible. I want to add a ton of greebles and maybe lights.... Ive started shaving and sanding all the inaccurate raise and mirrored detail off the body and skirts. One thing that I really like is that its a bit taller than my Revel version. Bigger is better and I'm going to strive for a better paint job than on my smaller Revell. Couldn't resist taping it together for some size comparison.
 

Attachments

  • HrajG3J.jpg
    HrajG3J.jpg
    675.2 KB · Views: 455
  • 73nwIYi.jpg
    73nwIYi.jpg
    2.7 MB · Views: 348
  • 2.jpg
    2.jpg
    3.1 MB · Views: 347
  • 1.jpg
    1.jpg
    2.6 MB · Views: 339
Cool!

As an aside, that's the Revell version on the right there?

I was curious of the size different between the two as well as the detailing.

I've got the Revell on, but don't have the AMT one

AMT seems like it is closer in size to the Fine Molds one.

I may have to pick up an AMT one to do a Jango version. I was going to try picking up another Revell one, but looks like the AMT is a better size for getting closer to 1/72.

Although a lot more work detailing wise

The Revell 1 actually had some impressive details for the hull and body. The wings on the other hand were a different story

I've got some detailed comparison shots between the Revell and the Fine Molds here https://flic.kr/s/aHsm9RqJhj

At any rate, I'm looking forward to seeing this builds progress!
 
Small update.....Probably 12 good hours of me scribing panel lines and deciding where and what to change from the original AMT beasty. I don't know exactly why but I absolutely LOVE the old AMT/ERTL kits,, for absolutely no reason, and... every reason. Now I'm wanting another 1/29 X-Wing....
.s2.jpgs1.jpgs44.jpg
I have some 1/144 MF greeblies from the landing gear that I'm looking to use for detail. And.... a new set of Vellejo Air Navy colors to add to this beautiful color canvas of a model!
Just cant wait!!!
 
This looks fantastic! I had this model as a kid, I butchered it beyond belief! I think there's even a spot where a glob of glue fell and melted about halfway through the plastic.

Fantastic work with the extra detailing! What are you planning to use for painting?
 
Thanks computergeek.
I plan on using a host of Vallejo Air Navy colors and some custom mixes through my air brush.

Interested in whatever wisdom you have regarding Vallejo Air colors for the Slave 1. I've got a Bandai and Fine Molds in the queue and haven't figured out all the colors yet.

Looking forward to the rest of the build!
 
Shot my first colors on this morning. The upper hull is a mix of Vallejo air Insignia white with a couple drops of leather brown and a couple drops of Intermediate green. The skirt is roughly the same but I added a few less drops of the green to give it that slightly different hugh. After these dry I will start applying Vallejo liquid mask. In the mean time I'm going to build up the back plate, wings and the cock-pit

.FIRST COAT.jpg
 
Last edited:
Awesome man. What greebles did you add?

Thank you GoldenStudio, I used bits of plastic card cut into various rectangles and layered along with a short piece of tube or small gadget from my spares drawer. Also some small round shapes made from a tiny hole punch as well as some 1/144 Bandai MF landing gear parts. I think there is a small tank piece somwhere in there. Scribing the panel lines was the most difficult part but now that Ive done it its a piece of cake.
 
Last edited:
Very cool thank you. What process did you use from scribing?

Thanks, I use dymo tape (commonly used in the old style label makers) as a sticky ruler. First I use the back side of a broken #11 Exacto blade to lightly start the process. I drag it toward me very lightly at first and slowly add pressure to give the panel line more depth. I also use a compass center prong to give the lines a little more of a rounded edge. And during the process I lightly sand with some 400 grit sand paper to get rid of the ugly plastic build up. Then I always clean it all up with a tooth brush or very stiff paint bush. I might even rub some tape on it to make sure I got all the dust up before I commit and primer the area. There are quite a few great examples on Youtube of this for sure.

sc1.jpgsc2.jpg

- - - Updated - - -

Just grabbed a fine molds kit. You inspired me.

That is a nice kit! I don't think you will need to do much to it besides the crazy paint job. I think the FM has got some excellent recessed panel lines and great detail! Good buy!
 
Awesome thank you, I love learning new things. Thank you for your updates. I’m having fun watching your progress.. Ues I’m super excited about then FM version to get here.
 
This thread is more than 5 years old.

Your message may be considered spam for the following reasons:

  1. This thread hasn't been active in some time. A new post in this thread might not contribute constructively to this discussion after so long.
If you wish to reply despite these issues, check the box below before replying.
Be aware that malicious compliance may result in more severe penalties.
Back
Top