GoldenStudio
New Member
Very nice man! How will you apply the latex for the fuselage?
The 1/144 scale Bandai is the superior kit. Its smaller but the detail is amazing, its prepainted and it fits together without any glue whatsoever. Its almost like connecting legos. You cant go wrong. I have one waiting but Im doing this one first for a challenge.Ah! Going to have to look into that. I been scratching my head trying to figure out how to get that cool look. Can’t wait to see your work.
im buying my son a slave 1. Either the one you have or the smaller fine molds one. Going to work side by side with him on my own project. Any thoughts of which one to get him? He’s 13.
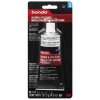
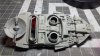
Thanks! I applied Vallejo mask with a small paint brush and "frayed" it out at some of the edges with some fine steel wool held with a tweezers. As for putty I use thisThat looks amazing! How did you apply the latex? Great job! Also what putty do you use? I have Vallejo putty but not 100% sure if it’s sandable etc.
Thanks! I applied Vallejo mask with a small paint brush and "frayed" it out at some of the edges with some fine steel wool held with a tweezers. As for putty I use this
Thanks Jake.
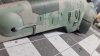
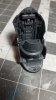
On the photo can you circle a spot so I can see what the wool actually did? If not no worries. Looks great man.
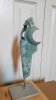
I circled two spots where I used the steel wool but its kinda everywhere there is a tiny line or spot.
Yes, just like using a piece of sponge. As for the wool, I dont have the bag. But I remember buying it at an autozone. It was the finest grade. Maybe 1000?


")
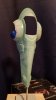
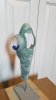
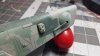
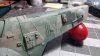
I taped up and chipped out the "humps" then also taped off the big funky multi-panel on the backbone. I shot it with some green/grey mix. I shot the ramp with some dark military grey. I used some fine steel wool to buff on the red skirt in order to knock down the color a tad and give it a slightly used look. Then set it down to take some shots so I can get an objective view of how its going so far.
View attachment 837257View attachment 837258View attachment 837259View attachment 837256
Turning out great
Oh man this looks great
J