Tom’s Relby K-23 Bespin Guard blaster

thd9791

Master Member
RPF PREMIUM MEMBER
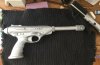
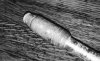
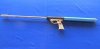
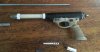
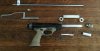
I managed to pick up a Nemron Galeon (sp?) speargun. I think it’s the right kind as the “S” has an identical font as the one in the 90s icons archive photos.

now, this thing was easy to take a part... until it wasn’t. I read up o how these function: you hand pump air into the rear and a piston system moves the spear forward while keeping things air-tight. Also... oil. And sand. Together they will pour out when you disassemble it :lol

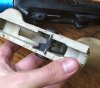
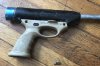
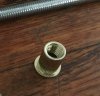
now, I think the muzzle is crusted on and the barrel is stuck in place, so I tried to remove the back compressed air chamber. (Since the greeblies seem to begin immediately after the handle, there’s something before the v8 part?!)

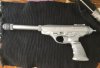
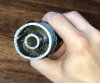
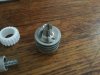
so I was cutting ... and cutting... and realized a pipe should have opened up already, so I cut a couple inches down the chamber and it finally came off. Then I got to study the inside - there seems to be a pin that comes from the trigger, an inner pipe and some piece of solid metal BEFORE the plastic handle. And the thing won’t unscrew either. Anyone taken one of these apart?

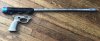
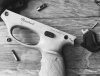
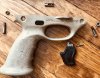
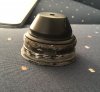
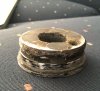
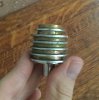
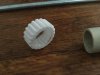
These also are are the greeblies I have - the mystery part was sculpted by someone and cast in resin
 

Attachments

  • 0EF6A1C1-A270-42BB-8B03-6F28DA08B951.jpeg
    0EF6A1C1-A270-42BB-8B03-6F28DA08B951.jpeg
    2.1 MB · Views: 452
  • 12F55376-D10E-424C-BEDC-959827D559B4.jpeg
    12F55376-D10E-424C-BEDC-959827D559B4.jpeg
    871.1 KB · Views: 350
  • 065BA2BC-9953-4DEE-821F-A7B8B72501C9.jpeg
    065BA2BC-9953-4DEE-821F-A7B8B72501C9.jpeg
    2.3 MB · Views: 344
  • 63DF3798-46E6-462E-957C-FB4A907E659F.jpeg
    63DF3798-46E6-462E-957C-FB4A907E659F.jpeg
    598.1 KB · Views: 306
  • EAD83D6B-BD16-42C4-8851-DDDF0E6EC807.jpeg
    EAD83D6B-BD16-42C4-8851-DDDF0E6EC807.jpeg
    1.4 MB · Views: 349
  • A978F0F9-E7ED-463D-8E90-619CA0695D9E.jpeg
    A978F0F9-E7ED-463D-8E90-619CA0695D9E.jpeg
    1.1 MB · Views: 319
  • B36698D2-B8DA-453E-B176-E1B8B1516234.jpeg
    B36698D2-B8DA-453E-B176-E1B8B1516234.jpeg
    3.4 MB · Views: 372
  • A48E49E4-9C8B-4734-BABF-CAC22169AACE.jpeg
    A48E49E4-9C8B-4734-BABF-CAC22169AACE.jpeg
    8.1 KB · Views: 333
  • 9906F0DF-D213-4369-82D3-23A9BC8C40F0.jpeg
    9906F0DF-D213-4369-82D3-23A9BC8C40F0.jpeg
    2 MB · Views: 321
  • 2929FEBF-4425-4813-87E2-94D4AAB259D9.jpeg
    2929FEBF-4425-4813-87E2-94D4AAB259D9.jpeg
    2.5 MB · Views: 334
Last edited:
Aha, so you got the other one that was on eBay?

The one I got was in much worse shape.

I can't remember what I did to get the rear tank to separate, but eventually it did, and I used part of it to machine the transition from the plastic to the conical V8 part.

I didn't know someone else made that greeblie!

I scratch built all of mine, and made a few molds of them.

I've got someone working on modeling the parts as well, including the gears, so hopefully they'll be up on Shapeways soon!
f0d8ba06361454062f42858db3904247.jpg
79f6161975928ae5a67dada624a9ee53.jpg
cce8af0c2d1e6938b49b675cea28b63f.jpg
 
Last edited:
Aha, so you got the other one that was on eBay?

The one I got was in much worse shape.

I can't remember what I did to get the rear tank to separate, but eventually it did, and I used part of it to machine the transition from the plastic to the conical V8 part.

I didn't know someone else made that greeblie!

I scratch built all of mine, and made a few molds of them.

I've got someone working on modeling the parts as well, including the gears, so hopefully they'll be up on Shapeways soon!
https://uploads.tapatalk-cdn.com/20180704/f0d8ba06361454062f42858db3904247.jpghttps://uploads.tapatalk-cdn.com/20180704/79f6161975928ae5a67dada624a9ee53.jpghttps://uploads.tapatalk-cdn.com/20180704/cce8af0c2d1e6938b49b675cea28b63f.jpg

that looks AMAZING! It looks like the blaster barrel is a sleeve with those mystery gears.

I actually lowballed the guy to get a cheaper price, I see online there are many more parts to this speargun kit

Were you able to get the F4-E kit? Those parts I may struggle with... and I could make the coffee stirrer!
 
Thanks!

Yeah I didn't pay what was asked for mine, either. More like half.

Yeah I've got the Phantom kit.

It is believed that the barrel and gears are all one piece, yes.

Sent from my VS996 using Tapatalk
 
I FOUND THE FLANGED PART BEFORE THE V8 END CAP.

it's an aluminum and rubber gasket that sits in the end of the air chamber. I nearly destroyed mine, so I'm going to fill the holes and cuts with putty or something.
 
Okay, this was a solid metal thing, with a rubber gasket around the middle that crumbled. The blue air chamber was stuck around this and I had to drill into it to figure out how it was put together (I thought the chamber was one piece). Thank heavens for apoxie sculpt. Imagine this in better shape without the filler

the barrel is still sticking out the back of the main receiver, I think I have to shorten it to fit under the v8 cap
 

Attachments

  • 699DDE1C-4290-4C8A-BE71-6D231529219F.jpeg
    699DDE1C-4290-4C8A-BE71-6D231529219F.jpeg
    1.2 MB · Views: 293
  • 22E80DBF-4098-45E8-9AC8-5C3F2252BF2E.jpeg
    22E80DBF-4098-45E8-9AC8-5C3F2252BF2E.jpeg
    1.5 MB · Views: 333
  • 6C3CEFB9-391E-4487-8CE5-C417A3C9A2A3.jpeg
    6C3CEFB9-391E-4487-8CE5-C417A3C9A2A3.jpeg
    956.8 KB · Views: 300
Here, I tried to draw the gasket on my iPod :lol blue is the air chamber and black is the gun.

Rare-LFL-Lucasfilm-Archives-Movie-Prop-Lost-Photos-Star-Wars-Indiana-Jones-Historic-Visit-Origin.jpg
 

Attachments

  • D1932215-8335-42D3-BDD0-99FD9C97F6C3.png
    D1932215-8335-42D3-BDD0-99FD9C97F6C3.png
    940.7 KB · Views: 246
Last edited:
Was that an unidentified part? For some reason I thought this whole gun was ID'd already. Guess not.

My 15yo. nephew made fun of me for still using an iPod...
 
I made some moderate progress today! I got the gears and a stirring stick 3D printed and that gave me a barrel length. I cut it down and chopped a 3/8 16 threaded rod down. I slammed a “rivet nut” into the rear of the gun (same piece of metal as the barrel tube, runs right through) and it fit snugly beneath the V8 end cap. Had to drill a hole and hollow that out a bit to match the rivet nut beneath it so the threaded rod can poke through the back.

I DID also try making a flash hider. It’s a bunch of washers and brass washers glued together, with a T nut glued to the back. For some reason the glue (e6000) turned yellow on the washers... I hate just glueing stuff together I’m getting paranoid it will just fall apart.

Anyway i I got the ratios right by grinding down two of the middle washers but the whole thing came out much too short!

- - - Updated - - -

Oh I forgot, that barrel sleeve is 7/8 OD pvc pope. Had to file and sand out the inside though, took three days!
 

Attachments

  • FECE468F-26E5-4569-8F1D-190EB301F98E.jpeg
    FECE468F-26E5-4569-8F1D-190EB301F98E.jpeg
    1.6 MB · Views: 275
  • 01E01870-1687-4595-BCE2-0E45DCAF7FB4.jpeg
    01E01870-1687-4595-BCE2-0E45DCAF7FB4.jpeg
    1.9 MB · Views: 260
  • B78DA8D2-28A5-4CAE-9BB4-8ACDFAEA0BCF.jpeg
    B78DA8D2-28A5-4CAE-9BB4-8ACDFAEA0BCF.jpeg
    713.9 KB · Views: 300
  • 93F8AC44-2D20-4399-B167-511D541D17DB.jpeg
    93F8AC44-2D20-4399-B167-511D541D17DB.jpeg
    1.8 MB · Views: 322
  • 945DC2A7-F0B5-405D-B365-3F25220BFEE7.jpeg
    945DC2A7-F0B5-405D-B365-3F25220BFEE7.jpeg
    650.1 KB · Views: 271
  • 0FD6A835-5BD8-4A29-B568-2CEA8989345B.jpeg
    0FD6A835-5BD8-4A29-B568-2CEA8989345B.jpeg
    1.5 MB · Views: 278
I ordered some more delrin (actually, technically it's polyethylene, not delrin) the other day, so I'll make you a barrel tip when it gets here!

Also, 7/8" thin-walled polycarbonate tube used for fx lightsaber blades slides right over the original barrel. No sanding required.

I'm glad someone else has already benefited from the 3D printer parts!

Keep up the good work!

EDIT: I just noticed, your little stepped carburetor part is backwards!
 
Last edited:
Tom all your recent posts are making me jealous,.

I find myself stomping like a little girl not getting her way

Damn I want this blaster!!


Sent from my iPhone using Tapatalk
 
I ordered some more delrin (actually, technically it's polyethylene, not delrin) the other day, so I'll make you a barrel tip when it gets here!

Also, 7/8" thin-walled polycarbonate tube used for fx lightsaber blades slides right over the original barrel. No sanding required.

I'm glad someone else has already benefited from the 3D printer parts!

Keep up the good work!

EDIT: I just noticed, your little stepped carburetor part is backwards!

thank you!!! some really good tips there. and i always seem to do that with at least one greeblie every now and then. I guess this will be a mark of my own blaster. (personally, i think it looks more realistic gradually going up in size there :lol)

Tom all your recent posts are making me jealous,.

I find myself stomping like a little girl not getting her way

Damn I want this blaster!!


Sent from my iPhone using Tapatalk

:) if it makes you feel better, these projects started because I was searching any and all parts we know of and a couple things popped up. I decided, hey, maybe I could go down this rabbit hole and pulled the trigger

that being said, the ROTJ vader saber is a nightmare - ive been searching old burgess microswitches

- - - Updated - - -

Oh, I went at this thing with putty last night, getting anywhere I could. I'll post pictures after sanding today
 
okay, so I got some automotive primer, and it didn't cure.... it turned to dust!

Not even exaggerating, it beaded up like lint and I could blow on it and it would come off. So I tried to sand off as much as I could and just go straight to the chrome. worked pretty well! I'm going to sand it again I think, in some trouble areas and repeat.

I managed to make the dot greeblie out of aluminum and sliced rivets! I used the rod thats pulled up when you pop a rivet, and sliced it with a dremel four times.

I also quickly sliced some arrows out of small plastic pipe to substitute for the F-4E parts

The top sight was done with apoxie sculpt as well on top of the greeblie cast, forgot if I mentioned that
 

Attachments

  • 4B066F95-5F4A-407E-9D3F-861D301E5D8F.jpeg
    4B066F95-5F4A-407E-9D3F-861D301E5D8F.jpeg
    2 MB · Views: 287
  • 9E896CDE-BD06-4D77-A2E8-2B693F7EA47E.jpeg
    9E896CDE-BD06-4D77-A2E8-2B693F7EA47E.jpeg
    2.6 MB · Views: 364
I'd do some more sanding and filling and sanding where you've puttied the sides and the screw holes. Try and blend all that smooth. Looking good, though!

Do you need the F4 landing gear covers?

Sent from my VS996 using Tapatalk
 
I'd do some more sanding and filling and sanding where you've puttied the sides and the screw holes. Try and blend all that smooth. Looking good, though!

Do you need the F4 landing gear covers?

Sent from my VS996 using Tapatalk
will do!

what are those?
 
You know, the side details behind the swizzle sticks. The scoop looking greeblies.


You didn't same away the "OIL" lettering, did you? I accidentally did that with mine. That area was mangled pretty bad on my Nemrod. :(
 
Thankfully no, I think some putty got around the oil lettering.

and yes! Do you have extras? I really don't like the triangles I made :lol
 
Thankfully no, I think some putty got around the oil lettering.

and yes! Do you have extras? I really don't like the triangles I made :lol

Not all NEMRODs have the "oil" lettering. Out of the three I purchased last year, only ONE has it. So I had to rip another apart, since the first one I started to convert was without it...of course :rolleyes
 

Your message may be considered spam for the following reasons:

If you wish to reply despite these issues, check the box below before replying.
Be aware that malicious compliance may result in more severe penalties.
Back
Top