Embiggened Tomy Rascal Robot

Treadwell

Legendary Member
RPF PREMIUM MEMBER


moffeaton mastered, Salzo cast, it's large-ified 70s robot toy goodness!

moffeaton's thread on building the master:
https://www.therpf.com/showthread.php?t=263760&highlight=tomy

I got to work on this kit 17 months after I received it, which for me is practically overnight.
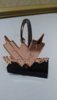
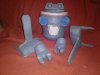
Here it is after the bulk of the cleaning, filling and sanding:


There was a minor offset of the top plate (was it a three-part mold?) so that it overlapped the body on its right side, and the shell (this is a hollow rotocast piece) was paper thin and cracking inside one of the lower stepped accordion-grooves on the body. Also the tips of the spires on the feet plates had bubbles. Nothing egregious at all, it's a very well cast kit, as Mike's always are, and filling and sanding went well. Those gouges you see in some parts are not casting bubbles, they're channels I dremeled out on gluing surfaces for the epoxy to grip to.

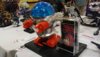
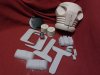
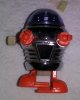
After more cleaning, some assembly, and priming:


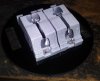
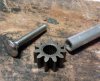
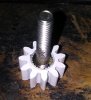
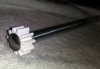
I like to have mechanical attachments to aid any gluing of flat surfaces to one another, so I made pegs out of kit sprue for the pincers, inserting them into holes drilled into the hands. I also added a wooden dowel post in the middle of the head just to provide more surface to glue with, since there wasn't much gluing surface to work with on the hollow head piece. I failed to take pics of that step, except for another sprue post added to the disk attachment for the top of the head (to be installed after painting):


20180621_014103_.jpg

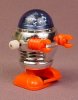
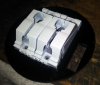
The kit is lacking a groove going around the surface of the trapezoidal front plate.....which makes sense because the mold split runs through there, and a seam passing through those grooves would've been a real pain to deal with.

I got lazy, though, and attached a raised styrene plate of the same shape on there instead. I just knew I would never be happy with my hand-scribing. I'd slip, and have to fill and sand boo-boos, ad infinitum.

Note that I've added a collar. There's an extra step on the toy, with six rivet-like details on it that is absent on the kit, that the dome rests on. So I cut a strip of styrene for that.

end part 1
 

Attachments

  • rascal-the-robot.jpg
    rascal-the-robot.jpg
    174.7 KB · Views: 1,628
  • 13682094.jpg
    13682094.jpg
    22.1 KB · Views: 1,723
  • 20180603_021613.jpg
    20180603_021613.jpg
    4.8 MB · Views: 1,473
  • 20180609_144111.jpg
    20180609_144111.jpg
    3.9 MB · Views: 1,238
(scroll to bottom to click on images to see bigger versions, because I suck at inserting images properly)

The toy has a bit of milky white plastic that houses the mechanism protruding from the bottom:

attachment.php


...so I wandered Lowe's looking for something trapezoidal, hopefully in white.
I finally settled on a pair of circuit breakers:

attachment.php


(might not be exact model, I didn't take a before pic)

I took their guts out, glued them together, and sawed off the part I wanted:

attachment.php


I experimented with trying to duplicate the look of milky white plastic by painting it silver and then giving it just a misting of white.
Didn't work, it just came out looking like pot metal:

attachment.php


Effect noted for future use. Enough experimentation...gloss white it is, and epoxied to the unpainted black ABS bottom plate. I added thin greeblies along the sawed edge to cover cutting boo-boos:

attachment.php


I also wanted to add a wind-up gear. That was also part of the same Lowe's search, but no luck. So I went to Amazon, and still couldn't find anything in white plastic or nylon. Best I could come up with was a metal gear with that isn't wide enough and doesn't have enough teeth. But I settled for it, painted it white, and attached it to a steel bolt with epoxy and then to an aluminum tube with plumber's putty:

attachment.php

attachment.php

attachment.php


end part 2
 

Attachments

  • 20180616_024907_.jpg
    20180616_024907_.jpg
    914.3 KB · Views: 1,086
  • Screen Shot 2018-06-29 at 6.04.20 PM.png
    Screen Shot 2018-06-29 at 6.04.20 PM.png
    495.9 KB · Views: 906
  • 20180614_021733.jpg
    20180614_021733.jpg
    4.2 MB · Views: 972
  • 20180616_024823_.jpg
    20180616_024823_.jpg
    2.3 MB · Views: 925
  • 20180621_015257_.jpg
    20180621_015257_.jpg
    2.3 MB · Views: 942
  • 20180625_003508_.jpg
    20180625_003508_.jpg
    3 MB · Views: 855
  • 20180625_123513_.jpg
    20180625_123513_.jpg
    1.5 MB · Views: 869
  • 20180629_003230_.jpg
    20180629_003230_.jpg
    2.2 MB · Views: 833
Last edited:
Looks fantastic, Makes me miss my little Rascal Robot... I loved that little guy... Anyway, if you really want to replicate the milky white plastic, you could always use some HDPE... just cut up a couple of milk bottles and bake them at around 350 degrees till transparent and cram the hot plastic into a block shape, then cut and sand to size... or use a heat gun... that works too. It's extra work but but it'll match the look perfectly. And it's extremely cheap if you already have empty milk bottles around the house...

In fact, the same method would work for making the windy knob-thingy, too...
 
Figuring out where to cut the legs: I wanted it in a "walking" pose, so one leg would be flat and one would be on its "toes". The real toy would never quite be in that position but for stability I needed both feet to be touching the ground, one of them entirely. I had to account for the thickness of the bottom plate, because I would be epoxying (and also bolting, if necessary) directly to the lower surface of the main body. If the interior had been accessible I would've come up with some more secure fastenings hidden inside.

20180622_042721_.jpg20180622_042708_.jpg

Now, painting!

20180621_114531_.jpg20180623_145040_.jpg
20180625_140342_.jpg20180625_235633_.jpg

Dupli-color Chrome is a great paint. No it isn't a mirror finish but it does pass for a polished steel. I wasn't going to send this out to be chromed for real, and I HAAAAATE cleaning airbrushes so Alclad was out.

It probably didn't make a difference due to heavy and multiple coats, but I did an undercoat of gloss white for the orange parts, and gloss black for the silver.

Some sanding had been required to get the bottom plate on during early test-fitting, and after painting it was so snug during a test fit I just left it there rather than risk damage prying it back off just to glue it back on again. But I went ahead and bolted it in, too:

20180629_012103_.jpg

Yeah there are some scuffs. DONE with the tweaks, they stay!

Then the very dicey gluing on of the feet and keeping it propped up so they'd stay straight during curing. So far they seem pretty secure, so no bolts for now.

I put a blob of plumber's putty on the end of the wind-up rod and pushed it through a hole I'd drilled until it reached the opposite side of the interior, squishing the blob. I let it set, and it seems to have worked. No wind-up gear wobble. But don't try to turn it!

(then the frustrating step I had been trying to avoid by pre-painting: masking off the feet and wind-up rod, because the silver had gotten messed up. GRRRR)

Then:

20180703_030629_.jpg20180703_030700_.jpg20180703_030724_.jpg

I wanted it a bit dynamic, thus one turned claw, and a slight lean forward.
The tilt to its left was NOT intentional--a slight miscalculation in the leg cutting. I might put a little clear adhesive 3M foot under there to prop it up.

And silver is even better than primer at revealing all the places I could've sanded better, but at some point ya got to move on. Re-dos suuuuuuuck.

next: DOME
 
Last edited:
I bought a 6" acrylic hemisphere from Plastruct.
It fit, as it was meant to, but was too tall.
The plan: cut it short, but not so much that it no longer fit.

The cut, including horrible slips of the blade on my part:


cut.jpg

...well..... it don't fit no mo:

fit.jpg

soooo, gotta mask off the rest of the robot and grind down that ridge:

grind.jpg

Now I need to strip and sand and fill and repaint.

But first an attempt to polish those blade boo boos:

tape.jpg

Which worked to some degree. Since it will overlap the top silver ridge, I will paint that lower strip silver if I have to.

But it needs to be blue! Or purple. Not sure if my vintage robot has had a color shift over the years. Either will do.

rit.jpg

Got a pot of water to a light boil, dumped in the dye, put in the dome and left it in there until the water cooled.

The result:

fog.jpg

NOTHING, except for a slight fog. (Yellow tinge is just from my overhead incandescents.)

So I've ordered Tamiya transparent blue:
41s4t64RfvL.jpg


...we'll see how that goes! Might have to try a styrene dome instead, maybe that will take dye better than acrylic.

moffeaton has also moved away from the plastruct dome approach (which is funny because the entire scale of the bot was based on it), and has spun up a buck for vacuforming a custom dome. I could try to glom onto that, but only as a last resort. I don't like bugging people for stuff I might be able to accomplish myself.
 
Tried the Tamiya clear, and it's going to work great.
Unfortunately I FUBARed my current dome and have ordered another one.
 
Now that is a subject I never thought I would see a kit of, let alone one that size. You did a magnificent job of recreating this iconic toy!- congratulations on the win!
 
This thread is more than 4 years old.

Your message may be considered spam for the following reasons:

  1. This thread hasn't been active in some time. A new post in this thread might not contribute constructively to this discussion after so long.
If you wish to reply despite these issues, check the box below before replying.
Be aware that malicious compliance may result in more severe penalties.
Back
Top