MarM
New Member
I hope many RPFers see this.
I want to thank many on here for sharing their knowledge, research, tutorials, etc. It's been inspiring and instrumental for my son and I.
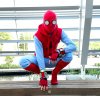
First, my son was able to gather all the parts and pieces generally agreed upon that were used by the costume department for the film(s). Not only was he able to get every piece, he taught himself how to see so he could make the mask from the sleeves of the hoodie, as Parker would have done.
He was able to find a tailor that helped him tailor the items to best fit him and is learning how to do alterations on his own.
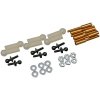
Secondly, the community inspired me and helped me make the web shooters, thanks to all the photos and screen caps floating around the RPF. We had originally planned on a father/son build of the web shooters using UVA foam and other items, until we stumbled upon some RC parts used on the actual prop. Unfortunately for me, I mentioned that I may be able to make them using styrene sheets. LOL. My son was extastic but worried it was too much for him to ask. I gladly took on the project while he concentrated on the costume. BTW, he didn't want to take the easy route and buy prints from the ONE screen accurate 3D model we found on the internet's.
Well, 4 straight weeks of looking at pictures, finding minor parts, reviewing some costly screen accurate 3D files, reverse engineering, toying with measurements, etc, I finally finished.
Here are a few pics I have on my phone.
I want to take some more detailed ones of the web shooters later.
The main point of this thread is my gratitude to all you creative SOBs!!!
You all should be proud of yourselves...
Mark
I want to thank many on here for sharing their knowledge, research, tutorials, etc. It's been inspiring and instrumental for my son and I.
First, my son was able to gather all the parts and pieces generally agreed upon that were used by the costume department for the film(s). Not only was he able to get every piece, he taught himself how to see so he could make the mask from the sleeves of the hoodie, as Parker would have done.
He was able to find a tailor that helped him tailor the items to best fit him and is learning how to do alterations on his own.
Secondly, the community inspired me and helped me make the web shooters, thanks to all the photos and screen caps floating around the RPF. We had originally planned on a father/son build of the web shooters using UVA foam and other items, until we stumbled upon some RC parts used on the actual prop. Unfortunately for me, I mentioned that I may be able to make them using styrene sheets. LOL. My son was extastic but worried it was too much for him to ask. I gladly took on the project while he concentrated on the costume. BTW, he didn't want to take the easy route and buy prints from the ONE screen accurate 3D model we found on the internet's.
Well, 4 straight weeks of looking at pictures, finding minor parts, reviewing some costly screen accurate 3D files, reverse engineering, toying with measurements, etc, I finally finished.
Here are a few pics I have on my phone.
I want to take some more detailed ones of the web shooters later.
The main point of this thread is my gratitude to all you creative SOBs!!!
You all should be proud of yourselves...
Mark
Attachments
-
IMG_20180511_235150866_LL.jpg5.5 MB · Views: 557
-
IMG_20180511_232944855_LL.jpg5.3 MB · Views: 676
-
IMG_20180512_151027577_HDR.jpg5.3 MB · Views: 551
-
 IMG_20180512_150918870_HDR~01.jpg1 MB · Views: 1,719
 -
IMG_20180512_151813277.jpg4.5 MB · Views: 560
-
IMG_20180513_162438430_HDR.jpg8.9 MB · Views: 391