Then I added thin strips down the centre of the cross patterns of the outside of the wing to replicate the toys wing outsides design.
I could have left it but I want to do a good job of it.
I purchased these cans of spray paint good stuff and quick drying too.i got the black of course and chose slate blue which is identical to my tie fighter toy ☺.
Until this point all I've used apart from a couple of tiny bits of plastic piping cut in half for rounded little bits of design is just wood and screws. Machine wise I've used a standard black n decker jigsaw a black and decker drill and a black and decker sander and one with that I've used the same size screws really till this point as all the wood has been 12 mm ply till this point.
Well a slight lie there the centre 50p shape thin wood under the thicker one is actually 3mm ply my bad ��
So I used smaller screws for that
I used 3mm ply for these edgings and small screws as the wings have the same colour round the edges facing u as the other design bits do but they are also level on the toy to the rest of the wing which is why I've gone for thin wood to avoid it sticking out ��.
All these little things to think about when making things of this type thats what makes it fun tho ☺
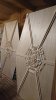
Then I was onto the other side again this time to add these thin double beams to each cross section of the inner wing side.
Plenty detailing and design work to do in these wings but they were closer to being done at this point ☺
The other side gets its spray paint done looking good ☺
- - - Updated - - -
A closer angle Im glad I put the thin double beams down the cross sections of the wing like the toy has they Stand out and look good with the paint job on top too.
U can cut corners and I do now and then but the more ya try to get all those details on its worth it in the end even tho it takes plenty time for it all.