You are using an out of date browser. It may not display this or other websites correctly.
You should upgrade or use an alternative browser.
You should upgrade or use an alternative browser.
Black Series Darth Vader Helmet Mod Thread!
- Thread starter Jennigirl
- Start date
Toadmeister
Sr Member
Dang!Well, I've been working away on my Vader! This was the perfect helmet to make a deconstructed display piece from. Gave me more peace about cutting into it and modifying for display.
Since it has some major sculpt inaccuracies, I decided not to go nuts trying to be 100% accurate. It's getting closer. Here are a few highlights.
- Airbrushed the two-tone paint, which was quick and simple.
- Decided to tint the lenses, I love that ruby look.
- All parts of the helmet are removable from the stand, and pressure fit into place.
- Base is wired with multi color LEDs and a remote control.
I still need to paint the inside of the nose, finish the interior detailing, etc.
Here's where the display is so far:
https://i.imgur.com/4nv4m0M.jpg
https://i.imgur.com/Pc8QYnS.jpg
https://i.imgur.com/XBgIxzQ.jpg
https://i.imgur.com/HlNJfs6.jpg
https://i.imgur.com/tnYq4bs.jpg
https://i.imgur.com/vZUyVCY.jpg
What paint did you use for the gunmetal areas?
Sent from my SM-G900V using Tapatalk
Dang!
What paint did you use for the gunmetal areas?
Sent from my SM-G900V using Tapatalk
I went simple. It was a basic metallic silver, applied at about 50% opacity over the gloss black.
StephenMG
Active Member
One of things I disliked the most when I got my BS Vader were the grills in the 'mouth' parts. As an experiment today I've temporarily installed some real metal grills of the same size as the original plastic Hasbro versions. I haven't fixed them yet but I really like the effect - it's made a huge difference to the look of the helmet to my eyes and remove some of the 'toy' look.
Sorry, the photos aren't the best (close-up with a flash, the other without) but what do you think?


I also plan to fix the nose recess, apply the two-tone paint scheme, replace the tusks with aluminium version and possibly extend the neck a bit.
Sorry, the photos aren't the best (close-up with a flash, the other without) but what do you think?


I also plan to fix the nose recess, apply the two-tone paint scheme, replace the tusks with aluminium version and possibly extend the neck a bit.
Last edited:
vader45
Sr Member
I like it. Are the plastic grills easy to take out? I haven't really got a good look at mine yet.
The mouth one is removable but the chin one is molded with the face.
StephenMG
Active Member
Actually they are both separate pieces. The mouth one is very easy to remove as it just slides out. The chin one however needs the interior of the lower section to be removed to get at it. The grill itself is fitted in to the triangular hole and is held in place only by a tab at the bottom point. Unfortunately that tab is glued down. I had to separate it by sliding a very thin, flexible saw blade under it and sawing through the weld. I didn't want to damage anything really but at least doing it that way I could glue it back in place if required.
The speaker is mounted on a bracket screwed to the back of the original grill moulding so, if I keep the metal grill, I'll have to devise a different way of holding it in place.
The speaker is mounted on a bracket screwed to the back of the original grill moulding so, if I keep the metal grill, I'll have to devise a different way of holding it in place.
Well, I've been working away on my Vader! This was the perfect helmet to make a deconstructed display piece from. Gave me more peace about cutting into it and modifying for display.
Since it has some major sculpt inaccuracies, I decided not to go nuts trying to be 100% accurate. It's getting closer. Here are a few highlights.
- Airbrushed the two-tone paint, which was quick and simple.
- Decided to tint the lenses, I love that ruby look.
- All parts of the helmet are removable from the stand, and pressure fit into place.
- Base is wired with multi color LEDs and a remote control.
I still need to paint the inside of the nose, finish the interior detailing, etc.
Here's where the display is so far:
https://i.imgur.com/4nv4m0M.jpg
https://i.imgur.com/Pc8QYnS.jpg
https://i.imgur.com/XBgIxzQ.jpg
https://i.imgur.com/HlNJfs6.jpg
https://i.imgur.com/tnYq4bs.jpg
https://i.imgur.com/vZUyVCY.jpg
Good work,man...(also with the pics)..for a second I´ve forgotten how wrong this complete mask design really is.
..for a second I´ve forgotten how wrong this complete mask design really is.
LOL.
___
StephenMG
Active Member
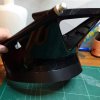
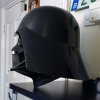
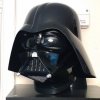
I've started to extend the neck on mine a bit. I've fixed some black styrene sheet in place so need to fill and smooth the join now. I'll trim it back a bit so the extension will be about 3/4" - just enough to make the whole thing look a bit more 'balanced'. I'm not bothering with any flare so that's about as long as I can get away with anyway. Unfortunately the original short neck helps contribute to the squat appearance I think - along with the too-wide face and the short dome of course!


StephenMG
Active Member
How easy is it to disassemble the neck?
Fairly easy. You need to remove 4 screws each side (you'll need a short cross-head screwdriver) on the inside of the lower section then work the inside moulding (the one with all the interior details on it) free of the exterior shell. It's a little fiddly but if you start with the rear corner where the battery compartment is you can flex the inner and outer apart enough to work it all free. The electronics are all attached to outer shell so the inner moulding comes out without messing that up. The electrics can then be removed easily as one piece including the battery box, circuit board, switch and speaker.
StephenMG
Active Member
Made a bit more progress trying to improve the look of my BS. Having extended the neck I have now painted the lower section with a graphite grey paint (alongside the appropriate black bits) and fully installed my metal mesh. I also wanted to ditch the Hasbro plastic tusks which look exactly what they are, painted plastic, and also looked very big to me. I made some cheap replacement metal tusks from some thumb nuts, a few washers and a couple of upholstery nails. The knurled section is a little short really but I still think they looks better than the original plastic ones.
I would post a comparison pic of the originals alongside my metal replacement but I think my cats have run off with the original tusks! Heaven knows where they are now so I couldn't put them back on even if I wanted to!!! :rolleyes
Next job is to paint the upper section.

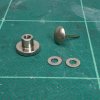
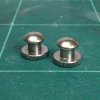
I would post a comparison pic of the originals alongside my metal replacement but I think my cats have run off with the original tusks! Heaven knows where they are now so I couldn't put them back on even if I wanted to!!! :rolleyes
Next job is to paint the upper section.


VaderFan
New Member
Hey everyone! All of your Black Series Vader mask mods looks great. I'm in the middle of mod'n mine as well. I have a quick question for all of you who have already finished yours:
I'm going to be upgrading the tusks on this mask. What is the best way to remove the original plastic silver mouth tusks; do you twist them off, pull them off, or cut them off? In other words, how are the tusks mounted to the unit?
I'd like to know before I go down the wrong route and regret it. Thanks in advance.
Similar threads
- Replies
- 4
- Views
- 1,012
- Replies
- 0
- Views
- 189
- Replies
- 3
- Views
- 813
- Replies
- 15
- Views
- 710


